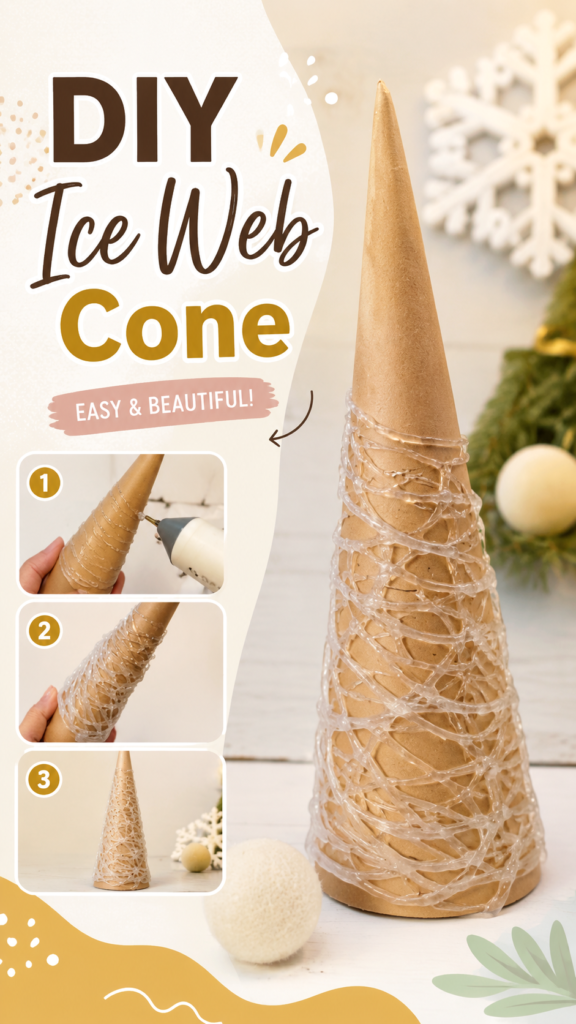
Looking for a simple Christmas tree DIY that feels handmade, stylish, and a little different from the usual holiday crafts? This textured cone tree is a beautiful way to create festive decor with a few basic supplies and a creative approach. The finished piece has a delicate, snowy appearance, while the warm neutral base keeps the design soft and modern.
This project is especially appealing if you love cozy Christmas decorating, minimalist holiday displays, or handmade decorations that can be customized to match your home. Instead of relying on complicated techniques, the design builds interest through layers of textured lines wrapped around a simple cone shape.
Key Takeaways
- A cone-shaped base creates an easy foundation for a handmade Christmas tree.
- Layered lines add dimension and give the decoration a snowy, textured appearance.
- A warm neutral palette works beautifully with modern, rustic, and minimalist Christmas decor.
- The project can be adapted with different finishes, colors, ornaments, and decorative accents.
- Making several trees in different sizes can create a charming holiday centerpiece or display.
What Makes This Christmas Tree DIY So Appealing?
The charm of this Christmas tree DIY comes from its simplicity. The main form is a tall cone, but the addition of irregular, overlapping lines transforms that plain shape into something decorative and eye-catching. The texture catches the light and creates a handmade look without requiring an elaborate design.
The neutral coloring also makes the project surprisingly versatile. Rather than creating a traditional green Christmas tree, you can use a soft white, cream, beige, or metallic finish to achieve a more contemporary holiday aesthetic. This makes the craft particularly suitable for homes where traditional Christmas colors are not the main focus.
Another advantage is that the cone shape naturally resembles a miniature evergreen tree. Once decorated, it can stand on a shelf, mantel, tabletop, sideboard, or holiday craft display. You can also create a small collection of trees to give a surface more height and visual interest.
Important: The most effective part of this craft is the texture. You do not need perfectly straight or evenly spaced lines. Slight variations help create the organic, handmade appearance that makes the finished Christmas tree feel special.
Materials for a Textured Christmas Tree
You can keep the supply list relatively simple. The exact materials can vary depending on the look you want, but the image suggests a lightweight cone base combined with a raised decorative material that forms the web-like texture around it.
- A cone-shaped craft base
- A hot glue gun and glue sticks
- Protective work surface
- Optional paint or decorative finish
- Small decorative accents
- Optional artificial greenery or seasonal elements for the display
A plain craft cone is a convenient starting point because it already has the proportions of a miniature Christmas tree. You can leave the base visible for a warm, natural look, or cover it completely if you prefer a snowy or monochromatic finish.
Choosing the Right Base
The cone should be sturdy enough to hold its shape while you work. A neutral-colored base is particularly useful when you want a subtle finished piece because small areas that remain visible between the textured lines will blend naturally into the design.
If you are planning to make a group of Christmas trees, consider using several cone sizes. A tall tree can become the focal point, while two smaller versions can sit beside it. Keeping the same texture and color across the set will make the arrangement feel intentional.
How to Make the Christmas Tree DIY
The technique is straightforward, but working slowly will give you better control over the texture. The goal is to create overlapping strands that follow the shape of the cone without forming a completely solid surface.
1. Prepare Your Workspace
Begin by protecting your work surface and gathering everything you need. A clean, flat workspace makes it easier to rotate the cone as you work. Because hot glue is involved, keep your fingers away from freshly applied glue and use appropriate care throughout the project.
Place the cone somewhere you can comfortably turn it. You will get a more natural pattern if you can rotate the cone instead of trying to reach around it from one fixed position.
2. Start Adding the Texture
Apply a small amount of the decorative material near the lower portion of the cone. Slowly move around the surface, creating lines that curve and cross as they travel around the form.
There is no need to create a strict geometric pattern. In fact, a more relaxed arrangement works well for this style. Some strands can sit closer together, while others can have more space between them.
Keep the Lines Light and Layered
One of the easiest ways to make the texture look attractive is to build it gradually. Instead of covering a large area at once, work in smaller sections. This gives you more control over the spacing and helps prevent the surface from becoming visually heavy.
3. Work Toward the Tip
Continue moving upward while rotating the cone. As the cone becomes narrower, adjust the scale of your lines so that the pattern follows the changing shape.
The tip does not need to be completely covered. A clean point can actually emphasize the tree-like silhouette and give the decoration a polished finish.
4. Let the Texture Set
Once the surface has the amount of texture you want, allow the material to cool and set completely. Avoid handling the decoration too much while the glue is still warm, especially around the finer strands.
When it is fully set, inspect the tree from different angles. This is the perfect time to remove unwanted strands or add a few extra lines to areas that look too empty.
Creating a Soft Winter Look
The finished texture naturally gives this Christmas tree DIY a winter-inspired appearance. The pale, translucent details resemble delicate frost or icy branches, while the cone underneath provides warmth and contrast.
If you want to emphasize that effect, keep the rest of your styling understated. Cream-colored ornaments, soft white accents, natural wood, neutral textiles, and warm lighting can complement the tree without competing with its texture.
Expert Insight
For a sophisticated holiday display, think about contrast rather than adding lots of decorations. A textured tree looks especially elegant when placed against a simple background with a few carefully chosen seasonal accents.
Ways to Customize Your DIY Christmas Tree
The basic technique is only the beginning. Once you have the cone and texture method figured out, there are plenty of ways to adapt the idea to your own decorating style.
Try Different Colors
Traditional green is an obvious choice, but it is not your only option. White creates a snowy appearance, while cream and beige give the project a warm Scandinavian-inspired feeling. Gold or silver accents can add a little sparkle for a more glamorous holiday arrangement.
You could also create a coordinated set using several shades from the same color family. This keeps the display cohesive while adding subtle variation.
Add Small Decorative Details
Once the main texture is complete, consider adding a few small embellishments. Tiny ornaments, beads, bows, faux snow, or miniature seasonal accents can personalize the tree.
Keep decorations relatively light so they do not overwhelm the delicate texture. A few strategically placed details can have a greater visual impact than covering the entire tree.
Make a Mini Christmas Tree Forest
One tree looks lovely on its own, but a collection can make an even stronger display. Create three or five cones in different heights and arrange them together on a tabletop, shelf, mantel, or console.
Varying the height creates a layered composition, while repeating the same materials gives the group a unified appearance. You can even experiment with different textures on each tree while keeping the colors consistent.
Where to Display Your Handmade Christmas Tree
This type of Christmas decoration is small enough to work in many areas around the home. A single tree can add a festive detail to a bedside table or bookshelf, while a group can become the centerpiece of a larger holiday display.
- Christmas mantel arrangements
- Dining or coffee table centerpieces
- Entryway and console table displays
- Bookshelves and open shelving
- Holiday craft tables
- Cozy bedroom decorations
- Neutral Christmas vignettes
For a particularly polished look, place the tree beside a few natural-looking seasonal elements. Soft greenery, neutral ornaments, textured fabrics, and warm-toned accessories can help connect the handmade piece to the rest of your Christmas decor.
Tips for a Cleaner Finished Result
Although this is an easy Christmas craft, a few small adjustments can make the finished decoration look much more refined.
- Rotate the cone as you work: This helps the texture wrap naturally around the entire shape.
- Change the spacing: Slight variation makes the design look organic rather than mechanically repeated.
- Work in manageable sections: Smaller areas are easier to control than trying to decorate the entire cone at once.
- Inspect from every angle: Turn the finished tree around before deciding whether more texture is needed.
- Keep the tip neat: A clean upper point helps maintain the recognizable Christmas tree silhouette.
Pro Tip: Do not chase perfection. The slightly irregular, overlapping texture is part of what gives this handmade Christmas tree its character. A natural pattern often looks more interesting than perfectly uniform lines.
How to Style It for Different Christmas Themes
A major benefit of this DIY Christmas tree is that its simple silhouette can fit into several decorating styles.
Minimalist Christmas
Keep the tree in white, cream, or beige and pair it with a small number of decorations. A clean arrangement allows the texture to become the main feature.
Rustic Christmas
Combine the handmade tree with wood, natural textures, neutral fabrics, and simple greenery. The warm cone base can work particularly well with rustic surroundings.
Elegant Holiday Decor
For a more sophisticated look, introduce metallic details sparingly. Gold, champagne, or silver accents can add sparkle while allowing the textured surface to remain the star.
A Simple Craft With Plenty of Possibilities
What makes this Christmas tree DIY worth trying is how easily the basic concept can be adapted. The cone provides a familiar holiday shape, while the handmade texture gives it a distinctive personality.
You can make the project as simple or decorative as you like. Leave the cone mostly natural for a soft, understated design, cover it with a snowy finish for a winter display, or personalize it with small accents that coordinate with your existing Christmas decorations.
It is also a useful project when you want holiday decor that feels personal rather than mass-produced. A handmade piece does not have to be complicated to make an impression. Sometimes a simple shape, interesting texture, and thoughtful styling are all you need.
At a Glance
- Simple cone-shaped Christmas craft
- Textured handmade finish
- Easy to customize with colors and accents
- Perfect for shelves, tables, mantels, and holiday displays
- Great for creating a coordinated set of mini trees
Conclusion: Create a Christmas Tree That Feels Uniquely Yours
This Christmas tree DIY is a wonderful example of how a basic craft shape can become beautiful through texture and thoughtful styling. With a simple cone base, layered decorative lines, and a soft seasonal palette, you can create a charming piece that adds handmade warmth to your holiday home.
The best part is the freedom to make it your own. Experiment with different colors, sizes, finishes, and decorations until you find a combination that fits your Christmas style. Whether you prefer minimalist neutrals, rustic warmth, or elegant winter decor, the same basic idea can be transformed to suit your space.
If you are building a collection of handmade Christmas decorations this year, this textured tree is an easy project to add to the list. Make one as a subtle accent or create several for a complete little holiday forest. Gather your supplies, put on some festive music, and enjoy the process of making something beautiful by hand.
Tags
Christmas Tree DIY DIY Christmas Decor Christmas Crafts Holiday DIY Handmade Christmas Decor Christmas Table Decor Winter Crafts span style=”display:inline-block; background:#f1e7d9; color:#5a4636; border-radius:20px; padding:7px 13px; margin:4px; font-size:14px;”>DIY Holiday Decorations