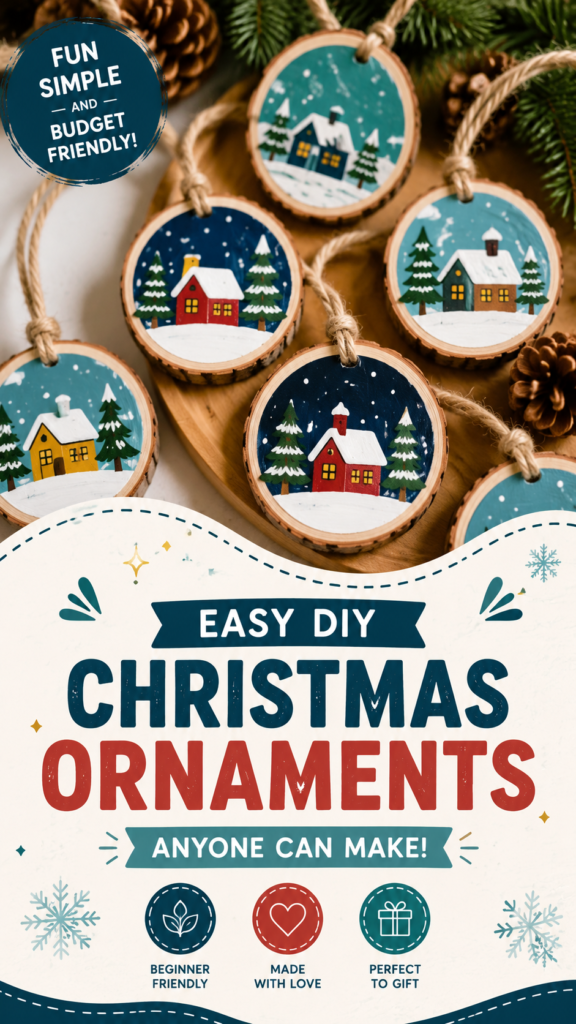
Bring a warm, handmade feeling to your holiday decorating with these easy DIY Christmas ornaments. The cozy wood-slice ornaments shown here combine rustic natural wood, painted snowy landscapes, evergreen trees, colorful little houses, and simple twine hangers to create decorations that feel personal and charming. They are a wonderful choice for anyone who wants to make Christmas decorations at home without complicated techniques or an oversized supply list.
One of the best things about Christmas ornaments DIY projects is the freedom to make every piece slightly different. You can change the house colors, experiment with snowy backgrounds, add different evergreen shapes, or personalize an ornament for someone special. The result is a collection that looks coordinated while still having plenty of handmade character.
Key Takeaways
- Wood slices create a naturally rustic base for handmade Christmas ornaments.
- Simple cabin, snow, and evergreen scenes are beginner-friendly painting subjects.
- Acrylic-style craft paints work well for colorful ornament designs.
- Twine adds an easy finishing touch and complements the natural wood.
- Handmade ornaments make thoughtful decorations and simple holiday gifts.
- Small design changes can make each ornament feel completely unique.
Why Wood Slice Christmas Ornaments Are So Charming
Natural wood and Christmas decorations are a beautiful combination. The rough outer edge of a wood slice adds texture, while the smooth painted center gives you a clean surface for a winter scene. That contrast makes these ornaments especially attractive on a Christmas tree, where handmade details can stand out among traditional decorations.
The designs shown in this style often feature a small house surrounded by evergreen trees beneath falling snow. It is a simple composition, but it immediately creates a cozy winter atmosphere. Dark blue or teal backgrounds can make the white snow pop, while red, yellow, green, and brown details give each miniature scene plenty of personality.
Important: The charm of a handmade ornament comes from its individuality. You do not need every painted detail to look perfectly identical. Slight variations in the trees, snowflakes, windows, and houses are what make a DIY collection feel genuinely handmade.
Materials for an Easy Christmas Ornaments DIY Project
You can keep the materials simple for this project. The focus is on creating a pretty painted surface and finishing it with a practical hanging loop.
- Round wood slices or unfinished wooden ornament blanks
- Craft or acrylic paints in winter-inspired colors
- Small and medium paintbrushes
- White paint for snow
- Dark blue, teal, or another background color
- Green, brown, red, yellow, and neutral paint for details
- Natural twine or rustic cord
- A pencil for lightly sketching the design
- Optional protective clear finish
- Optional small decorative accents such as snowflake details
Choose your supplies based on the look you want. A limited palette of two or three main colors can create a sophisticated collection, while brighter colors can make the ornaments playful and cheerful. Natural wood works particularly well when you want a rustic Christmas decorating style.
How to Make Painted Wood Slice Christmas Ornaments
The process is straightforward, making this a useful Christmas craft for beginners. The most important part is allowing each layer of paint to dry before adding small details.
1. Prepare the Wood Slice
Start with a clean, dry wood slice. If the surface feels particularly rough, lightly smooth the front with fine sandpaper. You do not need to remove all of the natural texture. In fact, keeping some of that character can make the finished ornament more rustic.
If your wood slice does not already have a hole for hanging, carefully create one near the top. Keep enough space between the hole and the edge so the wood remains sturdy when the ornament is hung.
2. Paint the Winter Background
Apply a thin background layer to the front of the wood. Deep blue creates a dramatic snowy-night effect, while teal or light blue gives the ornament a softer daytime appearance. Leave the bark edge visible if you want to emphasize the natural shape of the wood.
Depending on your paint, you may want more than one thin coat. Several light coats generally give you better control than applying one heavy layer. Let the surface dry between coats.
3. Create the Snowy Ground
Use white paint to create a curved snowy foreground along the bottom portion of the ornament. It does not have to be perfectly smooth. Gentle curves can make the snow look more natural and give the little house a place to sit within the scene.
For additional depth, you can add a second shade of white or a very subtle cool tone to portions of the snow. Keep the design simple so the small ornament remains visually clear.
4. Paint the Cozy Little House
The house is the focal point of this style of ornament. Begin with a simple rectangular or slightly irregular shape. Add a roof with a generous layer of white paint to represent snow. Then introduce a door, windows, and a chimney using a fine brush.
Warm yellow windows are particularly effective against a cool blue background because they create the feeling of a cozy home glowing on a snowy evening. Try red, brown, green, mustard, or other cheerful colors for the exterior.
5. Add Evergreen Trees
Paint one or more evergreen trees around the house. A simple layered triangular shape is enough to suggest a Christmas tree or winter pine. Use different heights to make the scene more interesting.
After the green paint dries, add small white strokes to the branches. These details can suggest freshly fallen snow and help the trees coordinate with the snowy ground.
6. Add Falling Snow
Small white dots can instantly transform a painted scene into a winter landscape. Use the end of a small brush or another suitable tool to add dots across the background. Vary the sizes and spacing rather than creating a perfectly regular pattern.
A few larger dots near the foreground and smaller dots farther away can give the scene more visual depth.
7. Finish With Twine
Once the paint is completely dry, thread natural twine through the hole at the top of the wood slice. Tie a secure loop that is long enough to hang comfortably from a tree branch.
The neutral color and texture of twine pair beautifully with unfinished wood. It also reinforces the handmade, rustic character of the finished Christmas ornament.
Easy Ways to Personalize Your DIY Christmas Ornaments
The basic snowy cabin design is only a starting point. Once you understand the simple structure, you can create an entire collection of personalized ornaments.
Try Different House Colors
Make each little home a different color while keeping the snowy roofs and evergreen trees consistent. Red, blue, green, mustard, and warm neutral shades can all work beautifully together.
Create a Daytime Winter Scene
Instead of a dark background, choose pale blue or soft teal. A lighter palette gives the ornaments an airy look and can work especially well with neutral or Scandinavian-inspired holiday decor.
Add Names or Dates
If you are comfortable working with small lettering, consider adding a name, year, or short word along the bottom edge. This can turn a simple craft into a meaningful keepsake. Practice the lettering on paper first because the curved surface and small scale can make tiny text challenging.
Experiment With Snowflakes
Small snowflake shapes can add extra detail to the background. Keep them relatively simple so they remain recognizable at the ornament’s small size. You can also combine snowflakes with dots for a more relaxed snowfall effect.
Expert Insight
For small painted ornaments, think in terms of recognizable shapes rather than tiny details. A simple house silhouette, bright windows, snowy roof, and layered pine trees can communicate a complete winter scene without overcrowding the design.
Tips for Better-Looking Painted Ornaments
Small crafts can sometimes be more challenging than larger paintings because there is less room for correction. A few simple habits can make the process much easier.
- Work from large shapes to small details. Paint the background, snow, house, and trees before adding windows or snowfall.
- Use a light touch. Thin layers give you better control and help prevent paint from becoming thick or uneven.
- Keep your palette coordinated. Repeating the same colors across several ornaments makes the finished collection look intentional.
- Let layers dry. Rushing between colors can cause them to blend when you want crisp edges.
- Practice details first. Test trees, snowflakes, and tiny windows on scrap wood or paper before painting the final piece.
- Embrace natural texture. The bark edge does not need to be perfectly uniform. Its irregular appearance is part of the rustic appeal.
Pro Tip: If you are making several ornaments, paint the same step on all of them before moving to the next step. For example, paint every background first, then every snowy foreground, followed by the houses. This keeps the color palette consistent and makes a larger batch easier to manage.
How to Use Handmade Christmas Ornaments in Your Decor
These wood slice ornaments are naturally suited to a Christmas tree, but they can also be used throughout a holiday display. Hang several together in a small grouping, combine them with other natural decorations, or use individual pieces as special accents.
They pair particularly well with greenery, pinecones, wood textures, neutral ribbons, and warm holiday colors. The painted winter scenes provide a colorful focal point while the natural edges keep the overall look relaxed.
You can also use a handmade ornament as a small finishing touch on a wrapped gift. Tie one onto a package with twine or ribbon, and the decoration becomes part of the gift itself. This is an easy way to make simple wrapping feel more personal.
Why This Is a Great Beginner Christmas Craft
A Christmas ornaments DIY project does not have to involve advanced crafting skills. These painted wood slices rely on basic shapes that can be adapted to different ability levels. Beginners can create simple houses and trees, while more experienced crafters can add intricate windows, layered snow, decorative borders, and personalized lettering.
There is also plenty of room to make mistakes without ruining the entire project. If a small detail does not look right, you can often paint over it after the surface dries and try again. That flexibility makes this type of craft approachable for a relaxed holiday afternoon.
Important: Choose a design that matches your skill level instead of trying to reproduce every tiny detail. The most successful handmade decorations usually have a clear focal point, a limited color palette, and enough open space for the design to breathe.
Ideas for a Handmade Ornament Collection
Once you have made one ornament, it is tempting to create a complete series. A collection can share the same background colors and snowy ground while changing the central scene on each piece.
- A tiny red cabin surrounded by snowy pine trees
- A yellow cottage beneath a softly falling snowfall
- A dark blue winter night with several snow-covered trees
- A simple woodland scene with a small house in the center
- A personalized family ornament with a name or year
Another fun approach is to create a coordinated set with different color combinations. For example, several ornaments could use blue, white, and natural wood, while another collection could introduce red and green accents. Keeping the wood base and general winter theme consistent will help everything feel connected.
At a Glance
- Style: Rustic, cozy, handmade winter decor
- Main materials: Wood slices, paint, brushes, and twine
- Design focus: Snowy houses, evergreen trees, and falling snow
- Best feature: Easy to personalize with colors and small details
- Decor use: Christmas trees, gift wrapping, and seasonal displays
Final Thoughts on Christmas Ornaments DIY
Making your own Christmas ornaments is a simple way to bring more personality and warmth into holiday decorating. These painted wood slice designs are especially appealing because they combine the natural beauty of wood with cheerful winter artwork. Snow-covered houses, evergreen trees, warm windows, and falling snow create a miniature seasonal scene that feels both nostalgic and fresh.
You do not need elaborate tools or advanced painting skills to get started. Begin with a few basic shapes, choose a small group of colors, and build the design one layer at a time. The natural wood edge and handmade brushwork will give every ornament its own character.
Whether you are decorating your own tree, preparing handmade gifts, or looking for a relaxing Christmas craft, these DIY ornaments offer plenty of creative possibilities. Make a few simple designs first, then experiment with personalized colors, scenes, names, and seasonal details as your confidence grows.
The best part of a handmade Christmas ornament is not perfection. It is the feeling behind it. A small painted wood slice can become a treasured holiday decoration simply because you made it yourself. Gather a few supplies, put on some festive music, and enjoy creating a collection that can return to the tree year after year.