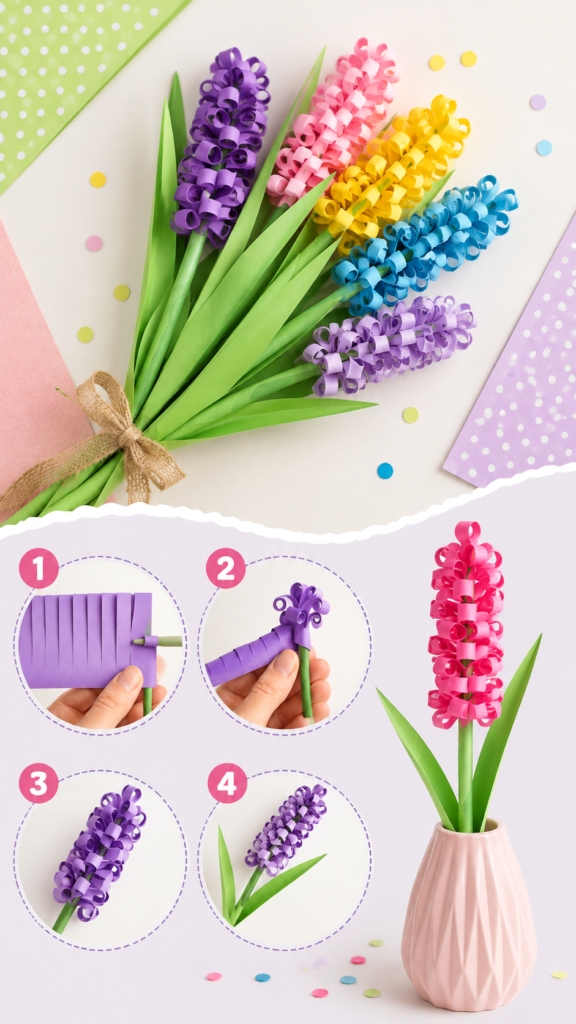
Paper flowers DIY easy projects are a wonderful way to turn a few simple craft supplies into bright, cheerful decorations. This colorful paper hyacinth project shows how strips of paper can be transformed into curled blooms that look surprisingly detailed while remaining approachable for beginners. With a handful of colorful sheets, green paper for the stems and leaves, and a little patience, you can create a handmade bouquet that works beautifully for spring decorating, craft days, gifts, or simply adding a playful touch to your home.
The finished flowers feature tightly curled paper loops gathered around a green stem, creating the full, textured appearance of a hyacinth. The colorful arrangement makes the project especially appealing because you can experiment with different shades and create a bouquet that matches your favorite room, season, or celebration.
Key Takeaways
- Turn simple paper strips into colorful curled flower blooms.
- Use several colors to create a cheerful handmade bouquet.
- Keep the paper strips evenly spaced for a fuller flower shape.
- Add green stems and pointed leaves to complete the floral look.
- This is a flexible craft that can be adapted for seasonal decor and gifts.
Why Paper Flowers Are Such a Fun DIY Craft
Paper flowers combine creativity, simplicity, and visual impact. Unlike fresh flowers, handmade paper blooms do not depend on a vase of water or a short blooming season. Once finished, they can be displayed again and again, making them a practical choice for anyone who enjoys handmade home decor.
This particular flower craft is also satisfying because the technique creates plenty of texture. Flat paper strips become little spirals and curls, giving each bloom a dimensional appearance. The repetition makes the process relaxing, while the final arrangement feels much more elaborate than the basic materials suggest.
Another advantage is the freedom to customize the colors. The example uses bright shades of purple, pink, yellow, and blue, but there is no need to follow a particular palette. Soft pastels can create a delicate spring arrangement, while deeper shades can give the bouquet a richer, more dramatic appearance.
Important: The beauty of an easy paper flower project is that small imperfections can make the finished bouquet feel more handmade. Focus on creating consistent curls and an attractive overall shape rather than making every single loop identical.
Materials for Easy Paper Flowers DIY
You do not need a large collection of specialized supplies to recreate this style of paper flower. The project is centered around basic craft materials that are easy to adapt according to what you already have available.
- Colored craft paper or lightweight cardstock for the flower heads
- Green paper for leaves
- Green floral wire, paper-covered stems, or suitable craft sticks
- Scissors or a paper trimmer
- A pencil, skewer, or similar narrow tool for curling the paper
- Craft glue or another suitable adhesive
- A small vase or container for displaying the finished flowers
Bright paper is particularly effective for this project because the curled strips create shadows and highlights across the flower head. If you want a softer look, choose pale pink, lavender, cream, light blue, or muted green. For a cheerful bouquet, combine three to five complementary colors.
Choosing the Right Paper
Paper that is flexible enough to curl but sturdy enough to hold its shape is ideal. Very thin paper may curl easily but can become difficult to handle, while extremely thick cardstock may resist tight spirals. A lightweight craft paper is a good starting point for beginners.
Consider testing one small strip before cutting all your pieces. Wrap it around your curling tool and see whether it forms a smooth loop. If it bends cleanly without tearing and holds a curl reasonably well, it should work nicely for the flower heads.
How to Make Paper Hyacinth Flowers Step by Step
The visual effect comes from a straightforward sequence: prepare a fringed strip, curl the individual sections, wrap the strip around a stem, and finish the flower with leaves. Taking your time during the curling stage will help produce a fuller and more polished result.
Step 1: Prepare the Flower Paper
Start by cutting a long rectangular strip of colored paper. The width and length can vary depending on how large you want the finished flower to be. A longer strip generally gives you more material to build a dense flower head.
Make a series of parallel cuts along one long edge of the strip. Leave an uncut section along the opposite edge so that all the small pieces remain connected. These cuts will become the individual curls that create the flower’s distinctive texture.
Try to keep the cuts relatively even. They do not need to be perfectly measured, but similar spacing will help the finished bloom look balanced.
Step 2: Curl the Paper Strips
Take a pencil, skewer, or another narrow cylindrical tool and gently curl each individual paper section. Roll the paper around the tool to create a small spiral or loop, then release it carefully.
This is the part of the craft where the flower begins to come alive. Some curls may be tighter than others, and that is perfectly fine. A mixture of slightly different curls can actually make the flower appear more natural and dimensional.
Work your way across the entire strip until all the cut sections have been curled. If the paper starts to flatten, gently reshape the loops with your fingers before assembling the flower.
Step 3: Attach the Curled Strip to the Stem
Place the end of the prepared paper strip near the top of the green stem. Apply a small amount of adhesive to the uncut edge, then begin wrapping the strip around the stem.
Keep the strip close together as you wrap. Each turn should sit near the previous one, gradually building the tall, clustered flower head shown in the finished arrangement.
If you want a particularly full bloom, you can add another curled strip around the same stem. Overlapping the curls creates extra volume and helps hide any small gaps.
Expert Insight
- Keep the uncut edge aligned as you wrap so the flower head stays neat.
- Use a little extra paper near the middle if the bloom looks too narrow.
- Shape the curls gently after assembly to create a fuller silhouette.
Step 4: Add the Leaves
Cut long, narrow leaf shapes from green paper. The leaves in this style of bouquet are slim and pointed, which helps emphasize the tall shape of the flower heads.
Attach one or more leaves along the lower section of the stem. Position them at slightly different angles rather than making every leaf point in exactly the same direction. This gives the finished flower a more natural, relaxed appearance.
You can gently fold each leaf lengthwise to create a subtle center crease. That small detail adds definition and helps the leaves stand away from the stem.
Step 5: Shape and Finish the Bloom
Once the paper flower is assembled, inspect the flower head from several angles. Carefully separate compressed curls with your fingertips and adjust any loops that are pointing too far inward.
The goal is a dense cluster of curls with enough variation to make the flower look lively. Avoid pulling too aggressively because the small paper loops can tear if handled roughly.
Pro Tip: Do the final shaping after the adhesive has had enough time to set. This makes it easier to fluff the flower without accidentally loosening the wrapped strip.
How to Create a Colorful Paper Flower Bouquet
One of the most appealing features of this project is the opportunity to create a complete bouquet from several individual flowers. Instead of making every bloom the same color, choose a small palette and repeat those colors throughout the arrangement.
A combination of pink, purple, yellow, and blue creates the bright, playful look seen in the finished design. For a more understated bouquet, try two shades of one color alongside green leaves.
Try a Monochromatic Palette
Choose several shades of the same color, such as pale pink, rose, and magenta. This approach creates a coordinated arrangement while still giving the individual flowers enough variation to stand out.
Mix Bright Complementary Colors
For a more energetic arrangement, pair colors that create strong contrast. Blue and yellow, pink and purple, or turquoise and coral can produce a lively handmade bouquet that immediately catches attention.
Easy Ways to Customize Your Paper Flowers
Once you understand the basic technique, there are many ways to personalize the project. You can change the size of the flower, vary the length of the curls, experiment with paper finishes, or create different arrangements.
- Make miniature flowers: Use shorter strips and smaller curls for tiny decorative stems.
- Create oversized blooms: Use longer strips and a wider flower base for a dramatic display.
- Layer colors: Wrap a second color over part of the first strip to create a two-tone effect.
- Vary the leaves: Make the leaves longer, shorter, wider, or more curved to change the overall style.
- Experiment with containers: Display the finished flowers in a vase, jar, bottle, or decorative craft container.
These variations make paper flowers especially useful for craft sessions where everyone wants to create something slightly different. Children and adults can choose their own colors and shapes while using the same basic construction method.
Paper Flower Decorating Ideas
A handmade bouquet does not have to stay in one location. These flowers can become part of many different decorative projects. Place several stems together in a small vase for a simple tabletop arrangement, or make a larger collection to fill a bigger container.
You can also use individual flowers as decorative accents on handmade cards, gift packaging, craft displays, or seasonal arrangements. Because the flowers are made from paper, they can be created in colors that coordinate with a particular celebration or room.
Spring and Seasonal Decor
Bright paper flowers are naturally suited to spring-inspired decorating. Fresh greens combined with pink, yellow, purple, and blue blooms can instantly create a cheerful seasonal mood.
For other seasons, simply change the color palette. Warm oranges, reds, and golds can create an autumn-inspired arrangement, while icy blue, white, and silver-toned papers can give the same technique a winter feel.
A Handmade Gift Idea
Paper flowers can also make a thoughtful handmade gift because the recipient can keep the arrangement for a long time. A small bouquet in a decorative container is simple enough for a beginner but still has the visual impact of a carefully crafted project.
Consider making several flowers in the recipient’s favorite colors. A personalized palette can make a simple DIY project feel much more intentional.
Common Mistakes to Avoid
Paper flower crafts are forgiving, but a few small adjustments can make the process easier and the finished result more polished.
- Making the cuts too deep: Leave enough uncut paper along the edge to keep the strip connected and strong.
- Using uneven spacing: Consistent cuts help create a more balanced flower head.
- Over-curling the paper: Tight spirals are attractive, but excessive pressure can crease or damage the paper.
- Using too much adhesive: A small amount is usually enough to secure the strip without making the flower messy.
- Skipping the final shaping: Gently fluffing and arranging the curls can make a major difference in the finished appearance.
Important: The finished flower is judged by its overall silhouette, not by whether every curl looks identical. Step back occasionally while crafting and shape the bloom based on how it looks as a whole.
Making This DIY Paper Flower Project Beginner Friendly
If you are new to paper crafts, start with one flower rather than attempting an entire bouquet immediately. The first bloom gives you an opportunity to test your paper, practice making the curls, and decide how tightly you want to wrap the flower head.
Once you are comfortable with the process, make several flowers in different colors. Repeating the same steps becomes much faster after the first attempt, and you can concentrate more on creating an attractive arrangement.
Keep your work surface organized as well. Place the paper strips in one area, finished curls in another, and your stems and leaves nearby. Having everything prepared before assembly makes the project smoother and more enjoyable.
Why This Easy Paper Flowers DIY Is Worth Trying
There is something especially satisfying about seeing a flat sheet of paper become a dimensional flower. The technique does not rely on complicated folding or advanced crafting skills. Instead, it uses simple cutting, curling, wrapping, and shaping to produce an impressive result.
The colorful finished bouquet is also highly adaptable. You can make one flower for a small decorative accent or create a full collection for a larger display. Changing the colors, flower sizes, and containers gives the same basic project countless different looks.
Most importantly, this craft invites experimentation. If one curl is imperfect or one flower turns out slightly different from another, those details can become part of its handmade character. The process is more about creating something cheerful and personal than achieving factory-perfect uniformity.
At a Glance
- Difficulty: Beginner friendly
- Main technique: Cutting, curling, and wrapping paper
- Best feature: Colorful textured flower heads
- Ideal for: Home decor, spring crafts, handmade gifts, and craft days
- Customization: Unlimited color, size, and arrangement options
Conclusion
Easy paper flowers are proof that a simple craft technique can create an eye-catching result. By cutting a strip of colorful paper, curling the individual sections, wrapping the strip around a stem, and adding green leaves, you can create cheerful hyacinth-inspired blooms with plenty of texture and personality.
Whether you are looking for a relaxing weekend craft, a colorful spring decoration, a handmade gift idea, or a beginner-friendly paper project, this DIY is a great place to start. Try your favorite colors, make a few different sizes, and arrange the finished flowers into a bouquet that feels uniquely yours.
Start with one flower, experiment with the curls, and let your creativity grow into a colorful paper bouquet.
Tags
Paper Flowers DIY Easy Paper Crafts DIY Flower Craft Paper Flower Tutorial Spring Crafts Handmade Flowers DIY Home Decor Paper Craft Ideas