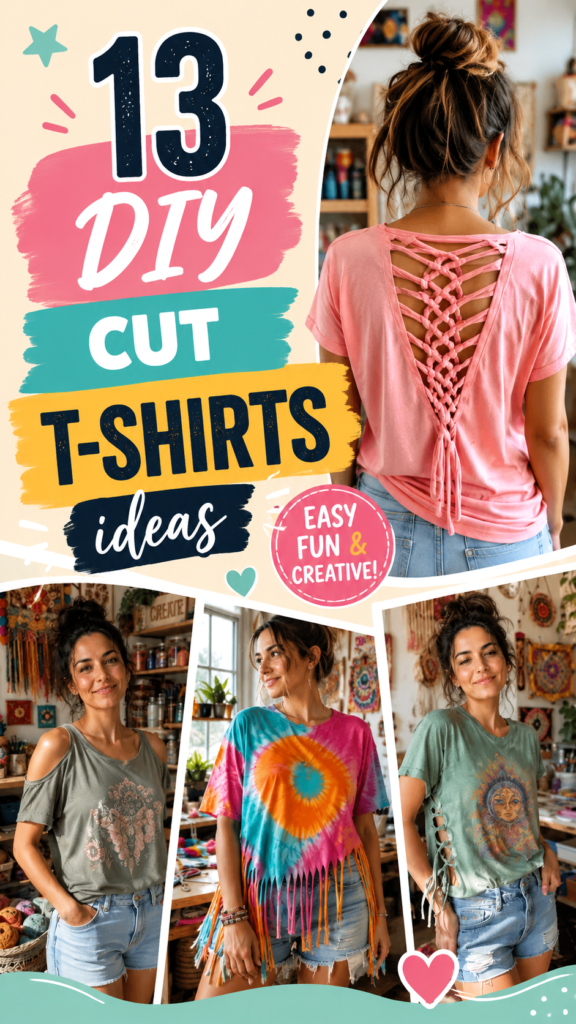
Old T-shirts have endless creative potential. With a few simple cuts, knots, braids, and design ideas, an ordinary shirt can become a bold fashion piece that feels completely new. DIY clothes design is all about experimenting with what you already own and turning basic garments into personalized styles that reflect your creativity.
From lace-up backs and fringe hems to cold-shoulder cuts and colorful tie-dye transformations, DIY T-shirt projects are an easy way to refresh your wardrobe without buying something new. You do not need advanced sewing skills or expensive equipment to get started. In many cases, a sharp pair of fabric scissors, a little patience, and a willingness to experiment are enough.
Whether you love boho-inspired fashion, casual summer outfits, festival clothing, or creative upcycling projects, these DIY clothes design ideas can help you give plain shirts a completely different personality.
Key Takeaways
- Simple T-shirts can be transformed with cutting, braiding, knotting, and fringe techniques.
- Most DIY clothes design projects require only affordable, beginner-friendly tools.
- Upcycling old clothing can help refresh your wardrobe while reducing textile waste.
- Different cuts and details can create casual, boho, edgy, colorful, or festival-inspired looks.
- Starting slowly and planning your design helps prevent uneven or accidental cuts.
- DIY fashion works best when you personalize each project to match your own style.
Why DIY Clothes Design Is So Popular
DIY fashion has become popular because it combines creativity, self-expression, and practicality. Instead of treating an old shirt as something disposable, you can see it as a blank canvas. A basic cotton tee can become an open-back top, a fringed festival shirt, an off-the-shoulder design, or a colorful statement piece.
Another major benefit is individuality. Store-bought clothing often follows the same trends and silhouettes, while handmade fashion allows you to experiment with details that feel more personal. You can decide where to cut, how much fringe to add, whether to create symmetry, and which colors best suit your wardrobe.
Important: The best DIY clothing projects do not need to look factory-made. Small handmade details, creative variations, and personal touches are often what make a custom piece feel unique.
13 Creative DIY Cut T-Shirt Ideas to Try
If you are looking for inspiration, these simple transformations offer plenty of ways to turn an ordinary T-shirt into something fresh and stylish.
1. Create a Lace-Up Open Back
An open-back shirt is one of the most eye-catching DIY clothes design ideas. Start by carefully cutting a large opening into the back of the shirt while leaving enough fabric around the edges to maintain the garment’s structure. The remaining strips can then be tied, woven, or braided to create a decorative pattern.
A crisscross design creates a more structured appearance, while loose braiding gives the shirt a relaxed, handmade feel. This style works especially well with oversized tees because the extra fabric gives you more room to experiment.
2. Add Fringe to the Hem
Fringe is a classic DIY fashion technique because it is easy to create and instantly changes the movement of a shirt. Cut evenly spaced vertical strips along the bottom hem, then gently stretch each strip so the fabric naturally curls.
You can leave the fringe loose for a casual look or tie small knots for extra texture. Long fringe creates a dramatic boho effect, while shorter fringe gives the shirt a more subtle update.
3. Try a Cold-Shoulder Cut
A cold-shoulder T-shirt design is simple but stylish. Instead of removing an entire sleeve, cut a curved opening around the shoulder area. This creates a relaxed silhouette while keeping the shirt comfortable and easy to wear.
It is a good beginner project because small adjustments can make a noticeable difference. Start with a conservative opening and enlarge it gradually if needed.
4. Make an Off-the-Shoulder T-Shirt
An oversized shirt can easily become an off-the-shoulder top. Cut around the neckline in a wide curve, removing small amounts of fabric at a time. Once the neckline is stretched slightly, the fabric will naturally relax into a casual draped shape.
This DIY clothes idea works particularly well for soft cotton shirts and relaxed summer outfits.
5. Create a Fringe Sleeve Design
Instead of modifying the bottom of the shirt, focus on the sleeves. Cut narrow strips into the sleeve edges to create a fringe effect. You can keep the strips short for subtle movement or make them longer for a more dramatic fashion statement.
Fringe sleeves pair beautifully with denim shorts, casual jeans, and festival-inspired outfits.
6. Experiment With Tie-Dye Colors
Color can completely transform a basic T-shirt. Tie-dye allows you to combine cutting techniques with bold patterns, making every finished piece look different. Spiral designs, stripes, bursts, and abstract color sections are all easy ways to personalize a plain shirt.
Bright colors create a playful statement, while softer shades can give the project a more modern appearance. If you are new to tie-dye, test your technique on an old cotton shirt before working on your favorite piece.
7. Cut a Side Lace Detail
Side cuts can add an unexpected detail to a simple T-shirt. Create evenly spaced horizontal openings along one or both sides, then weave or tie the strips together.
This technique can create a fitted shape while adding visual texture. It is especially useful for transforming a loose shirt that feels too plain or oversized.
8. Turn a Shirt Into a Knotted Crop Top
A longer T-shirt can be shortened with strategic cuts and knots. Trim the hem to your preferred length, then cut a small section at the front and tie it into a knot.
This creates a casual crop-top style without requiring a sewing machine. For a softer look, avoid cutting too much fabric at once. You can always shorten the shirt later.
Quick Note
Before making major cuts, lay the shirt flat and mark your design lightly with washable chalk or a fabric-safe marker. Planning first can make a big difference, especially when creating symmetrical patterns or detailed woven sections.
9. Add Braided Fabric Details
Braiding is an excellent way to turn cut fabric strips into something decorative. You can braid the back, sleeves, neckline, or sides of a shirt. The technique adds texture without requiring additional materials.
For best results, use evenly sized strips and keep the tension consistent. A loose braid creates a relaxed style, while a tighter braid gives the design a more defined appearance.
10. Create a Ladder Cut Pattern
Ladder cuts are made by creating parallel slits in the fabric. When the shirt is gently stretched, the strips between the cuts become thinner and create an interesting textured pattern.
You can place ladder cuts across the back, along the sleeves, or near the neckline. This is one of the easiest no-sew DIY clothing ideas because the final design develops naturally as the fabric stretches.
11. Make a Statement Back Design
The back of a T-shirt is often overlooked, which makes it the perfect place for creative experimentation. Try a large geometric opening, vertical strips, a woven panel, or multiple cutout sections.
A statement back can transform a plain shirt while leaving the front simple. This creates balance and makes the design feel surprising from different angles.
12. Combine Cutting With Fabric Art
DIY clothes design does not have to rely on cutting alone. Combine altered sleeves or fringe with fabric paint, printed designs, patches, or colorful dye techniques.
The combination of texture and color can create a truly original garment. Keep the overall design balanced by choosing one main focal point. For example, a colorful shirt may look best with simple fringe, while a detailed lace-up back can become the main attraction on a solid-colored tee.
13. Give an Old Shirt a Complete Makeover
For the most creative project, combine several techniques. You might shorten the hem, add fringe, cut the shoulders, and finish the back with a woven detail. The goal is not to follow a strict formula but to explore what happens when simple DIY methods work together.
Start with one idea, then step back and look at the overall design before adding more. Sometimes one bold change is enough to give an old shirt a completely new life.
Basic Tools for DIY T-Shirt Projects
You can complete many DIY clothing transformations with only a few simple supplies. Keeping the process uncomplicated makes it easier to experiment without investing in expensive equipment.
- Sharp fabric scissors: Clean cuts are easier to control and safer for detailed designs.
- Fabric chalk or washable marker: Useful for planning lines and keeping symmetrical cuts even.
- Ruler or measuring tape: Helpful for fringe, strips, and repeated patterns.
- Old cardboard: Useful when painting or dyeing fabric to prevent colors from bleeding through.
- Rubber bands: Helpful for tie-dye projects and fabric gathering.
- Needle and thread: Optional for reinforcing details or adding decorative elements.
How to Avoid Common DIY Clothing Mistakes
DIY fashion is meant to be creative, but a little preparation can help you avoid frustrating mistakes. The most common problem is cutting too much fabric too quickly. Once fabric has been removed, it is difficult to restore the original shape.
Start Smaller Than You Think
Make conservative cuts first. Try on the shirt between steps and decide whether more fabric needs to be removed. This is especially important for necklines, armholes, and crop lengths.
Consider How Fabric Stretches
Most T-shirt materials stretch after cutting. A narrow strip may become wider, and a small neckline opening may expand when worn. Gently stretching test areas can help you predict the final result.
Work on a Flat Surface
Uneven cuts often happen when fabric is bunched or hanging over an edge. Spread the shirt flat and smooth out wrinkles before measuring or cutting.
Pro Tip: Practice new cutting techniques on a shirt you no longer wear. It gives you freedom to experiment and helps you understand how different fabrics react before you begin a more important project.
Styling Your DIY Clothes Designs
Once you finish your custom T-shirt, styling can help highlight the details. Fringed shirts work naturally with denim shorts and casual accessories. Open-back or lace-up designs can become the focal point of a simple outfit, so neutral bottoms often work well.
Colorful tie-dye shirts pair nicely with simple denim, while a subtle cutout shirt can be layered with a jacket or cardigan. The beauty of DIY fashion is that the finished garment already has personality, so you often need fewer accessories to complete the look.
Think about the mood you want to create. A loose fringed shirt can feel relaxed and artistic. A clean lace-up design can look more modern. Bright colors can create a playful summer aesthetic, while neutral shades allow the texture and cuts to stand out.
Why Upcycling Clothes Is Worth Trying
Upcycling gives old garments a second chance. Instead of immediately replacing clothing that feels outdated or boring, you can experiment with ways to transform it. This creative approach can help you build a more personal wardrobe while making better use of items you already own.
Not every project will turn out exactly as planned, and that is part of the creative process. DIY clothing encourages experimentation. A small design mistake can sometimes lead to an even more interesting idea.
It can also be a fun activity for creative afternoons, fashion projects, seasonal outfit planning, or handmade gifts. Each finished piece becomes a reflection of your choices, making DIY clothes design more personal than simply purchasing another standard item.
At a Glance
- Start with simple T-shirt transformations before attempting complex patterns.
- Cut less fabric first and make adjustments gradually.
- Use fringe, braids, knots, and cutouts to add texture.
- Combine color techniques with structural changes for a unique look.
- Let your personal style guide the final design.
Final Thoughts on Creative DIY Clothes Design
A plain T-shirt does not have to stay plain. With a few creative cuts and simple techniques, it can become a completely different piece of clothing. From fringed hems and colorful patterns to intricate lace-up backs and relaxed shoulder cuts, DIY fashion offers countless opportunities to experiment.
The best part is that there is no single definition of the perfect design. You can keep a project simple or turn it into a bold statement piece. Start with an old shirt, choose one technique that inspires you, and give yourself permission to experiment.
DIY clothes design is about more than changing fabric. It is an opportunity to create something personal, useful, and uniquely yours. Once you begin seeing old clothing as creative material rather than something to discard, your wardrobe can become an endless source of inspiration.