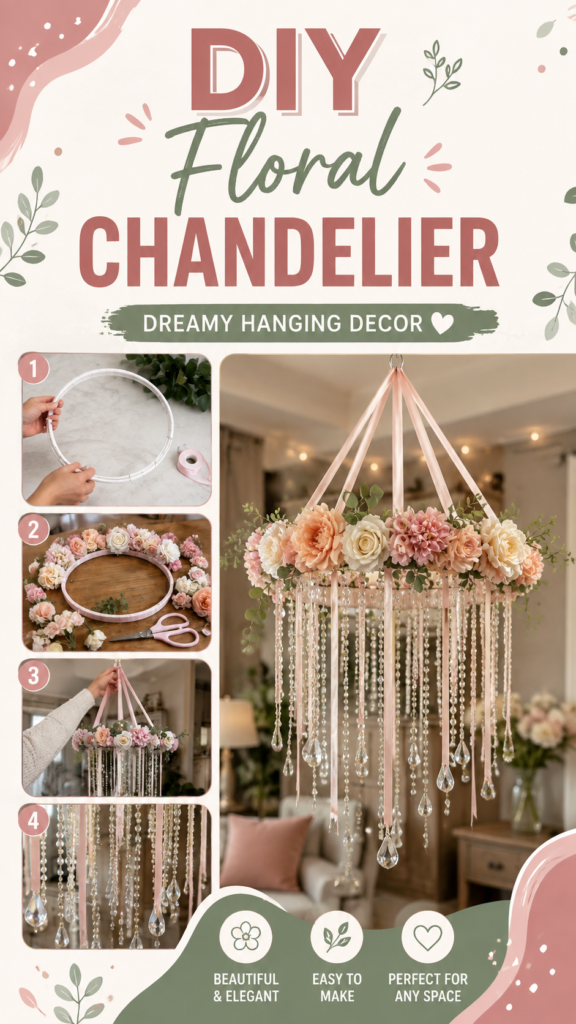
A DIY floral chandelier is a beautiful way to turn a simple hanging structure into a dreamy statement piece. With a basic hoop, soft ribbons, faux flowers, greenery, and cascading crystal or bead strands, you can create elegant hanging decor that feels much more elaborate than it actually is. The finished design works especially well as a focal point in a living room, bedroom, celebration space, or special event.
The charm of this project comes from its combination of textures. Soft pastel flowers create a romantic foundation, flowing ribbons add movement, and sparkling strands bring light and dimension. Whether you love cottage-inspired decorating, romantic home accents, or creative weekend crafts, this DIY chandelier offers plenty of room for personalization.
Key Takeaways
- A simple hoop can become an elegant floral chandelier with a few decorative materials.
- Layer flowers and greenery around the frame to create a full, balanced appearance.
- Use ribbons, beads, and crystal-style strands at different lengths for movement.
- Soft blush, cream, peach, and sage tones create a romantic and versatile palette.
- Faux flowers are especially practical when you want the decoration to remain attractive over time.
- The design can be adapted for everyday home decor, parties, showers, or other celebrations.
What Makes a DIY Floral Chandelier So Special?
Traditional chandeliers often serve as both lighting fixtures and decorative focal points. A floral chandelier takes the same idea in a softer direction. Instead of relying on elaborate hardware, it uses flowers and hanging details to create an eye-catching centerpiece.
The design shown here has a circular floral frame suspended from several ribbons. Flowers are arranged around the hoop while long strands of decorative beads and crystal-like drops hang beneath it. The result is airy, layered, and distinctly decorative.
Important: The secret to an elegant DIY chandelier is balance. The flowers should feel abundant without completely hiding the circular frame, while the hanging strands should have enough variation in length to create a graceful cascading effect.
Materials for a DIY Chandelier
You do not need an extensive craft supply collection to recreate the overall concept. The image suggests a relatively approachable collection of materials that can be arranged in different combinations depending on the look you want.
- A lightweight circular craft hoop or floral hoop
- Decorative ribbon for suspending the chandelier
- Faux flowers in complementary shades
- Artificial greenery or leafy stems
- Decorative bead strands
- Crystal-style drops or hanging accents
- Craft scissors
- Hot glue or another suitable floral adhesive
- Small decorative ties or floral wire if needed
Choose lightweight materials whenever possible. A finished chandelier can become surprisingly heavy once flowers, greenery, ribbons, and hanging strands are added. A lightweight construction makes the finished piece easier to handle and hang securely.
Choosing the Right Flowers
Flowers are the visual centerpiece of this project, so color and shape matter. The example uses a gentle combination of blush pink, peach, ivory, cream, and soft green. This palette gives the chandelier a warm, romantic appearance without making it feel overly bright.
For a natural-looking arrangement, combine different flower sizes. Larger blooms can establish the main visual points, while smaller blossoms can fill spaces between them. Greenery adds contrast and prevents the arrangement from becoming a solid block of color.
Selecting Ribbons and Hanging Details
Ribbon plays two roles in this design. Several ribbons suspend the circular frame from above, while additional ribbons can hang among the decorative strands below. Choosing a ribbon color that coordinates with the flowers helps the different elements feel connected.
Crystal-style beads and hanging drops provide the sparkle. They catch available light and create visual movement whenever the chandelier gently shifts. If you prefer a more understated look, fewer strands can be used. For a fuller statement piece, layer strands at several different lengths.
How to Make a DIY Floral Chandelier
The project can be approached in a few simple stages. The most important part is taking your time when arranging the flowers and planning the hanging strands. A little preparation makes the final composition look much more intentional.
1. Prepare the Circular Frame
Begin with a clean, lightweight hoop. If you want the frame to blend into the finished arrangement, wrap it with ribbon, floral tape, or another coordinating material. This creates a more finished foundation and can help disguise portions of the frame that remain visible between flowers.
Before attaching anything permanently, hold the hoop in the position where you expect it to hang. This gives you an idea of how much space is available for the flowers and helps you determine which side should be the front.
2. Arrange the Flowers Around the Hoop
Place the larger blooms first. Spread them around the hoop instead of concentrating every large flower in one area. Once the major flowers are positioned, add smaller blossoms to fill visible gaps.
Greenery can be tucked between flowers to introduce different shapes and create a more natural appearance. Allow a few leaves and stems to extend beyond the circular outline for a relaxed, garden-inspired effect.
3. Secure the Floral Arrangement
Once you are happy with the composition, secure each section using an appropriate adhesive, floral wire, or another method suited to the materials you have chosen. Work in small sections rather than attaching everything at once.
Pause regularly and look at the hoop from different angles. A floral chandelier is viewed from below and from the sides, so it should not only look attractive from one direction.
4. Add the Hanging Ribbons
Attach several ribbons evenly around the hoop so they meet at a central point above it. The image uses multiple pale ribbons to create a soft, triangular suspension system. This arrangement also adds another decorative layer to the finished piece.
Keep the suspension points evenly spaced. If one ribbon is significantly tighter than the others, the hoop may tilt. Adjust the lengths until the frame hangs level and feels visually centered.
5. Create the Cascading Strands
Now comes one of the most eye-catching parts of the project. Add bead strands, crystal-style drops, and narrow ribbons beneath the floral hoop. Vary their lengths rather than cutting every strand to exactly the same size.
Longer pieces can sit toward the center while shorter pieces fill the outer sections. This creates a cascading silhouette and keeps the chandelier from looking too uniform.
Expert Insight
Use repetition without making everything identical. Repeating the same flower colors, ribbon tones, and bead materials creates cohesion, while different flower sizes and strand lengths add visual interest.
6. Check the Balance
Step back and inspect the chandelier from several angles. Look for empty areas in the floral ring, overly crowded sections, and hanging strands that appear too concentrated on one side.
This is the perfect stage for small adjustments. Move a flower, add a leaf, shorten a ribbon, or reposition a bead strand until the composition feels balanced.
7. Hang and Enjoy Your Finished Decor
Once all components are secure, carefully hang the chandelier from an appropriate support point. Make sure the hanging method is suitable for the weight of the finished decoration and the location where it will be displayed.
The completed piece becomes a decorative focal point that combines flowers, soft textiles, greenery, and reflective details. Even when it is not illuminated, the layered construction gives the space a sense of movement and depth.
Creative Ways to Customize Your DIY Chandelier
One of the best things about this craft is how easily the color palette and materials can be changed. The floral chandelier concept does not have to follow one specific style.
Try a Neutral Floral Palette
Use ivory, white, beige, and muted greenery for a calm and sophisticated arrangement. This approach can work particularly well when you want the chandelier to complement existing furniture rather than dominate the room.
Create a Colorful Statement
For a more playful decoration, combine several pastel or vibrant flower colors. Keep the ribbon and hanging elements relatively simple so the flowers remain the main focus.
Make It Minimal
You can also simplify the concept by using fewer flowers and only a handful of hanging strands. Leaving more of the hoop visible creates an airy, contemporary appearance while preserving the recognizable chandelier shape.
Where to Use a DIY Floral Chandelier
A handmade floral chandelier can add personality to many different spaces. In a living room, it can become an unexpected decorative focal point. In a bedroom, soft flowers and ribbons can create a cozy, dreamy atmosphere.
The design can also be adapted for celebrations and special occasions. It works as decorative hanging art for a party area, photo backdrop, dessert table, gift table, or other visually important corner.
Because the arrangement is handmade, you can match its colors to the rest of your decor. Coordinate the flowers with cushions, curtains, table settings, or other decorative accents for a more unified look.
Tips for a More Professional-Looking Finish
Pro Tip: Photograph or inspect your chandelier from a distance before considering it finished. Small gaps that are difficult to notice up close can become much more obvious when the entire arrangement is viewed as one composition.
- Repeat your main flower colors throughout the hoop rather than grouping one color in a single section.
- Use different flower sizes to prevent the arrangement from looking flat.
- Allow some greenery to extend beyond the flower line for a softer silhouette.
- Vary the lengths of ribbons and decorative strands for movement.
- Keep the suspension ribbons evenly positioned so the hoop remains level.
- Inspect every attachment point before hanging the finished piece.
Another useful technique is to build the arrangement in layers. Start with the primary flowers, then add smaller blooms, greenery, ribbons, and finally the reflective strands. This approach makes it easier to see what the design actually needs instead of adding too many elements at the beginning.
Why Handmade Hanging Decor Is Worth Trying
DIY hanging decor gives you the freedom to create something that fits your exact space. Instead of choosing a finished decorative piece based only on what is available in stores, you can decide the size, colors, flower types, ribbon style, and amount of sparkle yourself.
It is also a satisfying way to refresh a room without changing everything around it. A single statement piece placed in the right location can introduce a new color palette and immediately draw attention upward.
Most importantly, the project encourages experimentation. You can rearrange the flowers, change the hanging strands, simplify the colors, or add new details until the chandelier reflects your personal decorating style.
Quick Points
- Start with a lightweight circular hoop.
- Build the floral arrangement from large blooms to smaller details.
- Combine greenery, ribbon, and decorative strands for texture.
- Vary hanging lengths to create a graceful cascading effect.
- Check balance and attachment points before displaying it.
Conclusion
A DIY floral chandelier is proof that beautiful home decor does not have to begin with a complicated project. A simple hoop can be transformed with flowers, greenery, ribbons, and sparkling hanging details into an elegant statement decoration.
The most successful designs focus on balance, layering, and a cohesive color palette. Start with the floral foundation, build texture gradually, and use different lengths to give the hanging elements movement. From there, the possibilities are almost endless.
Whether you are refreshing a room or preparing a special decorative display, this DIY chandelier is a creative project worth saving. Choose flowers that suit your style, experiment with the arrangement, and make the finished piece uniquely yours.