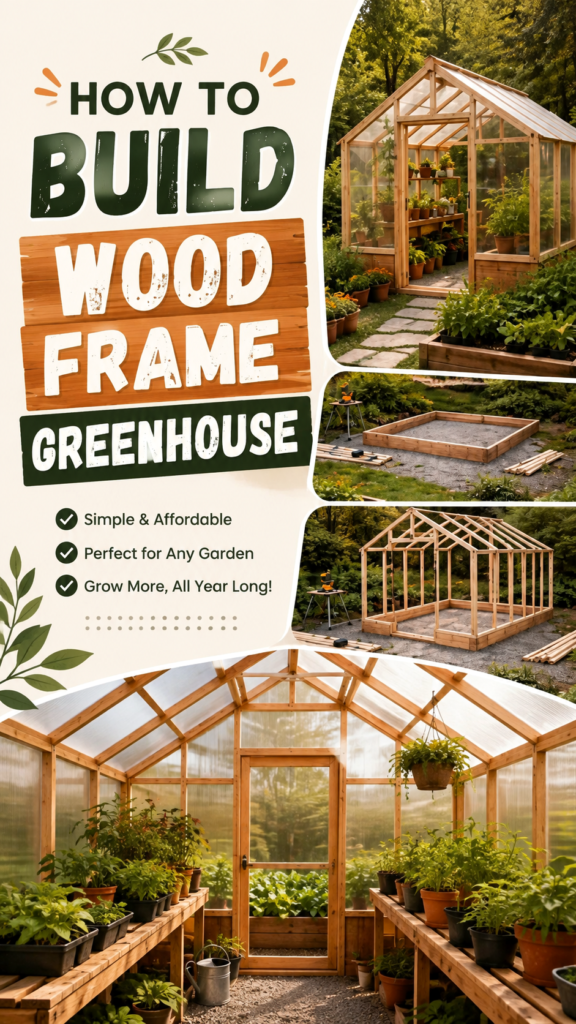
Building a greenhouse at home can turn an ordinary garden into a productive growing space where vegetables, herbs, flowers, and seedlings have a little more protection from changing weather. A simple wood-frame greenhouse is especially appealing because it combines a practical structure with the warm, natural look of timber. With thoughtful planning, you can create a greenhouse that fits neatly into a backyard while also giving you room for raised beds, pots, shelves, and garden tools.
The design shown here offers plenty of inspiration for anyone searching for DIY greenhouse plans. It features a wooden frame, transparent panels, a pitched roof, raised growing beds, and interior shelving filled with plants. The construction sequence also suggests a straightforward approach: prepare the base, assemble the timber frame, add the roof structure, enclose the greenhouse, and then organize the growing space.
Key Takeaways
- Choose a level, sunny area with enough room around the greenhouse.
- Use a sturdy wood frame designed around the size of your growing space.
- A pitched roof provides useful height and creates an attractive traditional greenhouse profile.
- Raised beds and shelving help maximize the available interior space.
- Plan the door, ventilation, watering, and pathways before completing the build.
- Keep the layout practical so daily gardening remains comfortable and accessible.
Why Build a Wood Frame Greenhouse?
A wood frame greenhouse is more than a place to protect plants. It can become the central feature of a productive backyard garden. Timber adds a natural appearance that blends beautifully with raised garden beds, surrounding foliage, gravel paths, and other outdoor elements.
Wood is also a flexible material for DIY construction. Individual sections can be measured, cut, assembled, and adjusted according to the available space. This makes a timber greenhouse an attractive option for gardeners who want something more personal than a standard prefabricated structure.
The visual design combines a compact footprint with generous growing capacity. Tall side walls, a peaked roof, and built-in shelving create multiple areas for plants without requiring an enormous amount of ground space.
Important: The most successful DIY greenhouse plans begin with the location and layout, not the lumber. Spend time deciding where sunlight, drainage, access, and garden pathways will work best before cutting any wood.
Choose the Right Location
Location has a major influence on how useful your greenhouse will be. Look for an area that receives plenty of natural light and provides enough space for the greenhouse itself plus comfortable access around it.
A relatively level surface makes construction much easier. The reference design shows a greenhouse sitting on a prepared area surrounded by gravel and garden beds. This type of setting creates a clean transition between the greenhouse and the rest of the garden while helping define walking areas.
Think About Sunlight
Plants need light, so avoid placing the greenhouse where large trees, buildings, or other structures will block significant amounts of sunlight. Consider how shadows move throughout the day rather than judging the location from a single moment.
Plan for Easy Access
You will visit the greenhouse frequently to water plants, harvest crops, remove damaged leaves, move seedlings, and maintain the structure. A location that looks attractive but is awkward to reach can quickly become frustrating.
Leave enough room for a clear pathway to the entrance. If you are building raised beds outside the greenhouse as shown in the design, make sure those beds do not interfere with the door or walking route.
Plan Your DIY Greenhouse Before Building
Before purchasing materials, decide what you actually want to grow and how much space those plants will need. A greenhouse intended mainly for seedlings can have a different layout from one designed for vegetables, herbs, and potted plants.
Sketch the structure from above and from the side. Mark the door, raised beds, shelves, and main walkway. This simple step can reveal problems before construction begins.
- Decide on the overall footprint.
- Mark the location of the entrance.
- Determine where raised beds or containers will sit.
- Leave comfortable space for walking and maintenance.
- Plan shelves for smaller pots and seedlings.
- Consider where air can enter and escape for ventilation.
A compact greenhouse can be surprisingly productive when vertical space is used well. The example design uses long wooden shelves along the sides, allowing many containers to sit above additional growing areas.
Building the Wood Frame
The wooden frame provides the structural skeleton of the greenhouse. The design shown uses vertical posts, horizontal supports, roof rafters, and triangular framing beneath the pitched roof.
Begin with a properly prepared base. The base should provide a stable foundation for the walls and help keep the frame aligned during assembly. Once the base is positioned, check that the corners are square before moving on.
Install the Base
The base defines the footprint of the greenhouse. Take time to make it straight, level, and securely supported. A small error at this stage can become much more noticeable as the wall and roof sections are added.
Add the Vertical Supports
Next, position the upright frame members around the perimeter. These supports establish the height of the greenhouse walls and provide attachment points for the transparent covering.
Temporary bracing can be useful while the frame is being assembled. Keep checking alignment as you work instead of waiting until the entire structure is finished.
Construct the Pitched Roof
The pitched roof is one of the most recognizable features of the design. Sloping rafters meet at the ridge, creating a classic greenhouse shape and providing additional headroom inside.
Roof construction deserves particular attention because it must remain stable and accurately aligned. Measure each corresponding piece carefully and make sure connections are secure before installing the covering.
Expert Insight
A greenhouse is easiest to use when its structure and interior layout are designed together. Position framing supports with future shelves, beds, and the entrance in mind so the finished space feels intentional rather than crowded.
Add Transparent Greenhouse Panels
Once the wood frame is complete, the next step is enclosing the structure with a suitable transparent greenhouse covering. The image shows clear panels that allow sunlight into the growing space while creating a protected environment around the plants.
Whatever material you choose, it should be appropriate for outdoor use and compatible with your frame design. Accurate measurements are important because gaps, poorly aligned panels, or loose attachment points can reduce the effectiveness of the enclosure.
The roof covering should follow the slope of the frame cleanly. Pay particular attention to corners and roof joints, where careful installation can make the finished greenhouse look much more polished.
Create a Practical Greenhouse Interior
After construction comes one of the most enjoyable parts: turning the empty structure into a productive growing room. The interior shown in the design is organized around wooden shelves, containers, raised beds, and a central walking path.
Use Shelving for Pots and Seedlings
Long shelves make excellent use of vertical space. Smaller plants can be kept at a comfortable working height, while larger crops can occupy floor-level areas.
Keep shelves strong enough for the weight they will carry, especially after containers have been filled with damp soil. Leave enough room between shelves for watering and routine plant care.
Add Raised Growing Beds
Raised beds can provide a dedicated space for vegetables and other plants that benefit from being grown directly in a defined soil area. The image pairs the greenhouse with attractive timber garden beds, creating a cohesive growing area.
Keep the bed layout simple. You should be able to reach plants from the surrounding paths without constantly stepping into the growing area.
Keep a Clear Central Path
A clear pathway is essential in a greenhouse. It gives you room to carry watering cans, inspect plants, harvest produce, and move containers without disturbing nearby crops.
The interior design shown uses a central aisle with shelves positioned along both sides. This is a particularly useful arrangement for a narrow greenhouse because it creates an obvious circulation route.
Pro Tip: Do not fill every available corner with plants on day one. Leave some flexible space so you can rearrange containers, accommodate larger plants, and make maintenance easier as the growing season develops.
Ventilation and Everyday Maintenance
A well-planned greenhouse needs airflow as well as light. When designing your structure, think about how fresh air can enter and warm air can escape. A functional door and appropriately placed openings can make the interior more comfortable for plants and gardeners alike.
Daily maintenance should also influence your layout. Keep watering equipment easy to reach, avoid creating narrow spaces between containers, and leave enough clearance around the entrance.
Regularly inspect the wooden frame, covering, fasteners, and door. Outdoor structures are exposed to changing weather, moisture, and temperature, so routine checks can help identify small problems before they become larger repairs.
Ideas for Growing in Your Greenhouse
The finished greenhouse can support a wide variety of gardening projects. The visual emphasizes leafy vegetables, potted plants, flowers, herbs, and seedlings, making the space feel like a flexible extension of the backyard garden.
- Start seedlings in containers and move them outdoors when appropriate.
- Grow herbs where they are easy to access for regular harvesting.
- Use shelves for smaller potted plants and young seedlings.
- Reserve larger floor areas for crops that need more room.
- Combine ornamental flowers with edible plants for a welcoming atmosphere.
One of the biggest advantages of a greenhouse is organization. Instead of scattering pots around the garden, you can create dedicated growing zones and keep many plants protected within one attractive structure.
Make the Greenhouse Part of the Garden
A greenhouse does not have to look like a separate utility structure. The design shown integrates the greenhouse with gravel paths, raised wooden beds, potted flowers, and surrounding greenery.
Repeating materials throughout the garden can create a cohesive appearance. For example, wooden raised beds can echo the greenhouse frame, while gravel pathways can connect the entrance with other growing areas.
Adding a few decorative containers or flowering plants around the entrance can also make the greenhouse feel inviting. The goal is to create a productive space that you will enjoy visiting as much as you enjoy harvesting from it.
Common DIY Greenhouse Planning Mistakes
Even a simple greenhouse project benefits from careful preparation. Several common planning mistakes can make a finished structure less convenient than expected.
Making the Interior Too Crowded
It is tempting to maximize every inch, but an overcrowded greenhouse quickly becomes difficult to maintain. Plan realistic spacing around shelves, beds, and plants.
Ignoring the Door Swing
Make sure the entrance opens without hitting raised beds, containers, or shelving. A few inches of additional clearance can make a noticeable difference in everyday use.
Forgetting Future Plant Growth
Small seedlings do not stay small. Leave adequate room for mature plants and consider how tall they may become before committing to a shelf arrangement.
Rushing the Frame
The frame determines the quality of everything that follows. Carefully check measurements, corners, levels, and connections as you build. A little extra attention early in the project can make panel installation and finishing much easier.
At a Glance
Quick Points
- Start with a sunny, level location.
- Build a square, stable wood frame.
- Use a pitched roof for a classic greenhouse profile.
- Combine shelves, containers, and raised beds.
- Keep pathways open for comfortable maintenance.
Conclusion
A thoughtfully planned wood-frame greenhouse can become one of the most useful features in a home garden. The combination of natural timber, transparent panels, raised beds, organized shelving, and a simple central walkway creates a growing space that is both practical and visually appealing.
The best DIY greenhouse plans are not necessarily the most complicated. A well-proportioned frame, a sensible location, good access, and an interior designed around the plants you actually want to grow can deliver far more value than unnecessary complexity.
Use the design as inspiration for your own version, then adapt the dimensions, layout, shelves, beds, and finishing details to suit your garden. With careful planning and patient construction, a simple backyard greenhouse can provide a beautiful place to grow, experiment, and enjoy gardening throughout the seasons.
Tags
DIY Greenhouse Greenhouse Plans Wood Frame Greenhouse Backyard Gardening Garden DIY Raised Garden Beds Vegetable Gardening Homestead Gardening