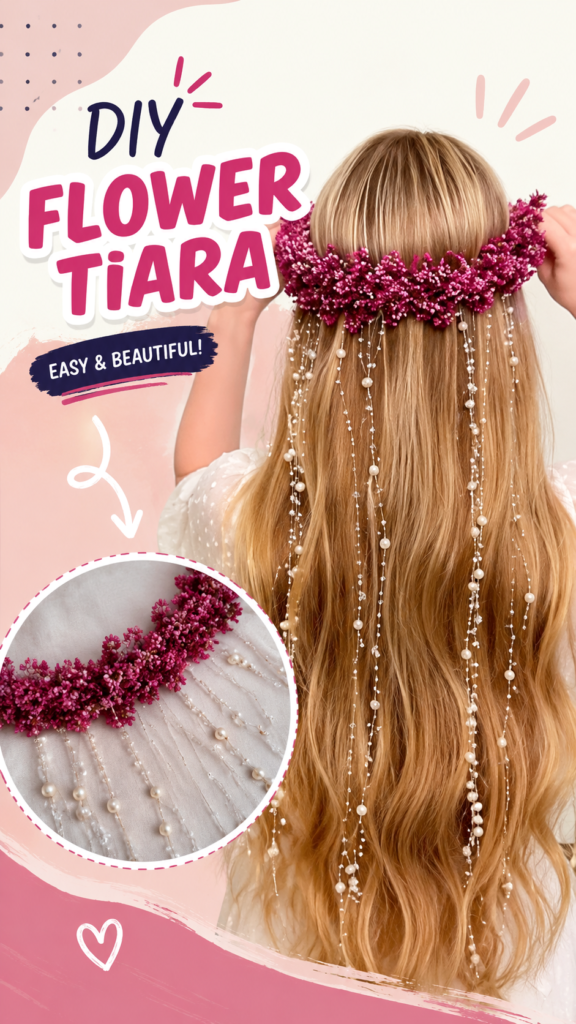
A DIY flower crown is one of those creative accessories that can instantly transform a simple hairstyle into something romantic, playful, and eye-catching. The design shown here combines a lush band of tiny pink flowers with delicate pearl and crystal-like strands that fall through long hair, creating a soft, whimsical effect. It is a beautiful idea for anyone who wants to make a statement accessory without relying on a complicated crafting project.
Whether you are preparing for a festival, birthday celebration, photoshoot, themed party, wedding-related event, or simply want to experiment with handmade accessories, a DIY crown gives you plenty of room to personalize the finished look. You can change the flowers, colors, size, embellishments, and overall shape to create a crown that feels completely your own.
Key Takeaways
- A DIY flower crown can be customized for almost any occasion or personal style.
- Lightweight artificial flowers are practical for comfortable, reusable designs.
- Pearls, beads, and hanging strands can add movement and an elegant finish.
- A flexible base makes it easier to adjust the crown for a secure fit.
- Simple color coordination can make a handmade crown look polished and intentional.
Why DIY Crowns Are So Fun to Make
There is something special about wearing an accessory you created yourself. A handmade crown can be designed around an outfit, a favorite color palette, or a particular event rather than being limited to whatever is available in a store. The process is also flexible enough for beginners. You can create a simple floral band or keep adding details until you achieve a more dramatic statement piece.
The flower crown featured in this style has a particularly romantic appearance because the floral band is paired with long decorative strands. The flowers provide volume around the head while the hanging embellishments add length and movement. This combination creates visual interest from both the front and the back.
Important: The secret to a beautiful DIY crown is balance. Choose one main decorative feature, such as flowers, and let the smaller embellishments support it rather than competing with it.
Materials for a DIY Flower Crown
You do not need an enormous craft supply collection to make a flower crown. The exact materials can vary depending on the style you want, but a few basic components can give you a strong starting point.
- Flexible crown base: Use a plain headband, flexible craft wire, or another comfortable base that can follow the shape of the head.
- Artificial flowers: Small faux flowers work especially well for creating a full floral band without adding excessive weight.
- Floral wire: Thin craft wire can help secure individual stems and decorative sections.
- Floral tape: Useful for covering wire and creating a cleaner finish.
- Pearls or beads: These can be attached to strands for an elegant cascading effect.
- Decorative string: Clear beading thread, jewelry wire, or another suitable flexible material can be used for hanging details.
- Scissors or craft cutters: Choose a tool appropriate for the materials you are using.
- Adhesive: A suitable craft adhesive can reinforce areas that need additional stability.
For a design inspired by the soft pink example, consider combining several shades within the same color family. A mixture of deep pink, dusty rose, blush, and lighter accents can make the crown look more dimensional than a single flat color.
How to Make a DIY Crown Step by Step
1. Choose and Prepare the Crown Base
Start with a base that feels comfortable against the head. If you are using a headband, choose one that is not overly tight. If you prefer a more flexible design, craft wire can be shaped into a circular or slightly curved form that sits around the head.
Before adding decorations, test the base on your head. Make sure it stays in place without creating uncomfortable pressure. This small step is important because a crown that looks beautiful but does not fit comfortably will be difficult to enjoy for an entire event.
2. Plan the Flower Placement
Lay the flowers beside the crown base before attaching anything. This allows you to experiment with spacing and decide whether you want an evenly covered band or a more concentrated arrangement.
The pictured style uses a dense floral appearance across the crown. To recreate that general feeling with your own materials, group small flowers closely together instead of leaving large gaps between individual pieces.
Create a Natural-Looking Arrangement
A perfectly uniform row can sometimes make a handmade crown look overly structured. Try varying the direction and height of individual flower clusters. A few slightly raised flowers mixed with flatter sections can create depth and make the arrangement feel fuller.
3. Attach the Flowers
Once you are happy with the layout, begin securing the flowers to the base. Work in small sections rather than trying to attach everything at once. This makes it easier to maintain the shape and correct the placement as you go.
Depending on your materials, you can secure flowers using thin floral wire, floral tape, or a suitable craft adhesive. If you use wire, keep the ends neatly covered so they cannot scratch the wearer.
Build the floral section gradually. It is much easier to add another flower than to remove a large number of pieces after everything has been secured.
4. Add Pearl and Beaded Strands
The cascading strands are what give this particular DIY crown style its distinctive appearance. You can create them using thin decorative cord, jewelry wire, or beading thread combined with lightweight pearls and beads.
Cut several strands in different lengths. Attach small beads or pearls at intervals, leaving enough space between them to maintain a delicate appearance. You do not need every strand to be identical. Slight variations in length can create a softer, more organic cascade.
Expert Insight
When adding hanging embellishments, keep the materials lightweight and distribute the strands across the crown rather than concentrating all the weight in one area. This helps the accessory remain comfortable and visually balanced.
5. Check the Fit and Finish
After the flowers and hanging details are attached, gently test the crown again. Look for loose decorations, exposed wire, sharp edges, or strands that could become tangled easily.
Hold the crown from different angles to see how it looks from the front, side, and back. Since the cascading details are an important part of the design, make sure they hang naturally instead of becoming bunched together.
Pro Tip: Take a quick photo of your crown from several angles before wearing it to an event. Photos can reveal uneven spacing or crowded areas that may be harder to notice in a mirror.
How to Customize Your DIY Crown
The best part of making your own crown is the ability to change almost every detail. The same basic construction can produce completely different results depending on your flower selection and decorations.
Experiment With Color
Pink flowers create a soft and romantic effect, but there is no reason to stop there. White and cream flowers can create an understated look, while purple, blue, yellow, or multicolor arrangements can feel more playful.
For a polished result, choose a main color and one or two supporting shades. If your flowers are already detailed, keeping the hanging embellishments neutral can help the design feel more cohesive.
Try Different Flower Sizes
Small flowers are ideal for a delicate, detailed crown, while larger blooms create a bolder statement. You can also combine both. Place larger flowers at a few focal points and use smaller blooms to fill the surrounding spaces.
Add Ribbons and Other Details
Ribbons can add movement without making the crown feel too heavy. Thin satin ribbon, sheer fabric strips, small bows, or subtle decorative cords can all work depending on the desired aesthetic.
If you want an elegant finish similar to the delicate strands in the featured style, choose lightweight embellishments that catch the light without overwhelming the flowers.
DIY Crown Ideas for Different Occasions
A handmade flower crown can be adapted to suit many different occasions. Because you control the materials and colors, you can make a design that feels appropriate for everything from casual creative projects to special celebrations.
- Festival accessory: Use colorful flowers, playful beads, and flowing ribbons for a cheerful statement piece.
- Birthday crown: Choose bright colors and fun embellishments to create a celebratory accessory.
- Photoshoot accessory: Try a more dramatic floral arrangement with cascading strands for added texture.
- Costume crown: Coordinate the flowers and decorations with the character or theme.
- Party accessory: Keep the design lightweight and comfortable so it can be worn for several hours.
- Gift idea: Create a personalized crown using the recipient’s favorite colors and decorative details.
Tips for Making a Comfortable Flower Crown
Comfort should be part of the design from the beginning. A crown that is too tight, too heavy, or covered with rough materials can quickly become unpleasant to wear.
Keep the Weight Distributed
Large clusters of flowers can become surprisingly heavy. Spread decorations around the base instead of placing most of the material in a single section. Lightweight faux flowers are particularly useful when you want a fuller appearance.
Cover Exposed Craft Materials
Always inspect the inside of the crown after finishing it. Any exposed wire or rough adhesive should be covered or repositioned. The inside should be as comfortable as possible, especially if the crown will be worn for an extended period.
Secure Hanging Decorations Carefully
Long strands should be firmly attached but should still have enough flexibility to move naturally. Check each connection before wearing the crown and trim excessively long pieces if they become difficult to manage.
Styling Your DIY Flower Crown
A detailed crown can become the main feature of an outfit, so the rest of the look does not necessarily need to be complicated. Long flowing hair works especially well with cascading strands because the decorations can blend naturally into the hairstyle.
For a soft romantic look, pair the crown with light fabrics and simple accessories. For something more playful, choose a brighter floral palette and coordinate the colors with your clothing.
Hair styling can also change the appearance of the crown. Loose waves can create a relaxed effect, while a partial updo can make the floral band more prominent. If the crown includes many hanging strands, keeping the hairstyle relatively simple can help the decorative details remain visible.
Common DIY Crown Mistakes to Avoid
Even a simple crown can benefit from a little planning. Avoid attaching every decoration immediately. Instead, arrange the components first and step back occasionally to evaluate the overall composition.
Another common mistake is using too many different decorative elements. Flowers, pearls, beads, ribbons, crystals, and other accents can all be attractive individually, but combining too many can make the finished piece look crowded.
Finally, do not overlook the fit. A crown should sit securely without causing discomfort. If it slides around, consider adding a discreet stabilizing feature or adjusting the base before continuing with additional decorations.
A polished DIY crown does not have to be complicated. A simple floral base paired with one carefully chosen decorative detail can look more intentional than a design overloaded with embellishments.
How to Make Your Crown Look More Professional
Consistency is one of the easiest ways to improve the appearance of a handmade accessory. Keep the floral arrangement visually connected by repeating similar colors and textures throughout the crown.
Pay attention to transitions between sections. If one part of the crown has very dense flowers and another suddenly becomes empty, the design can feel unfinished. Small filler flowers or subtle decorative details can help bridge these areas.
Clean finishing also makes a significant difference. Trim excess wire, hide attachment points, and check that each hanging strand is securely connected. These small details may not be obvious individually, but together they can make the final crown look much more refined.
At a Glance
Quick Points
- Start with a comfortable, flexible crown base.
- Arrange flowers before permanently attaching them.
- Use lightweight pearls or beads for cascading details.
- Coordinate colors for a cohesive handmade look.
- Always check comfort, balance, and secure attachments before wearing.
Conclusion
Making a DIY crown is a creative way to turn simple craft materials into a memorable accessory. A floral band provides an eye-catching foundation, while pearls, beads, ribbons, and cascading strands can add texture and movement. The result can be as subtle or dramatic as you want, making this project easy to adapt to different outfits, occasions, and personal styles.
The flower-inspired design featured here shows how effective a focused color palette and a few thoughtful details can be. You do not need advanced crafting skills to create something beautiful. Start with a comfortable base, arrange your flowers carefully, add lightweight embellishments, and take time to refine the final fit.
Most importantly, have fun experimenting. Try different flower colors, change the length of the decorative strands, mix textures, or create a completely different version for your next event. Once you have the basic technique down, you can use it as a starting point for countless handmade crown ideas.
Whether you are looking for a DIY flower crown, a creative hair accessory, a festival-inspired piece, or an easy handmade project, this approach offers plenty of possibilities. Gather your favorite materials, create a design that reflects your personality, and enjoy wearing something you made with your own hands.