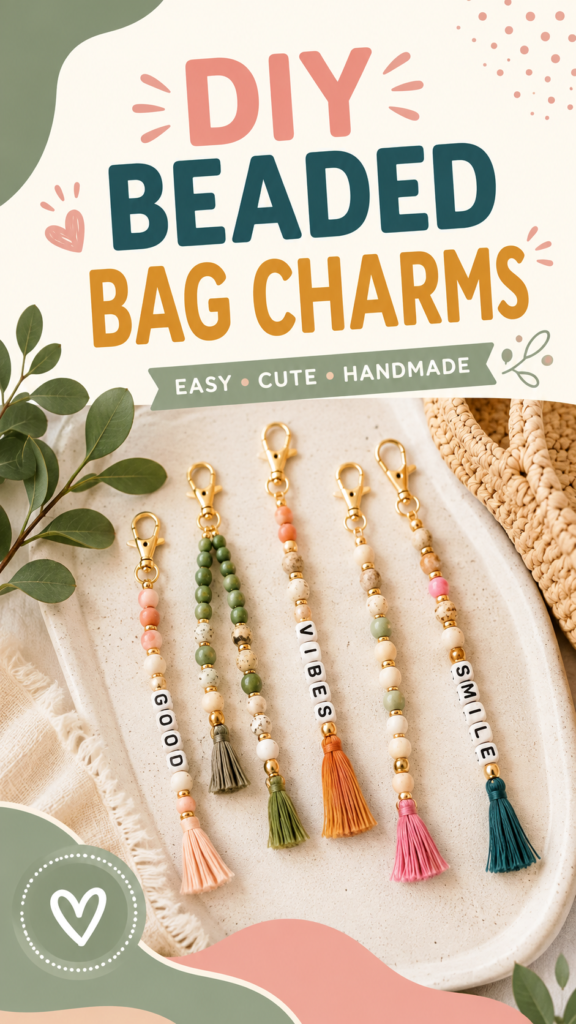
Looking for a simple way to give your favorite handbag, tote, or backpack a little more personality? A bag charms DIY project is an easy and creative place to start. With colorful beads, gold-toned clasps, small spacer beads, and soft tassels, you can create charming accessories that feel personal, playful, and completely handmade. The combinations are almost endless, making this a fun craft for beginners as well as experienced jewelry makers.
Key Takeaways
- Beaded bag charms are beginner-friendly and highly customizable.
- Mix colorful beads with neutral tones for a balanced handmade look.
- Letter beads can turn a simple charm into a personalized accessory.
- Tassels add movement, texture, and a polished finishing detail.
- Gold-toned clasps make charms easy to attach and remove from bags.
- Small bead combinations can make thoughtful handmade gifts.
Why DIY Bag Charms Are So Fun to Make
Bag charms are one of those small accessories that can completely change the feel of an everyday bag. A plain tote can look more cheerful with a pastel beaded charm, while a neutral handbag can become more interesting with earthy green, cream, and natural-colored beads. The charm does not need to be complicated to make an impression.
The appeal of a DIY bag charm is the freedom to choose every detail. You can decide whether your finished piece feels colorful and playful, soft and feminine, natural and earthy, or minimalist and modern. Changing just a few beads can create an entirely different result.
They are also practical little projects when you want to make something creative without committing to a large craft. A charm can be designed in a relatively small workspace, and the finished accessory is useful rather than simply decorative.
Important: The secret to a beautiful beaded bag charm is balance. Combine different bead sizes and colors, but give the eye a few repeating elements, such as the same spacer beads, a consistent hardware finish, or a repeated color.
Materials for a Beaded Bag Charm
You do not need an enormous collection of supplies to begin. The charm designs shown in this style of project rely on a small selection of simple components that work well together.
- Beads: Choose a mixture of round beads, decorative beads, neutral beads, or colorful accent beads.
- Letter beads: These are perfect for adding short words, initials, or playful messages.
- Gold-toned clasp: A lobster-style or swivel clasp makes the finished charm easy to attach to a bag.
- Beading cord or strong string: Use a suitable cord that can pass through your chosen beads.
- Spacer beads: Small metallic or plain beads help separate larger beads and create visual rhythm.
- Tassel: A ready-made tassel or handmade thread tassel gives the charm a soft, decorative finish.
- Jewelry-making tools: Depending on the construction method, small pliers and scissors can make assembly easier.
Choosing the Right Beads
Start by thinking about the overall mood you want. Earthy greens, creams, browns, and speckled beads create a relaxed handmade aesthetic. Pink, peach, and warm orange tones feel cheerful and playful. You can also combine a neutral base with one or two brighter colors to keep the finished design from looking too busy.
Different textures make a particularly attractive combination. Smooth beads can be paired with speckled or irregular-looking beads, while metallic spacers add a subtle shine. Letter beads provide another visual layer and can become the focal point of the charm.
Picking a Color Palette
A simple palette of three to five related colors is usually enough. For example, sage green, cream, soft pink, and gold create a calm yet cheerful combination. If you prefer a bolder result, use a neutral base and add coral, orange, turquoise, or another favorite accent.
Before stringing anything, place your beads on a flat surface and experiment with the order. This makes it much easier to see whether the colors are balanced before you commit to the final arrangement.
How to Make Bag Charms DIY Style
The basic process is straightforward. The most enjoyable part is experimenting with different bead arrangements until you find a combination that feels right.
1. Plan Your Design
Begin by deciding how long you want your bag charm to be. Lay the clasp, beads, spacer pieces, and tassel on your work surface. Arrange everything in the order you think you want to use it.
Try several variations before cutting your cord. You might prefer larger beads toward the center, smaller beads near the clasp, or a symmetrical arrangement. Another option is to create a deliberately varied design with different bead shapes and colors.
2. Attach the Beading Cord
Secure your cord to the clasp using a method appropriate for the type of cord you have chosen. The connection should be neat and strong because the charm will move around whenever the bag is carried.
Leave enough working length for your beads and finishing method. It is better to have a little extra cord to work with than to discover halfway through the project that you need more length.
3. Start Adding the Beads
String your beads one at a time according to your planned pattern. If you are using letter beads, decide whether they should sit in the middle of the design or closer to the bottom.
For a more polished appearance, repeat certain elements throughout the charm. For instance, you could place a small metallic spacer between larger beads or repeat one neutral bead color at regular intervals.
4. Add a Personal Message
Letter beads are an easy way to make a handmade charm feel more personal. Short words such as “GOOD,” “VIBES,” or “SMILE” can add a cheerful touch, while initials can create a more understated design.
When using letter beads, keep the surrounding colors relatively simple so the message remains easy to notice. A neutral bead next to a white letter bead can provide enough contrast without overwhelming the design.
Why This Matters
A handmade charm looks more intentional when its decorative details have a clear visual relationship.
- Repeat one or two colors to connect the design.
- Use metallic spacers sparingly for small points of shine.
- Let the tassel complement the bead colors rather than compete with them.
5. Finish the Bottom of the Charm
Once the bead arrangement is complete, secure the end carefully according to your chosen construction method. Trim excess cord neatly after making sure the connection is secure.
This is also the stage where you can add a tassel. Tassels work particularly well with beaded bag charms because they create a contrast between the structured beads and soft flowing fibers.
6. Check the Finished Charm
Give the completed charm a gentle inspection before attaching it to your bag. Check that the clasp opens and closes properly, the beads are secure, and the finishing points do not have loose ends that could catch on fabric.
Once everything looks secure, clip your new charm onto a handbag, tote, backpack, or other suitable bag and enjoy the handmade detail.
Creative Beaded Bag Charm Ideas
One of the best things about this craft is how easily the basic technique can be adapted. You can make several charms using the same supplies while giving each one a completely different personality.
Soft Pastel Charm
Combine pale pink, peach, cream, and white beads with a blush-colored tassel. This approach creates a gentle accessory that works beautifully with neutral handbags and light-colored totes.
Earthy Green Charm
For a natural-inspired look, build your design around sage and deeper green beads, then add cream and speckled accents. A green or neutral tassel completes the relaxed handmade feel.
Personalized Letter Charm
Make the lettering the star of the project. Choose a short word or initials and surround the letters with simple beads. This is especially useful when creating a small handmade gift for someone because the design can be tailored to their personality.
Mixed-Bead Charm
Do not be afraid to combine several bead styles. A mixture of smooth rounds, speckled beads, metallic spacers, and colorful accents can create the layered look that makes handmade accessories so appealing.
Pro Tip: If your bead collection feels overwhelming, choose one “hero” bead first. Build the rest of the charm around its color, texture, or shape. This simple approach makes it much easier to create a coordinated design.
How to Make Your Charm Look More Polished
A handmade project does not have to look complicated to look professional. In fact, a clean arrangement and consistent finishing can make a simple design feel especially refined.
- Repeat colors: Bring the same shade into multiple parts of the charm instead of using every color only once.
- Create spacing: Small spacer beads can keep larger beads from visually blending together.
- Balance proportions: If you use a large tassel, consider a slightly simpler bead arrangement.
- Keep hardware consistent: Gold-toned findings create a cohesive appearance when paired with other warm metallic details.
- Inspect the finish: A secure clasp and tidy ends make the finished accessory feel more complete.
Ways to Use Your DIY Bag Charms
These handmade accessories are not limited to one type of bag. Clip a beaded charm onto a woven tote for a relaxed summer-inspired look, add one to a backpack for a playful detail, or attach one to a simple handbag when you want a quick style update.
You can also create a small collection and switch charms depending on your outfit or mood. A pastel charm can complement a soft everyday look, while a colorful design can brighten a simple neutral bag.
Because the projects are small, they are also a fun way to use leftover beads from other jewelry or craft projects. Instead of leaving individual beads in a supply box, turn them into a useful accessory.
DIY Bag Charms Make Thoughtful Handmade Gifts
A personalized bag charm can be a lovely small gift because it is both decorative and practical. Choose colors that match the recipient’s style, add their initial, or create a short word that reflects their personality.
For a coordinated gift, make several charms using different color combinations. Friends can each have their own variation while the overall collection still feels connected.
Packaging can be kept simple too. A small paper card, a neat pouch, or a ribbon-tied presentation can make a handmade charm feel ready for gifting without requiring elaborate materials.
Simple Tips for Beginner Crafters
If this is your first time making a beaded accessory, focus on enjoying the process rather than trying to create a perfect design immediately. Start with a small number of beads and a straightforward pattern.
- Lay out your design before stringing the beads.
- Take a quick photo of your arrangement if you want to remember the pattern.
- Keep extra beads nearby so you can experiment with alternatives.
- Do not overcrowd the charm with too many decorative elements.
- Double-check the clasp and finished connections before regular use.
At a Glance
- Style: Colorful, handmade, personalized
- Main supplies: Beads, cord, clasp, spacers, and tassels
- Best feature: Easy to customize with colors and letter beads
- Great for: Handbags, totes, backpacks, gifts, and craft projects
- Design tip: Keep your palette coordinated for a polished finish
Final Thoughts on Bag Charms DIY
Making your own bag charms DIY accessories is a simple way to turn basic craft supplies into something useful, colorful, and personal. The combination of beads, letter details, gold-toned hardware, and tassels gives you plenty of room to experiment while keeping the project approachable.
Start with a color palette you love, arrange your beads before stringing them, and let one or two details become the focus of the design. Whether you prefer soft pastels, earthy greens, cheerful colors, or personalized lettering, there is no single right way to create a handmade bag charm.
The best part is that every charm can tell a slightly different story. Make one for your everyday tote, another for a favorite handbag, and another as a thoughtful handmade gift. Once you have tried one design, you may find yourself looking at every leftover bead as the beginning of your next creative project.
Tags
Bag Charms DIY Beaded Bag Charms DIY Accessories Bead Crafts Handmade Accessories Tassel Charms Personalized Bag Charms