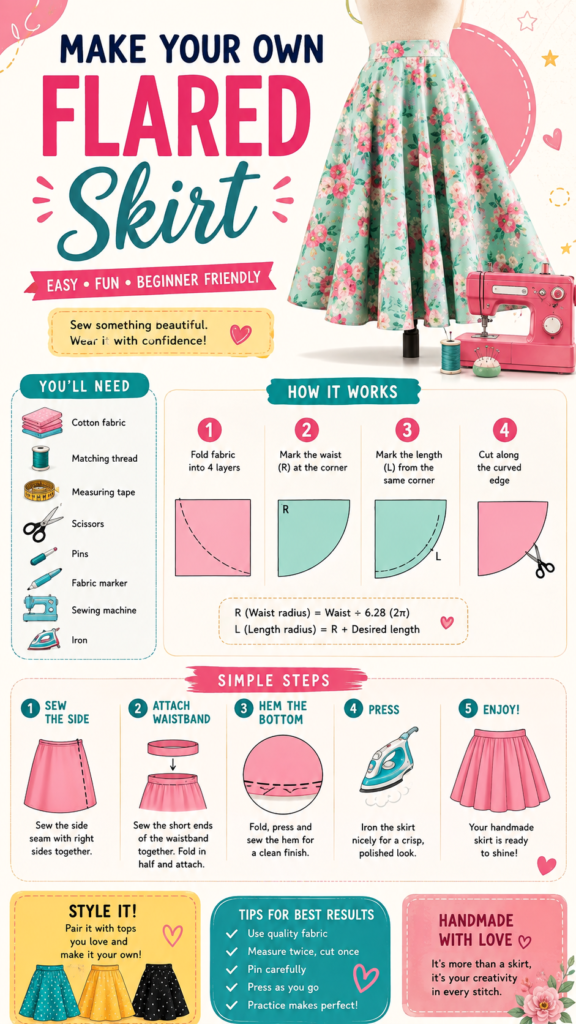
Making your own skirt can be much easier than it looks. With a few basic sewing supplies, some fabric, and accurate measurements, you can create a comfortable flared skirt that feels completely personal. A DIY skirt is also a wonderful way to practice essential sewing skills while turning fabric into something practical and stylish.
The flared skirt featured in this tutorial uses a simple circular construction method that creates a soft, flowing shape. The process focuses on measuring the waist, calculating the cutting radius, shaping the fabric, attaching a waistband, finishing the hem, and pressing the finished garment. It is a beginner-friendly sewing project that can be adapted with different fabrics, colors, prints, and lengths.
Key Takeaways
- A flared skirt is a practical project for learning basic sewing techniques.
- Accurate waist and length measurements are essential for a comfortable fit.
- The circular cutting method helps create a naturally flowing flare.
- Light to medium weight fabric works well for a soft, wearable shape.
- Pressing seams and hems carefully can make a handmade skirt look polished.
- The finished design can be customized with different lengths, prints, and colors.
Why Make a DIY Flared Skirt?
A handmade skirt offers more flexibility than buying a ready-made garment. You can choose the fabric, decide how long the skirt should be, and adjust the overall look to match your wardrobe. A simple flared silhouette can be dressed up or down, making it useful for everyday outfits as well as more polished occasions.
For beginners, a DIY skirt is especially useful because it introduces several core sewing skills in one project. You can practice using a measuring tape, marking fabric, cutting accurately, sewing a straight seam, attaching a waistband, creating a hem, and using an iron to improve the final finish.
Important: The most successful handmade skirts usually begin with careful measuring rather than rushing into cutting. Take your waist measurement, double-check the desired length, and allow room for the waistband and hem before making your first cut.
Materials You Will Need
The project can be completed with a straightforward collection of sewing supplies. Having everything nearby before you begin makes the process smoother and reduces interruptions once the fabric is on the cutting table.
- Cotton or another suitable lightweight to medium weight fabric
- Matching sewing thread
- Measuring tape
- Sharp fabric scissors
- Sewing pins
- Chalk or a washable fabric marker
- Sewing machine
- Iron and ironing surface
The fabric is one of the most important choices. A fabric with enough movement will help the skirt fall naturally and show off the flare. Cotton is a convenient option for a beginner project because it is easy to handle and comes in many colors and prints.
Prepare Your Fabric First
If your fabric requires pre-washing, do that before cutting. Fabric can change slightly after washing, and preparing it beforehand helps reduce the chance of an unexpected fit change later. Once washed, dry and press the fabric so it is smooth and ready for measuring.
Take Accurate Skirt Measurements
Good measurements are the foundation of a comfortable DIY skirt. Start with your natural waist measurement by wrapping the measuring tape around your waist without pulling it excessively tight. Record the measurement clearly before moving on to the skirt length.
For the length, measure from the waistline down to the point where you want the skirt to finish. The reference design uses a longer, feminine silhouette, but you can create a mini, midi, or maxi version depending on your preference.
Remember to account for seam and waistband allowances as you plan your measurements. A small amount of extra fabric can be trimmed, but fabric removed too early cannot easily be added back.
Understanding the Waist Radius
The circular method shown in this project uses a waist radius to determine where the waist opening should be marked. The illustrated formula is based on dividing the waist measurement by approximately 6.28, which corresponds to 2π.
Waist radius = Waist measurement ÷ 6.28
Once you have the waist radius, add the desired finished skirt length to determine the larger cutting radius.
Length radius = Waist radius + Desired skirt length
This approach makes it possible to create a continuous curved shape that produces the characteristic flare of the skirt.
Quick Note
- Measure your waist carefully before calculating the radius.
- Check your desired finished length before cutting.
- Use chalk or a washable marker for visible but removable guidelines.
How to Cut the Flared Skirt
The cutting process is where the simple geometry of the design becomes a wearable garment. The illustrated method begins by folding the fabric into layers. This allows the curved shape to be marked from a corner and helps create a symmetrical skirt when the fabric is opened.
Step 1: Fold the Fabric
Fold the fabric neatly so the layers are aligned. Smooth out wrinkles and make sure the edges are positioned accurately. Uneven folds can affect the final shape, so take a moment to check the fabric before marking anything.
Step 2: Mark the Waist Radius
From the appropriate corner, measure the calculated waist radius and mark a curved line. Use several small marks along the curve instead of trying to draw a perfect arc in one movement. Connecting those marks can make the curve easier to control.
Step 3: Mark the Skirt Length
From the same corner, measure outward using the length radius. Continue marking points around the fabric so that the finished curve maintains a consistent distance from the waist opening.
Step 4: Cut Along the Curves
Use sharp fabric scissors to cut carefully along the marked curves. Keep the scissors steady and avoid making large, uneven snips. Once the cutting is complete, open the fabric and inspect the overall shape before beginning the sewing process.
Pro Tip: Before cutting your final fabric, test the measurements on inexpensive practice fabric if you are unfamiliar with circular skirt construction. A quick test can help you understand how the radius affects the waist opening and finished length.
Sew the Skirt Step by Step
Once your fabric is cut, the project moves quickly. The main construction involves joining the skirt seam, attaching the waistband, finishing the hem, and pressing the garment. Taking your time at each stage will make the final skirt cleaner and more comfortable.
1. Sew the Side Seam
Place the skirt pieces with their right sides together and align the edges. Pin the seam carefully before sewing. Stitch along the seam using an appropriate seam allowance, then finish the raw edge according to your preferred sewing method.
Do not rush this first seam. Keeping the layers aligned helps prevent the skirt from twisting and gives you a cleaner foundation for the waistband.
2. Attach the Waistband
Prepare the waistband strip and join its short ends to create a loop. Fold the waistband as needed and position it around the skirt waist, matching the edges. Pin it evenly before sewing so the fabric does not bunch unexpectedly.
After attaching the waistband, check the inside and outside of the garment. A neat waistband should sit comfortably and create a clean transition between the waist and the flowing skirt.
3. Finish the Bottom Hem
The curved hem is one of the most visible parts of a flared skirt. Fold the lower edge inward, press the fold, and stitch it securely. The illustrated method emphasizes folding and pressing before sewing, which helps create a more controlled finish.
Work gradually around the curve. If the fabric starts to feel difficult to manage, stop and press the section before continuing. Small, careful adjustments are easier to handle than trying to force the entire hem through the sewing machine at once.
4. Press the Finished Skirt
Pressing is not simply a final decorative step. It helps seams lie flat, improves the shape of the waistband, and gives the hem a crisp appearance. Follow the care requirements of your fabric and use an appropriate temperature.
5. Enjoy Your Handmade Skirt
After the final stitches and pressing, try on the skirt and check the overall fit. Look at the waist, hem length, and movement of the fabric. This is also a good time to notice anything you would change in your next DIY sewing project.
How to Customize Your DIY Skirt
One of the best things about making your own skirt is the ability to change the style without completely changing the construction. The same basic concept can become several different wardrobe pieces.
- Choose a new length: Try a shorter everyday skirt, a classic midi, or a longer flowing version.
- Experiment with prints: Floral, geometric, striped, or solid fabrics can create completely different moods.
- Change the color: Bright colors can make the skirt playful, while neutral shades create an easy-to-style staple.
- Add layers: Different fabric weights and finishes can create more or less movement.
- Coordinate the waistband: Use matching fabric for a seamless appearance or a contrasting fabric for extra visual interest.
Why This Matters
A simple sewing pattern can become many different garments when you change the fabric, length, and styling. This makes a DIY skirt a useful foundation project for building confidence and developing your own sewing style.
Tips for Better Sewing Results
Precision does not mean everything has to be perfect on the first attempt. It means giving important steps enough attention to make the project easier later. Measuring twice before cutting is one of the simplest habits that can save fabric and frustration.
Keep your fabric flat when marking curves and make sure your scissors are sharp. Dull scissors can pull the fabric and create jagged edges, particularly around large curved sections.
Pinning can also make a major difference. Use enough pins to keep layers stable without overcrowding the sewing area. Remove pins as you approach the needle and follow safe sewing practices around your machine.
Pressing throughout the process is another valuable habit. Press seams after sewing, prepare folds before stitching, and use the iron to encourage the fabric to settle into its intended shape.
Important: If your first skirt is not perfect, treat it as useful practice. Sewing improves through repetition, and each project teaches you more about fabric behavior, measurements, seam control, and finishing techniques.
Styling Ideas for a Handmade Flared Skirt
A flared skirt is easy to style because its silhouette works with many different tops and shoes. For a casual outfit, pair it with a simple fitted or tucked-in top. A cardigan or lightweight layer can add dimension without overwhelming the shape of the skirt.
For a more polished look, choose a clean blouse and understated accessories. A midi-length skirt can also work well with flats, sandals, or other comfortable footwear depending on the occasion.
If the skirt uses a bold floral or colorful print, keep the rest of the outfit relatively simple. A solid top can let the handmade fabric become the focal point. With a neutral skirt, you can experiment more freely with colorful tops and accessories.
Common DIY Skirt Mistakes to Avoid
Cutting Before Checking Measurements
The most difficult mistake to correct is cutting before confirming the waist and length calculations. Always check your numbers and markings before making permanent cuts.
Ignoring Fabric Direction
Some fabrics have a noticeable print direction, nap, or pattern placement. Consider how the design will look once the skirt is opened and worn. This is especially important with directional prints.
Skipping the Pressing Stage
It can be tempting to finish the stitching and immediately try on the skirt, but pressing can significantly improve the appearance. Neat seams and a carefully pressed hem help a handmade garment look more refined.
Trying to Sew Too Quickly
Speed is rarely the goal in a beginner sewing project. Slow down around curves, check alignment regularly, and make small adjustments when necessary. A few extra minutes can make the final result much more satisfying.
At a Glance
- Measure the waist and desired skirt length.
- Calculate the waist and length radii.
- Fold, mark, and cut the fabric carefully.
- Sew the seam, attach the waistband, and finish the hem.
- Press the completed skirt and personalize the styling.
Conclusion
A DIY flared skirt is a rewarding sewing project because it combines practical techniques with plenty of room for creativity. Once you understand the basic measurements and cutting method, you can experiment with different lengths, fabrics, colors, and prints to create skirts that feel uniquely yours.
The process also gives beginners an approachable introduction to garment sewing. Measuring, cutting, joining seams, attaching a waistband, hemming, and pressing are all useful skills that can carry over into future clothing projects.
Start with fabric you enjoy, work carefully through each stage, and give yourself permission to learn as you go. Your first handmade skirt does not need to be flawless to be worthwhile. With every stitch, you are building confidence and creating something you can actually wear.
Tags
DIY Skirt Sewing for Beginners Flared Skirt DIY Fashion Sewing Projects Handmade Clothing Skirt Sewing Tutorial Easy Sewing Ideas