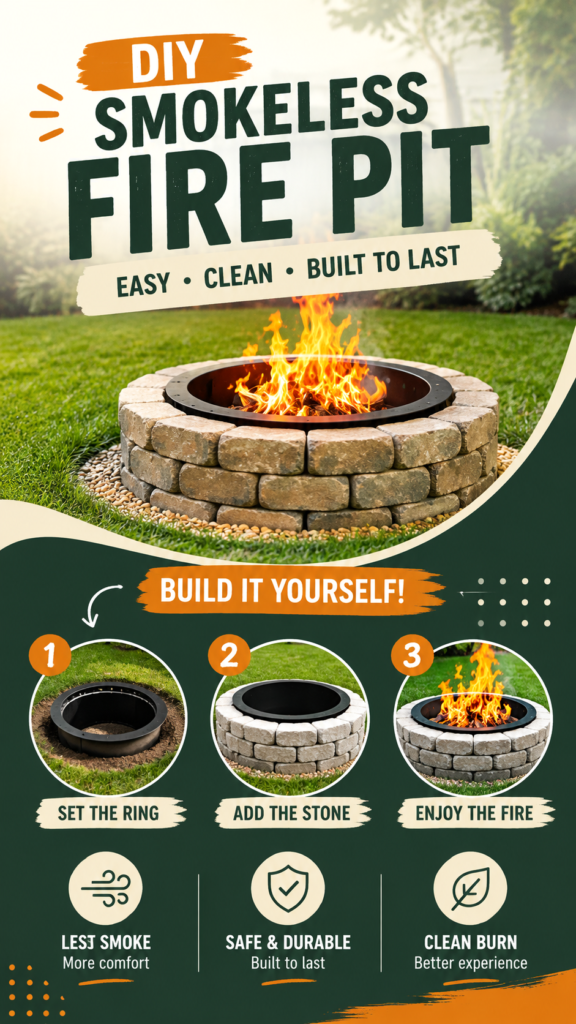
A DIY fire pit can turn an ordinary backyard into a welcoming place for relaxing evenings, casual gatherings, and outdoor entertaining. The design shown here combines a circular stone surround with a metal fire pit insert, creating a practical centerpiece while keeping the overall look simple and natural. It is the kind of backyard project that can make a noticeable visual difference without requiring an elaborate landscape redesign.
Key Takeaways
- A circular fire pit creates a natural focal point for a backyard seating area.
- A metal insert can provide a defined space for the fire within the stone surround.
- Level preparation and careful placement are essential for a stable DIY fire pit.
- Use materials specifically intended for high-heat outdoor applications.
- Always check local fire regulations before building or using a backyard fire pit.
Why a DIY Fire Pit Is a Great Backyard Upgrade
Outdoor spaces often need one strong feature to bring everything together. A well-designed DIY fire pit can provide exactly that. Instead of leaving an open section of lawn unused, you can create a dedicated gathering area where people naturally sit, talk, and enjoy the outdoors.
The circular layout is especially appealing because it feels social and balanced. There are no obvious corners or front-facing sides, so the fire becomes the center of attention. Stone surrounding the fire also adds texture and a rustic character that works well with grass, gravel, timber, and other natural landscaping materials.
Important: A fire pit should be treated as a serious outdoor fire feature, not simply as a decorative project. Choose an appropriate location, use suitable heat-resistant materials, maintain safe clearances, and follow local regulations before lighting a fire.
Understanding the Smokeless Fire Pit Concept
The design inspiration features a metal inner ring surrounded by stacked masonry. The inner metal component defines the combustion area, while the surrounding stone creates the finished exterior. The result is a cleaner-looking installation than a simple open fire placed directly on the ground.
A smokeless fire pit is generally designed around improved airflow. The goal is to provide oxygen to the fire and encourage more complete combustion, which can reduce visible smoke under suitable conditions. Actual performance depends on the design, airflow, fuel, weather, and how the fire is operated.
For a DIY project, it is useful to think of the fire pit as two connected parts: the functional fire area and the decorative outer surround. Keeping these roles clear makes planning much easier.
Planning Your DIY Fire Pit
Good planning can make the difference between a fire pit that looks professionally finished and one that feels improvised. Before moving any materials, decide where the fire pit will sit, how large the finished circle should be, and how people will use the space around it.
Choose the Right Location
Look for a stable outdoor area with enough room around the fire feature. Avoid positioning it beneath low branches, near structures, or in a location where sparks and heat could create an obvious hazard. Consider wind direction as well, especially if the goal is to create a more comfortable low-smoke experience.
The image uses an open lawn setting, which gives the fire pit plenty of visual space. A similar approach can work when you want the fire pit to become the centerpiece of a backyard rather than placing it in a cramped corner.
Think About the Finished Size
Measure the intended area before purchasing materials. The size of the metal insert will influence the diameter of the stone surround, while the height of the masonry will affect the overall appearance and how easily people can see the fire.
Creating a simple layout with stakes and string can help visualize the circle before construction begins. This is also a useful opportunity to make sure the fire pit will leave sufficient space for chairs and movement.
Materials for a Stone Fire Pit
The reference design uses a combination of a metal fire pit insert and masonry blocks or stones. This combination is attractive because it separates the high-heat fire area from the decorative outer wall.
Metal Fire Pit Insert
The insert forms the central bowl or ring where the fire burns. For a project like this, select a component specifically designed for fire pit use and suitable for outdoor temperatures. Its dimensions should be compatible with the intended stone surround.
Fire-Appropriate Stone or Blocks
The outer ring gives the project its finished appearance. Natural-looking retaining wall blocks or purpose-made fire pit blocks can create a similar stacked effect. The important consideration is that the selected materials are appropriate for the temperatures and construction method involved.
Base Materials
A properly prepared base helps keep the structure stable. Depending on the design and local conditions, this may involve compacted gravel or another suitable noncombustible base. The exact foundation should match the materials, ground conditions, and construction requirements of the chosen fire pit system.
Expert Insight
The most important part of a DIY fire pit is not the decorative stonework. It is creating a stable, suitable, and safely located fire area first. Once the functional foundation is right, the outer design can be tailored to your backyard style.
How to Build a DIY Fire Pit
The visual sequence suggests a straightforward construction concept: establish the circular opening, position the metal ring, build the stone surround, and finish the area around the pit. While the exact installation method will vary depending on the materials selected, the following process provides a useful planning framework.
1. Mark the Circular Area
Start by marking the location of the fire pit. A stake, string, and measuring tape can help create an even circle. Mark both the inner opening and the approximate outer diameter so you know where the stonework will sit.
Take your time during this stage. A slightly uneven circle can become much more noticeable once multiple courses of blocks are stacked.
2. Prepare a Stable Base
Remove unsuitable surface material where necessary and prepare a level, stable foundation. Compact the base carefully and check it from several directions. The goal is to create a surface that will support the fire pit components without rocking or shifting.
Drainage should also be considered. Water that collects beneath or around an outdoor fire pit can affect the surrounding area and may contribute to settling over time.
3. Position the Metal Insert
Place the fire pit insert according to its manufacturer’s installation guidance. Check that it is centered within the planned stone ring and that the surrounding construction will not interfere with its intended airflow or operation.
This is the point where you should verify the proportions. The image demonstrates how the dark metal insert creates a strong contrast against the lighter stone, giving the finished fire pit a clean and intentional appearance.
4. Build the Stone Surround
Begin placing the selected blocks around the insert. Keep the first course as level as possible because every additional course depends on the stability of the one below it.
Staggering joints between courses can create a stronger and more attractive wall. Step back regularly to check the circle from different angles rather than focusing on only one section at a time.
5. Finish the Surrounding Area
Once the structure is complete, clean away loose material and tidy the surrounding landscape. A narrow band of decorative gravel around the outside can create a finished transition between the stone fire pit and the lawn.
Keep combustible materials, loose debris, dry vegetation, and outdoor furnishings positioned appropriately away from the fire area. The final arrangement should be attractive while still leaving enough room for safe access and maintenance.
How to Make a Backyard Fire Pit Look More Stylish
A fire pit does not have to look purely functional. The circular stone design shown here has a natural landscaping quality that can easily become part of a broader backyard theme.
Create a Simple Seating Zone
Arrange outdoor chairs around the fire pit while leaving comfortable circulation space. Matching or coordinated seating can make the area feel like a deliberate outdoor room rather than an isolated fire feature.
Use Natural Textures
Stone, gravel, grass, timber, and neutral outdoor fabrics complement one another beautifully. The lighter masonry in the design provides contrast against the green lawn while the dark insert gives the center of the fire pit visual definition.
Keep the Design Uncluttered
You do not need many decorations to make a DIY fire pit attractive. The structure itself can serve as the focal point. A few comfortable chairs, simple outdoor lighting placed at an appropriate distance, and thoughtful landscaping can be enough to complete the space.
Common DIY Fire Pit Mistakes to Avoid
Even a simple-looking project deserves careful preparation. Avoiding common mistakes can improve both the appearance and long-term usability of the finished fire pit.
- Building on an unstable surface: A poor base can cause the stone surround to shift or settle unevenly.
- Using unsuitable materials: Not every decorative stone, block, adhesive, or metal component is intended for high-heat applications.
- Ignoring drainage: Water accumulation can create problems around an outdoor masonry structure.
- Placing the fire pit too close to hazards: Nearby structures, vegetation, fences, and other combustible materials require careful consideration.
- Making the opening too small: The fire area needs to work with the chosen insert and provide appropriate airflow.
- Skipping local regulations: Fire restrictions and setback requirements can vary by location, so check before construction and use.
Tips for a Better Smokeless Fire Experience
A smokeless design can help reduce visible smoke, but it does not mean a fire will literally produce no smoke under every circumstance. Fuel quality, moisture, airflow, wind, and how the fire is started can all influence the result.
Use dry, appropriate firewood and avoid burning materials that are not intended for outdoor fires. Give the fire enough airflow and avoid overloading the burning area. When conditions are windy or unusually dry, postpone using the fire pit until it is safe to do so.
Pro Tip: The cleanest-burning fire pit experience usually starts with the basics: dry suitable fuel, adequate airflow, a properly designed fire area, and responsible fire management. A beautiful stone surround cannot compensate for poor operating conditions.
Maintaining Your DIY Fire Pit
Once your fire pit is built, regular maintenance will help keep the area looking attractive. Remove ash only after the fire and remaining embers have completely cooled, and follow the maintenance instructions for the insert you selected.
Inspect the stone surround periodically for movement, cracks, or signs of settling. If the ground changes over time, individual blocks may need to be repositioned or the base may need attention.
Keep the surrounding lawn, gravel, and seating area free from dry leaves and other combustible debris. Before each use, check the overall area and confirm that weather conditions are appropriate for an outdoor fire.
Ideas for Using Your New Backyard Fire Pit
Once finished, a DIY fire pit can become much more than a landscaping feature. It can define a comfortable outdoor gathering zone and make your backyard feel useful well beyond daylight hours.
- Create a relaxed evening seating area for conversation.
- Use the fire pit as the centerpiece of an outdoor entertaining space.
- Pair the stone design with simple landscaping for a rustic backyard aesthetic.
- Arrange comfortable seating around the circle for a welcoming social layout.
- Keep the surrounding decor simple so the fire remains the visual focal point.
The beauty of this approach is its versatility. The same basic circular structure can suit a rustic garden, a modern backyard, or a casual outdoor entertaining area simply by changing the surrounding materials, seating, and landscaping.
Why This Matters
- The best fire pit designs balance appearance with safe functionality.
- A carefully leveled foundation helps create a more polished finished structure.
- Thoughtful spacing turns the fire pit into a practical outdoor living area.
Safety Checklist Before Lighting a Fire
Before enjoying your completed DIY fire pit, take a final safety check. Confirm that the installation complies with local requirements and that the selected components are appropriate for fire pit use.
- Check local fire regulations and any applicable restrictions.
- Confirm that the fire pit is positioned in a suitable outdoor location.
- Remove dry vegetation, leaves, and unnecessary combustible items nearby.
- Keep appropriate extinguishing equipment readily accessible.
- Use only suitable, properly seasoned firewood or fuel recommended for the fire pit.
- Never leave an active fire unattended.
- Allow the fire and ashes to cool completely before cleanup.
Responsible placement and operation should always take priority over aesthetics. If local rules, weather, or site conditions make a fire unsafe, wait for better conditions or choose a different location or design.
At a Glance
- Plan the location and dimensions before building.
- Use a stable, level, suitable base.
- Pair a purpose-made metal insert with appropriate masonry.
- Build the stone surround carefully and evenly.
- Prioritize safe clearances, airflow, fuel, and local fire rules.
Final Thoughts on Building a DIY Fire Pit
A DIY fire pit can completely change the character of a backyard by creating a defined destination for outdoor relaxation. The circular stone design is particularly effective because it combines natural textures with a strong central focal point. A dark metal insert provides the functional core, while the masonry surround gives the installation a finished landscaping appearance.
The most successful project starts with careful planning rather than rushing into construction. Choose the location thoughtfully, prepare a stable base, select materials suitable for their intended use, and follow the installation guidance for the fire pit components. From there, simple landscaping and comfortable seating can transform the finished structure into an inviting outdoor living space.
Whether you want a rustic gathering spot or a clean centerpiece for a modern backyard, this DIY fire pit concept offers plenty of inspiration. Focus on solid construction, responsible fire practices, and a design that complements your existing outdoor space. With those priorities in place, a simple circular fire pit can become one of the most enjoyable features in your backyard.