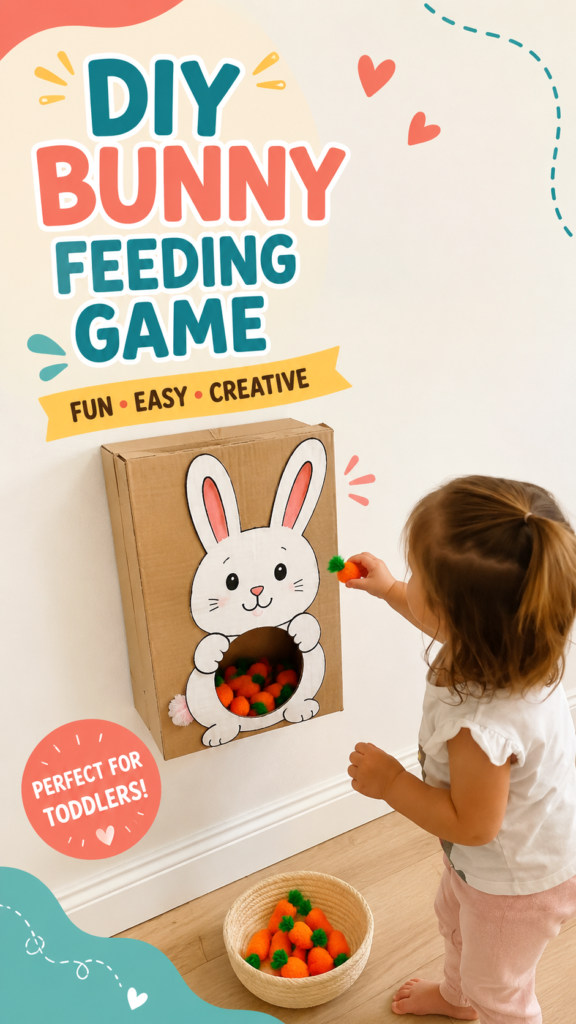
Some of the best DIY toys are made from the simplest materials, and this playful bunny feeding game is a perfect example. With a cardboard box, a cheerful handmade bunny, and a collection of colorful pretend carrots, a basic craft project becomes an interactive activity that encourages movement, imagination, and hands-on learning. It is the kind of homemade toy that feels exciting because children can actively participate instead of simply watching or playing with a finished object.
This easy DIY toy idea is especially appealing for toddlers and preschoolers because it combines crafting with a simple game. Children can pick up the soft carrots, carry them to the bunny, and place or toss them into the opening. The activity can be adapted for different ages and skill levels, making it a flexible choice for parents, caregivers, teachers, and anyone looking for creative kids’ activities at home.
Key Takeaways
- A cardboard bunny feeding game turns recycled materials into an engaging DIY toy.
- The activity supports hand-eye coordination and fine motor development.
- Children can practice color recognition, counting, and simple instructions while playing.
- The design can be customized with different animals, foods, themes, and difficulty levels.
- It is a budget-friendly activity for home play, preschool classrooms, or rainy days.
Why DIY Toys Are So Much Fun for Kids
Homemade toys have a special kind of charm. They do not need flashing lights, complicated instructions, or expensive materials to capture a child’s attention. Often, the most memorable activities are interactive and open-ended. A cardboard game can become a favorite afternoon activity simply because it gives children something physical to do.
The bunny feeding game works because it creates a clear and easy goal: collect the carrots and feed the bunny. That simple objective is enough to encourage repeated play, while the handmade design leaves plenty of room for imagination. A child might pretend the bunny is hungry, sort the carrots by color, count how many it eats, or create an entirely new story around the game.
Important insight: The strongest DIY toys often combine a simple action with an imaginative theme. When children can understand the activity quickly and then add their own ideas, the toy becomes more engaging and can be used in many different ways.
The Appeal of a DIY Bunny Feeding Game
A bunny feeding game is instantly recognizable and playful. The friendly animal character creates a warm visual focus, while the bright orange carrots add color and make the activity easy to understand. Children naturally connect the two objects: bunnies eat carrots, so feeding the bunny becomes a simple pretend-play challenge.
The cardboard box also serves an important purpose. It creates a sturdy vertical surface that can hold the animal design and provide an opening for the carrots. This transforms an ordinary recycled box into something that feels like a real game board.
A Simple Game With Multiple Learning Opportunities
One of the best things about this type of DIY toy is that play and learning can happen naturally at the same time. There is no need to turn the activity into a formal lesson. Small challenges can simply be added as the child plays.
- Count each carrot before feeding the bunny.
- Sort carrots by size or color if multiple varieties are used.
- Practice taking turns with siblings or friends.
- Place the bunny farther away to create a gentle tossing challenge.
- Ask children to follow simple instructions such as “feed the bunny three carrots.”
These small variations can help keep the game interesting without changing the main design. A toddler may enjoy simply placing the carrots inside the opening, while an older child may prefer a scoring game or a timed challenge.
Materials You Can Use for This Easy Homemade Toy
One reason cardboard crafts are so popular is that the main material is often already available at home. A medium or large cardboard box can become the base of the game, while simple craft supplies can bring the character to life.
Basic Supplies
- A sturdy cardboard box
- White paper, cardstock, or recycled packaging for the bunny shape
- Colored paper, markers, or paint
- Child-safe scissors and adhesive
- A craft knife for adult use when creating the opening
- Pom-poms, fabric pieces, felt, or soft handmade carrots
- A basket or bowl for storing the game pieces
The materials can be adjusted based on what is available. Felt can create soft carrots, colored paper can create lightweight pieces, and fabric scraps can add texture. The goal is not to make the project look perfect. A handmade appearance is part of what makes DIY toys feel personal and creative.
Choose Child-Friendly Pieces
When making a game for younger children, use pieces that are appropriate for their age and avoid very small loose parts that could create a safety concern. The carrots should be large enough to handle comfortably, and all cardboard edges should be checked and covered if necessary.
Adult supervision is also important when cutting the cardboard opening or preparing the base. Once the project is assembled, the activity itself can be simple enough for children to enjoy independently within an age-appropriate setting.
How to Create a Cardboard Feeding Game
The beauty of this project is that the construction process can stay simple. You do not need advanced crafting skills or special equipment. Start with a sturdy box and build the design around the opening where the pretend food will go.
1. Prepare the Cardboard Base
Select a box that can stand securely against a wall or on the floor. A rectangular box provides a large surface for the animal design and enough room behind it to collect the pieces that are dropped inside.
Make sure the box is clean and stable. If necessary, reinforce loose sections with tape. You can leave the natural cardboard visible for a rustic craft look or cover it with paper for a more colorful finish.
2. Create the Bunny Character
Draw or cut out a large bunny shape with long ears and a simple friendly face. The character does not need complicated details. Rounded shapes, soft colors, and a clear outline work especially well for a children’s game.
Attach the bunny to the front of the box so the body creates a visual frame around the opening. A large belly area can make the game concept especially clear, as if the bunny is collecting the carrots inside.
3. Add the Feeding Opening
The opening is the interactive center of the toy. Choose a location that fits naturally into the bunny design, such as the belly area. An adult can carefully cut a hole large enough for the carrots or other game pieces to pass through.
Test the opening before finishing the project. Pieces should fit easily without becoming stuck, but the hole should not be so large that the game loses its challenge.
4. Make the Pretend Carrots
Soft orange pom-poms with small green tops create a playful carrot-like appearance, but there are many alternatives. Felt carrots, rolled paper shapes, fabric scraps, or stuffed handmade pieces can all work well.
Creating the carrots can also become part of the craft activity. Older children may enjoy helping to decorate them, while younger children can choose colors or place finished pieces into a basket.
Why This Matters
A DIY game becomes more valuable when children can interact with it in different ways. Instead of creating a craft that is only displayed, this project encourages movement, repetition, imagination, and problem-solving through active play.
Ways to Make the Game More Challenging
Once the basic bunny feeding game is complete, it can easily be adapted. This flexibility is one of the reasons DIY toys can remain useful long after the initial craft session.
Turn It Into a Tossing Game
Move the basket of carrots a short distance away from the bunny and invite children to toss the pieces toward the opening. Start close to the target and gradually increase the distance as coordination improves.
This variation adds gross motor movement and makes the activity feel more energetic. For younger children, placing the pieces directly into the opening may be easier and more enjoyable.
Add Counting and Number Practice
Write numbers on the carrots or create number cards that tell children how many pieces to feed the bunny. For example, a child who picks the number four must place four carrots into the opening.
You can also ask simple questions during play. How many carrots are left in the basket? How many has the bunny eaten? Can you feed the bunny two more?
Try Color Matching
The concept does not have to stay limited to orange carrots. Create colorful pretend foods and ask children to match them with colored sections on the game board. This can turn one cardboard toy into a simple color recognition activity.
Pro Tip: Keep the basic structure of the game simple and change the rules instead. New challenges can make the same homemade toy feel fresh without requiring a completely new craft project.
Creative Animal Game Ideas to Try Next
The bunny design is adorable, but the same cardboard game concept can be transformed into many different characters. Changing the animal and the food pieces is an easy way to create themed activities for different seasons, lessons, or interests.
- Frog feeding game: Toss pretend bugs into a frog’s mouth.
- Monster snack game: Feed colorful balls or pom-poms to a silly monster.
- Shark feeding game: Drop small fish shapes into a large cardboard mouth.
- Bear picnic game: Feed a bear pretend berries and snacks.
- Farm animal game: Match different foods to the correct cardboard animals.
These variations can be based on a child’s favorite animals or current interests. A familiar theme often encourages children to participate in both the making and playing stages.
Why Cardboard Crafts Are Perfect for Family Activities
Cardboard crafts are accessible, affordable, and wonderfully flexible. Instead of throwing away a box, families can turn it into something imaginative. This also introduces children to the idea that everyday objects can have more than one purpose.
The crafting process itself can become quality family time. Adults can handle cutting and assembly, while children can help with safe decorating tasks. They can draw the face, choose colors, attach paper shapes, or organize the game pieces.
Unlike many ready-made toys, a homemade activity can reflect the personalities of the people making it. A bunny might have funny ears, a colorful outfit, or a completely unexpected expression. There is no single correct way to design it.
Encouraging Creativity Beyond the Finished Toy
After playing with the finished game, ask children what they would change next time. Maybe the bunny needs a larger belly, more carrots, or a friend to play with. These conversations encourage children to think like creators rather than simply consumers of toys.
A simple cardboard project can become the starting point for a larger creative habit. Children learn that they can imagine an idea, build something with their hands, test it, and improve it.
Tips for Keeping DIY Toys Organized
Small handmade game pieces can easily disappear after an enthusiastic play session. A dedicated bowl, basket, fabric bag, or small box can help keep the carrots together when the game is not being used.
It can also be helpful to store the game pieces inside the cardboard base if the design allows it. This makes cleanup easier and keeps the entire activity in one place.
Make Cleanup Part of the Game
Instead of simply asking children to put everything away, turn cleanup into one final challenge. Count the carrots as they return to the basket or race to collect all the pieces before a short song ends. Small playful routines can make cleanup feel like part of the activity.
DIY Toys for Toddlers and Preschoolers
When choosing DIY toys for younger children, simple interaction is often more important than complexity. A clear action, such as placing, dropping, matching, stacking, or tossing, can provide plenty of entertainment.
The bunny feeding game works well because the child quickly understands what to do. There is a target, there are objects to move, and there is a satisfying result when each carrot disappears into the opening.
For toddlers, focus on larger pieces and straightforward play. For preschoolers, introduce extra rules such as counting, sorting, matching, or taking turns. The same basic toy can grow with the child’s abilities.
At a Glance
- Easy to make with recycled cardboard and basic craft supplies.
- Encourages active, hands-on play.
- Can support counting, color recognition, and coordination.
- Simple to customize with new animals and themes.
- A fun option for home, classroom, or family craft time.
Final Thoughts on Making Fun DIY Toys
A creative DIY toy does not have to be complicated to be memorable. This cardboard bunny feeding game shows how a simple box and a few colorful craft pieces can become an activity filled with movement, imagination, and laughter. The combination of a friendly character and an easy interactive challenge gives children a reason to return to the game again and again.
What makes projects like this especially rewarding is their flexibility. You can keep the design simple for a quick afternoon craft or add educational challenges to create a more structured learning activity. You can also change the animal, swap the pretend food, and create an entirely new game using the same basic idea.
Whether you are searching for DIY toys for toddlers, easy cardboard crafts, preschool activities, or creative ways to reuse household materials, interactive homemade games are a wonderful place to start. Gather a few supplies, create a playful character, and let the fun begin. Sometimes the best toys are the ones made with imagination and enjoyed together.
Tags
DIY Toys Cardboard Crafts Toddler Activities Preschool Crafts Homemade Toys Kids Activities Creative Play