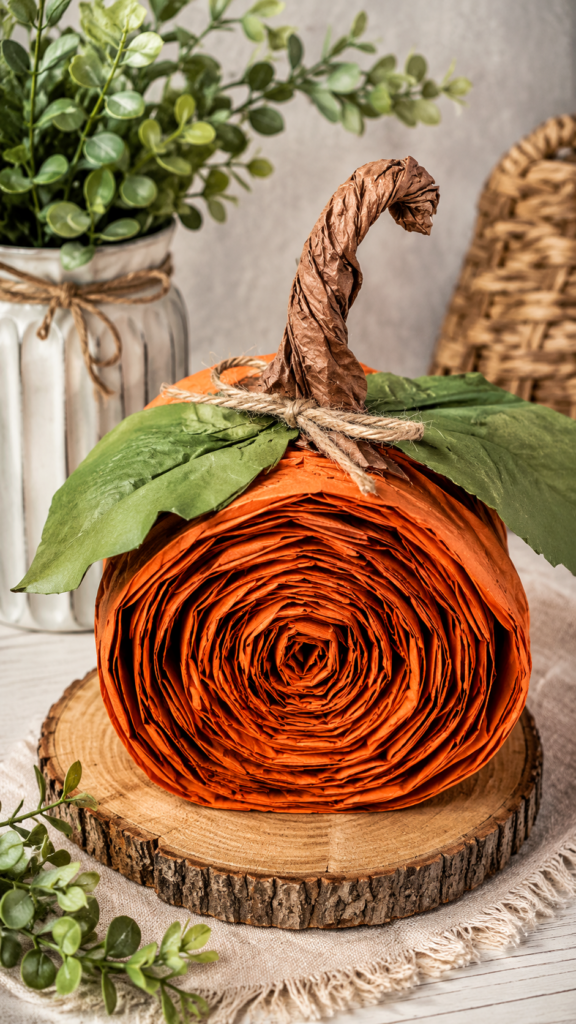
Looking for a creative way to turn ordinary cardboard into beautiful fall decor? This rustic DIY paper pumpkin is a perfect example of how simple recycled materials can become an eye-catching handmade centerpiece. With its warm orange color, curled stem, oversized green leaves, and layered texture, it brings cozy farmhouse charm to a table, shelf, mantel, or seasonal display without requiring expensive supplies.
The beauty of this cardboard DIY project is its texture. Instead of creating a perfectly smooth pumpkin, the tightly rolled cardboard layers create a dramatic spiral pattern that gives the finished piece plenty of character. It feels handmade, earthy, and naturally suited to autumn decorating.
Key Takeaways
- Turn recycled cardboard into a decorative pumpkin with rich natural texture.
- Use orange paper or paint to create a classic autumn-inspired finish.
- Add handmade leaves, a curled stem, and rustic twine for extra detail.
- Layered cardboard creates an interesting spiral effect from every angle.
- Customize the size and colors to match your existing fall home decor.
- This project works especially well as a budget-friendly seasonal centerpiece.
Why Cardboard DIY Projects Are Perfect for Fall
Cardboard is one of the easiest materials to transform into seasonal decorations. It is lightweight, accessible, inexpensive, and surprisingly versatile. Rather than throwing shipping boxes or sturdy packaging into the recycling bin immediately, you can save suitable pieces for craft projects.
Fall decorating is particularly well suited to cardboard crafts because the material can take on a rustic appearance. Rough edges, visible layers, folds, and natural imperfections can actually enhance the finished design. Those little details help create the cozy handmade look that works so well with farmhouse, cottage, rustic, and natural decorating styles.
Important: The strongest feature of this type of cardboard pumpkin is its layered texture. Rather than trying to hide every crease or variation, let the material contribute to the design. A slightly imperfect finish can make the decoration feel more authentic and handmade.
What You Need for a Cardboard Pumpkin
One of the biggest advantages of this cardboard DIY is that you can adapt the supply list to whatever you already have at home. The goal is to create a rounded, pumpkin-like form with visible layers and then decorate it with a few simple details.
- Sturdy corrugated cardboard
- Orange craft paper, tissue paper, or orange paint
- Green paper or lightweight cardboard for the leaves
- Brown paper for the stem
- Craft glue or another suitable adhesive
- Scissors or a craft knife, used carefully
- Natural twine or jute for a rustic accent
- A pencil, ruler, or round object for marking shapes
You do not need every item on this list. For example, the leaves can be made from painted cardboard, while the stem can be shaped from brown paper. If you prefer a cleaner modern appearance, skip the twine and use a simple paper stem instead.
How to Make a Layered Cardboard Pumpkin
The pictured pumpkin gets its distinctive appearance from numerous layers of material arranged into a compact spiral-like form. The process is less about making a perfectly symmetrical shape and more about building volume gradually.
1. Prepare the Cardboard
Start with clean, dry cardboard. Remove tape, labels, and loose pieces where practical. Corrugated cardboard is especially useful because its layered construction naturally creates texture.
Cut the cardboard into manageable strips. The exact dimensions can vary depending on how large you want the finished pumpkin to be. Narrower strips generally make it easier to create tighter curves, while wider pieces can help you build the shape more quickly.
2. Build the Rounded Form
Begin coiling or layering the prepared cardboard so that it gradually forms a rounded shape. Keep the center compact and continue adding material around it. Apply adhesive where needed to keep the layers secure.
As you work outward, gently adjust the curve so the form becomes fuller toward the middle. Take your time during this stage because the shape you create here determines the overall character of the pumpkin.
3. Add the Orange Finish
The warm orange surface is what immediately makes this craft read as autumn decor. You can use orange paper to wrap sections of the cardboard, or paint the visible surface with a suitable craft paint.
For a rustic result, do not worry about making every area perfectly uniform. Slight variations in orange tones can emphasize the individual layers and give the pumpkin more depth.
4. Create the Curled Stem
A curled brown stem adds an especially charming detail. Shape brown paper or thin cardboard into a long curved form, then secure it at the top of the pumpkin. A slightly irregular curve works beautifully because it complements the handmade appearance of the layered body.
You can lightly crumple or twist the brown material before shaping it. This creates visual texture and makes the stem look more dimensional.
5. Add Oversized Green Leaves
Cut several simple leaf shapes from green paper or lightweight cardboard. They do not need to be identical. In fact, varying the size and angle of the leaves can make the finished pumpkin feel more natural.
Arrange the leaves around the base of the stem and attach them securely. Slightly bending the leaves before gluing them can add dimension and prevent the decoration from looking flat.
6. Finish With Rustic Details
Natural twine, jute, burlap, or other earthy materials pair beautifully with orange cardboard. A small tied accent around the stem can reinforce the farmhouse-inspired aesthetic without overwhelming the main pumpkin shape.
Expert Insight
The most appealing handmade decorations often combine contrasting textures. Pair the rough, layered surface of cardboard with soft paper leaves, twisted twine, and natural wood. The combination creates depth without needing complicated embellishments.
How to Make Your Pumpkin Look More Rustic
If you love rustic fall decor, embrace earthy materials and imperfect finishes. The reference style works because the orange pumpkin is surrounded by natural textures such as wood, greenery, linen, and woven materials.
Use Warm, Muted Colors
Classic pumpkin orange is an obvious choice, but you can experiment with burnt orange, terracotta, muted rust, or earthy clay tones. Pair the orange with olive, sage, moss, cream, or brown for a softer palette.
Let Texture Do the Decorating
You do not need lots of decorative accessories. The spiral layers of cardboard already provide a strong visual focal point. Adding too many embellishments can hide the feature that makes the craft special.
Add Natural Elements
A wooden slice, greenery, linen fabric, woven basket, or simple neutral vase can make a handmade cardboard pumpkin look much more polished. These materials create a natural setting that allows the orange centerpiece to stand out.
Pro Tip: Place your finished pumpkin on a wooden tray or slice of natural wood, then surround it with a few green stems. Keeping the background neutral makes the warm orange color the star of the display.
Creative Ways to Display a Cardboard DIY Pumpkin
A handmade pumpkin does not have to sit in the middle of a dining table. Its compact shape makes it flexible enough for many areas around the home.
- Dining table: Place it on a wooden board as a simple autumn centerpiece.
- Mantel: Combine it with neutral candles, greenery, and other handmade decorations.
- Entryway: Add it to a console table for an inviting seasonal accent.
- Kitchen: Display it near a coffee station, open shelving, or a breakfast nook.
- Bookshelf: Use it as a colorful seasonal accent between books and neutral accessories.
- Craft room: Keep it visible as inspiration for future recycled cardboard projects.
Easy Variations to Try
Once you understand the basic technique, you can create an entire collection of cardboard pumpkins in different shapes and finishes.
Mini Cardboard Pumpkins
Make smaller versions for shelves, tiered trays, place settings, or gift baskets. Small pumpkins are also a practical way to use leftover cardboard strips from larger projects.
Neutral Farmhouse Pumpkins
Instead of orange, try cream, beige, taupe, or soft white. Add brown twine and natural greenery for a calm farmhouse-inspired look.
Colorful Decorative Pumpkins
For a more playful display, experiment with dusty pink, mustard, sage, deep green, or terracotta. A group of differently colored pumpkins can create a cheerful seasonal arrangement.
Tips for a Better Cardboard DIY
Working with recycled cardboard can sometimes be unpredictable, so a few simple techniques can make the crafting process easier.
- Choose cardboard that is sturdy enough to hold its shape.
- Test your adhesive on a small piece before building the complete pumpkin.
- Build the center carefully because it determines the shape of the outer layers.
- Allow glue to dry between major sections when necessary.
- Use several thinner pieces rather than forcing one thick piece into a tight curve.
- Keep the decorative details proportional to the pumpkin body.
- Place the finished piece somewhere dry and protected from excessive moisture.
Why This DIY Makes a Great Seasonal Project
There is something satisfying about transforming a basic material into a decorative object that looks intentionally designed. This cardboard pumpkin proves that seasonal decor does not need to be expensive or complicated.
It is also an approachable project for experimenting with texture. The layered construction creates visual interest even when the shape is simple. By changing the paper color, leaves, stem, and surrounding accessories, you can make the same basic idea fit many different decorating styles.
For anyone searching for cardboard DIY ideas, recycled crafts, fall decorations, or handmade home decor, this project offers a useful combination of creativity and simplicity. It turns a humble material into a centerpiece that feels warm, thoughtful, and seasonal.
At a Glance
- Material: Recycled cardboard
- Style: Rustic, handmade, farmhouse-inspired
- Theme: Autumn and fall home decor
- Key feature: Layered spiral texture
- Best display: Tabletop, shelf, mantel, or entryway
Conclusion: Turn Simple Cardboard Into Beautiful Fall Decor
This rustic cardboard pumpkin is a wonderful reminder that creative home decor can start with the simplest materials. With cardboard, a little color, a few handmade leaves, and some natural accents, you can create a seasonal decoration with plenty of personality.
The layered spiral construction gives the pumpkin its standout appearance, while the earthy stem, green leaves, and rustic details make it feel perfectly suited to a cozy autumn setting. Best of all, the design is flexible. Make it large or small, colorful or neutral, simple or heavily textured.
If you enjoy recycled crafts and creative cardboard DIY projects, this pumpkin is a great one to keep in your seasonal craft collection. Gather some sturdy cardboard, embrace the handmade texture, and create a warm fall accent that looks right at home among wood, greenery, linen, and other natural decorations.