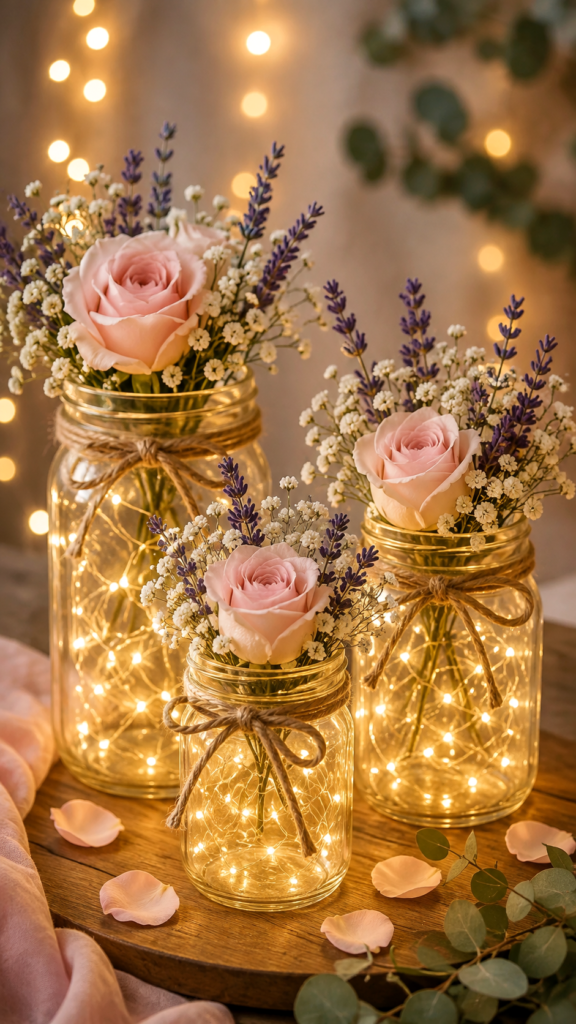
Simple wedding decor can make a celebration feel deeply personal, and you do not need an elaborate budget to create a beautiful atmosphere. A few glass jars, warm fairy lights, delicate flowers, and rustic details can become charming DIY wedding crafts that look thoughtful and romantic. This style works especially well for couples who love soft floral arrangements, cozy lighting, and handmade touches that make guests feel welcome.
Key Takeaways
- Glass jars can become elegant DIY wedding centerpieces with very little effort.
- Warm fairy lights create an inviting glow for evening celebrations.
- Blush roses, baby’s breath, and lavender create a soft romantic floral palette.
- Twine and natural wood details add rustic charm without overwhelming the flowers.
- Small handmade arrangements can decorate tables, welcome areas, and reception spaces.
Romantic Wedding Crafts DIY Ideas With Mason Jars
Mason jars are one of the most versatile materials for wedding crafts DIY projects. Their simple glass shape works with almost any wedding aesthetic, from rustic and country-inspired celebrations to romantic garden receptions. They are also easy to personalize with ribbon, twine, greenery, flowers, or small decorative accents.
For a look inspired by soft, glowing table decor, use several jars in different sizes. Fill each jar with delicate fairy lights and arrange flowers at the opening. The combination of illuminated glass and fresh-looking blooms creates depth, warmth, and visual interest.
The most effective DIY wedding decorations do not need to look complicated. A restrained combination of warm light, natural textures, and a soft floral palette can create a polished centerpiece while keeping the handmade character that makes DIY decor special.
Why Mason Jars Work So Well for Wedding Decor
The appeal of mason jars comes from their simplicity. Clear glass allows light to shine through, while the transparent surface keeps the arrangement visually light. Instead of making a table feel crowded, several illuminated jars can add atmosphere without taking up too much visual space.
They are also easy to coordinate. If your reception uses blush, ivory, lavender, beige, or warm gold tones, these colors can be repeated throughout the flowers and accessories. The result feels cohesive without requiring every decoration to match perfectly.
- Use small jars for individual place settings or smaller tables.
- Choose medium jars for classic floral centerpieces.
- Use larger jars as statement pieces around the reception area.
- Mix jar heights to create a more natural tabletop arrangement.
Create a Warm Fairy Light Wedding Centerpiece
Lighting can completely change the mood of wedding decor. Tiny warm-white fairy lights tucked inside clear jars provide a gentle glow that feels intimate rather than harsh. They are particularly attractive for evening receptions, romantic dinners, outdoor celebrations, and cozy indoor gatherings.
Start by placing the light strand inside the jar and distributing it loosely rather than packing every section tightly. A relaxed arrangement gives the lights room to sparkle. Keep the battery pack or power source discreetly positioned so the focus remains on the glowing glass.
Simple Lighting Tips
- Choose warm-white lights for a soft romantic effect.
- Keep the wire neatly arranged inside the jar.
- Test the brightness before placing the centerpiece on the reception table.
- Use different jar heights to prevent the lighting from appearing too uniform.
When several glowing jars are grouped together, their light naturally becomes part of the overall tablescape. Add scattered petals around the base for an extra romantic detail, especially if roses are already part of the floral design.
Choose Soft Flowers for a Romantic DIY Wedding Look
Flowers are the focal point of these handmade centerpieces. Soft blush roses immediately create a romantic feeling, while tiny white baby’s breath adds an airy texture around the larger blooms. Lavender-style purple sprigs introduce a subtle contrast and give the arrangements a delicate garden-inspired appearance.
You do not need a large bouquet in every jar. One or two prominent roses can be enough when surrounded by smaller filler flowers. This approach keeps the centerpiece visually balanced and makes each bloom stand out.
A Simple Floral Formula
Think of each jar as having three visual layers. The rose provides the focal point, the tiny white flowers fill empty spaces, and the lavender or greenery creates height and movement. This formula is easy to repeat while still allowing each arrangement to look slightly different.
- Focal flower: Choose a blush or pastel rose.
- Filler flower: Add baby’s breath or another delicate small bloom.
- Accent: Use lavender-style stems or soft greenery for texture.
Expert Insight
A strong centerpiece usually has one obvious focal point. Rather than filling every jar with a large quantity of flowers, let a few statement blooms sit above lighter filler flowers. This creates a softer, more intentional arrangement and keeps the glowing jars visible.
Add Rustic Details With Twine and Natural Textures
Twine is an inexpensive craft material that can make simple glass jars feel instantly more rustic. Wrap it around the neck of each jar and finish with a loose bow. The natural brown tone works beautifully with wood surfaces, blush flowers, and warm golden lighting.
The key is to keep the decoration understated. A small bow can frame the jar without competing with the flowers. For an even more cohesive wedding theme, repeat the same twine detail on several pieces of reception decor.
Ways to Personalize the Jars
Once the basic centerpiece is finished, there are plenty of ways to make the design your own. Add a small paper tag, a simple ribbon, a handwritten table number, or a subtle botanical detail. Keep the additions consistent with the overall color palette so the arrangement remains elegant.
- Wrap the jar with natural twine for rustic wedding decor.
- Use satin ribbon for a softer, more traditional appearance.
- Add small personalized tags for table numbers.
- Coordinate the jar accents with the wedding stationery.
- Place a few loose petals around the finished arrangement.
How to Arrange DIY Wedding Centerpieces on a Table
Once your jars are finished, the way you group them can make a major difference. Instead of placing every jar in a straight line, create a relaxed cluster with varying heights. Put the taller arrangement toward the back and the shorter jars toward the front. This allows guests to enjoy the flowers and candlelight without creating an unnecessary visual barrier.
A wooden tabletop works particularly well with this style because the natural grain contrasts with the smooth glass. Scatter a few petals around the jars rather than covering the entire surface. Leaving some empty space helps the centerpiece feel intentional and prevents the table from becoming cluttered.
If you are decorating multiple tables, avoid making every arrangement exactly identical. Repeat the same ingredients while changing the proportions slightly. One table might feature a taller jar with two roses, while another could use a smaller jar with one rose and more filler flowers.
Think in Groups, Not Individual Pieces
Three jars often create a more interesting composition than one oversized centerpiece. The eye naturally moves between different heights, flowers, and points of light. This also gives you flexibility when decorating tables of different sizes.
Budget-Friendly Wedding Craft Ideas
One of the biggest advantages of DIY wedding decor is the opportunity to create a beautiful result from relatively simple materials. Glass jars, twine, fairy lights, flowers, and loose petals can be combined in countless ways.
If you are working with a limited budget, prioritize the details guests will notice most. Lighting and flowers have a strong visual impact, while small decorative additions can be kept simple. Reusing jars throughout the celebration can also create a consistent design theme without requiring a different centerpiece for every area.
Consider creating the arrangements in stages. Prepare the jars and twine details ahead of time, then add flowers and final decorative touches closer to the celebration. This makes the project easier to manage and reduces last-minute stress.
Where to Use These Wedding Crafts
These glowing floral jars are not limited to reception tables. Their compact size makes them useful throughout a wedding venue.
- Reception table centerpieces
- Welcome tables
- Gift tables
- Dessert or cake tables
- Guest book displays
- Entryway decor
- Small accent arrangements around the venue
Make the Design Feel Cohesive
A beautiful wedding theme is often created through repetition. If you use blush roses in your jar centerpieces, echo that color in other small details. Natural twine can appear on favor packaging, while warm lighting can be repeated around the reception space.
Choose two or three dominant colors and let them guide your craft decisions. Soft pink, ivory, warm gold, and muted lavender work naturally together for a romantic palette. Natural wood and greenery can provide grounding tones without making the design feel overly formal.
Pro Tip: Photograph one finished centerpiece before making the rest. A quick test arrangement lets you see whether the flowers, lighting, jar heights, and accent colors work together before you commit to the full setup.
Easy DIY Wedding Craft Planning Tips
DIY projects are most enjoyable when the process is planned early. Make a short supply list, decide how many centerpieces you need, and create one sample before purchasing or preparing everything. This helps you estimate the materials required and gives you a clear visual reference.
- Choose your wedding color palette first.
- Create one complete sample centerpiece.
- Measure how much space the arrangement requires.
- Prepare jars, twine, and decorative elements ahead of time.
- Arrange flowers as close to the event as practical for a fresh appearance.
- Keep the final design simple enough to reproduce consistently.
It can also help to involve friends or family in the crafting process. Preparing jars together can turn wedding preparation into a memorable activity rather than another item on a long to-do list.
At a Glance
- Use clear jars to let warm fairy lights shine through.
- Pair blush roses with baby’s breath for soft contrast.
- Add lavender-style stems for height and texture.
- Finish with twine and scattered petals for rustic charm.
- Group different jar heights for a relaxed centerpiece.
Final Thoughts on Wedding Crafts DIY
Beautiful wedding decor does not have to come from complicated projects or expensive materials. Simple mason jars can become memorable wedding centerpieces when they are combined with warm fairy lights, delicate flowers, natural twine, and thoughtful placement. The result is romantic, inviting, and easy to personalize.
The real charm of DIY wedding crafts is the opportunity to make the celebration feel like your own. Whether you are planning a rustic reception, an intimate dinner, or a soft romantic gathering, these glowing floral jars can add warmth and personality to the setting.
Start with one jar, one beautiful flower, and one strand of warm light. Build from there, and let the simplicity of the materials become part of the magic. Save these wedding crafts DIY ideas as inspiration for your own celebration and create a tablescape that feels warm, personal, and unforgettable.