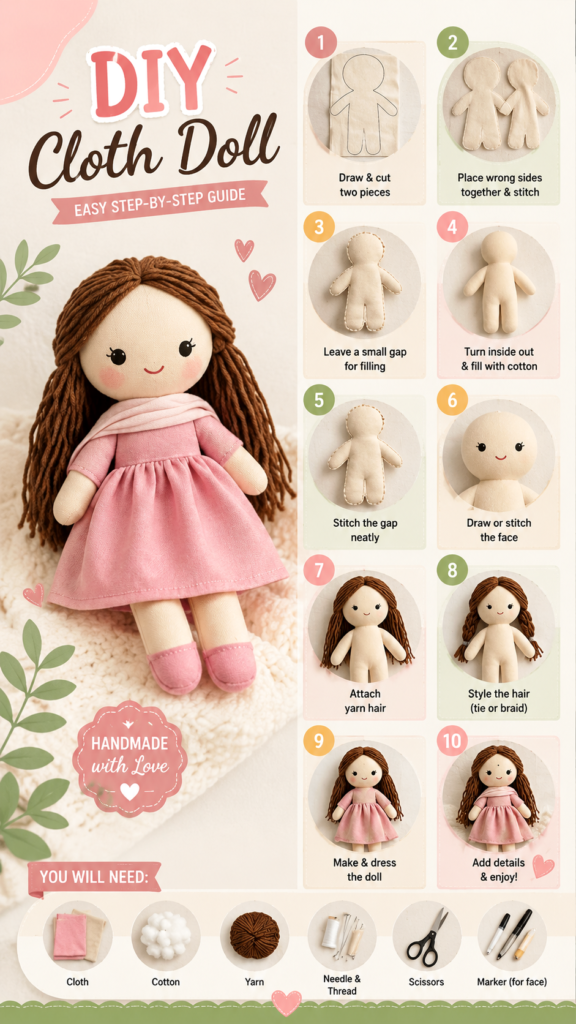
Making a DIY doll is a wonderfully simple way to turn basic craft supplies into something personal, charming, and completely unique. With a little fabric, cotton stuffing, yarn, thread, and a few sewing tools, you can create a soft cloth doll that is perfect for imaginative play, handmade gifts, nursery decor, or a relaxing weekend craft project.
This beginner-friendly cloth doll project follows a straightforward process: draw and cut a simple doll shape, sew the fabric pieces together, leave a small opening for stuffing, turn the body right side out, fill it with cotton, close the opening, and then add the details that bring the doll to life. The final steps involve attaching yarn hair, styling it, making a simple dress, and adding small finishing touches.
Key Takeaways
- A simple cloth doll pattern can be made with an easy body outline.
- Soft cotton fabric works well for a cozy handmade doll.
- Leave a small opening when sewing so the body can be turned and stuffed.
- Yarn is an easy material for creating customizable doll hair.
- Simple clothing can transform a basic doll into a finished character.
- Small details such as the hairstyle, face, shoes, and dress make every doll unique.
Why Make a DIY Cloth Doll?
A handmade doll has a special quality that is difficult to get from a mass-produced toy. You choose the fabric, colors, hairstyle, clothing, facial expression, and finishing details. Even when you start with the same basic pattern, two handmade dolls can look completely different.
A DIY doll is also a practical beginner sewing project because the basic shape is uncomplicated. The body can be created from a simple silhouette with a rounded head, small arms, and legs. You do not need an elaborate pattern to get started.
The project can also be adapted to your available supplies. Use leftover fabric for the body, scraps for clothing, yarn for hair, and small pieces of cotton for stuffing. This makes a cloth doll a fun choice for anyone who enjoys fabric crafts and wants to make something useful from materials already at home.
Materials You Will Need
The basic supply list is pleasantly short. The project shown uses fabric, cotton, yarn, a needle and thread, scissors, and a marker for drawing the face. You can keep the design simple or add additional craft supplies as you develop your own version.
- Cloth: Choose a soft fabric for the doll body and additional fabric for the outfit.
- Cotton stuffing: Use it to give the doll a soft, rounded shape.
- Yarn: Brown or another favorite color can be used to create the hair.
- Needle and thread: These are needed for joining the body pieces and attaching details.
- Scissors: Use sharp fabric scissors for cleaner cutting.
- Marker: A suitable fabric marker can be used for simple facial features.
Important: Fabric choice can make a noticeable difference in the finished result. A soft, tightly woven fabric is generally easier to handle than a very slippery or stretchy material, especially when you are learning basic sewing techniques.
Step 1: Create a Simple Doll Pattern
Begin by drawing the outline of your doll on paper or directly onto a suitable fabric surface if you are comfortable working that way. The reference design uses a very simple figure with a rounded head, curved shoulders, short arms, and two legs.
Keep the silhouette smooth and avoid overly narrow areas. Wider arm and leg shapes are often easier to sew and turn than extremely thin sections. Make sure the head connects naturally to the body so there are no sharp corners that could make the finished shape awkward.
Once your outline is ready, cut it out carefully. This first piece becomes your template for the second side of the doll.
Step 2: Cut Two Matching Fabric Pieces
Place your template on the fabric and cut two matching doll shapes. The two pieces should be similar in size and shape so that their edges align properly during sewing.
Before cutting, consider whether you want a little extra fabric around the outline as a seam allowance. Leaving enough room along the edges gives you space to sew securely without making the finished doll smaller than intended.
Take your time around the curves of the head, arms, and legs. Smooth curves are easier to sew and can help create a more polished finished shape.
Step 3: Place the Pieces Together and Sew
Place the two fabric pieces together with their wrong sides positioned appropriately for your chosen construction method. Pin them in place if needed so the pieces do not shift while you sew.
Work carefully around the entire body outline. The goal is to create a secure seam while maintaining the rounded shape of the doll. The head, arms, and legs require extra attention because these curved sections determine much of the final appearance.
Most importantly, do not sew completely around the shape. Leave a small opening in a convenient location so you can turn the doll right side out and add the stuffing.
How to Keep the Seams Neat
Use small, consistent stitches and avoid pulling the thread too tightly. If the stitches are too tight, the fabric can pucker around the curves. If they are too loose, the stuffing may push through the seam.
When sewing around tight curves, slow down and make small adjustments rather than trying to force the fabric through quickly. Careful stitching at this stage will make the later steps much easier.
Step 4: Turn the Doll Right Side Out
Once the main seam is complete, gently turn the doll body right side out through the opening you left earlier. This step reveals the finished outer fabric and hides the main seam inside the doll.
Curved areas such as the tips of the arms and legs may need gentle attention to reach their full shape. Avoid using anything sharp that could accidentally puncture the fabric. A blunt turning tool can be helpful when working with small areas.
Step 5: Fill the Body With Cotton
Now comes the satisfying part: giving your cloth doll its shape. Add small amounts of cotton stuffing at a time, distributing it throughout the head, arms, body, and legs.
Instead of putting a large amount of stuffing into the body all at once, work gradually. Small pieces allow you to control the firmness and help prevent obvious lumps. Pay attention to the ends of the arms and legs so they do not remain flat.
Expert Insight
- Stuff gradually rather than filling the whole body at once.
- Check the shape from several angles as you work.
- A moderately firm filling usually gives the doll a soft but defined appearance.
Once the doll has the shape you want, check the opening and make sure the stuffing is not preventing the fabric edges from meeting. Add or remove small amounts of cotton until the body looks balanced.
Step 6: Close the Opening Neatly
After stuffing, sew the remaining opening closed. Use careful stitches that bring the two fabric edges together without creating a large visible ridge.
This small seam is worth taking your time with because it completes the doll body. Once the opening is closed, inspect the entire doll and gently reshape the stuffing where necessary.
Pro Tip: Before finishing the seam, gently squeeze and rotate the stuffed body to check for empty areas. It is much easier to correct uneven stuffing before the opening is completely closed.
Step 7: Add a Simple Face
The face gives the doll its personality. The design shown uses very simple features, including small eyes and a curved smile. You do not need complicated embroidery skills to create an appealing expression.
Mark the position of the eyes first so they remain balanced. Then add the smile. Keep the expression simple and allow the softness of the fabric and hairstyle to do much of the visual work.
If you prefer embroidery, you can stitch the facial features instead of drawing them. This can create a different handmade look and gives you more opportunities to customize the expression.
Step 8: Create Yarn Hair
Yarn is one of the easiest materials to use for doll hair, and it offers plenty of creative freedom. Cut multiple strands to the desired length and attach them securely around the top and sides of the doll’s head.
You can make long straight hair, short hair, pigtails, braids, a ponytail, or a simple side style. Changing the yarn color can completely transform the character.
Simple Hairstyles to Try
- Long loose yarn hair for a classic handmade doll.
- Two braids for a playful and traditional look.
- Low pigtails for a cute everyday style.
- A short yarn bob for a modern character.
- A simple ponytail for a clean, easy finish.
Trim the yarn only after you are happy with the overall placement. This prevents accidentally cutting the strands too short while you are still arranging the hairstyle.
Step 9: Make a Simple Doll Dress
The clothing is where you can really personalize your DIY doll. The example features a sweet pink dress with a fitted upper section and a fuller skirt. You can recreate the general idea using fabric scraps or design an entirely different outfit.
A simple dress does not have to be complicated. A basic fabric shape with a gathered skirt can create a charming result. Choose colors that complement the yarn hair and the doll’s face.
You can also experiment with seasonal clothing. Try a small sweater-style top, a skirt, pajamas, a simple apron, or a dress in colors inspired by a favorite season.
Step 10: Add the Finishing Details
The final stage is about personality. Add tiny shoes, a scarf, decorative stitching, buttons, bows, or other fabric details that suit the design. Even one or two small additions can make the finished doll feel much more distinctive.
Think about the doll as a little character rather than simply a sewing project. Give her a favorite color, a recognizable hairstyle, or an outfit with a particular theme. These details make the crafting process more creative and give the finished doll a story.
Why This DIY Doll Is Great for Beginners
This cloth doll project introduces several useful sewing and crafting skills without requiring an overly complicated construction. You practice tracing, cutting, joining fabric, sewing curves, turning fabric, stuffing, closing an opening, and decorating a finished handmade item.
It is also forgiving. The face does not need to be perfectly symmetrical, and the hairstyle can be adjusted if the first attempt does not look exactly as planned. Handmade projects are often more charming because of their individual character.
For children, the project can also become a collaborative craft with an adult handling sewing and cutting while the child helps choose colors, yarn, clothing, and decorations. Always supervise children around needles, scissors, and other sharp tools.
Easy Ways to Customize Your Handmade Doll
Once you understand the basic construction, there are many ways to make your own version. Change the body fabric, hair color, facial expression, outfit, or accessories to create a completely different character.
- Change the fabric: Try neutral, pastel, floral, or colorful fabrics.
- Experiment with hair: Mix yarn colors or try different lengths and styles.
- Design new clothes: Make dresses, skirts, tops, pajamas, or simple costumes.
- Personalize the face: Adjust the eyes, smile, and other simple details.
- Add accessories: Small scarves, bows, bags, or shoes can complete the look.
Helpful Tips for a Better Finished Result
Patience is one of the most useful tools for any handmade doll project. Rushing through cutting or stitching can create uneven pieces that become more noticeable later. Take time to align the fabric before sewing and check the shape as you go.
Keep your stuffing light and controlled, especially around the head and limbs. Overstuffing can stretch the fabric and make the seams look strained. Understuffing can leave the doll floppy. Add cotton gradually until the body feels soft and holds its shape.
When attaching yarn hair, secure it firmly before styling it. Hair that is well attached gives you more freedom to braid, tie, or rearrange it without pulling individual strands away from the head.
Finally, remember that the goal is not perfection. A handmade doll should look handmade. Slight differences in the stitching, hair, or facial expression are part of what makes the finished piece special.
Why This Matters
The most successful DIY doll projects combine a simple construction with thoughtful personalization. You do not need dozens of materials or advanced techniques. A basic cloth body becomes much more special when you carefully choose the hairstyle, clothing, colors, and small finishing details.
A Creative Project Worth Saving
A DIY cloth doll is more than a beginner sewing exercise. It is a chance to create something soft, colorful, and personal from a handful of everyday craft supplies. The basic construction is approachable, while the decorative possibilities are almost endless.
Whether you are making a handmade gift, planning a creative afternoon, looking for an easy sewing project, or simply want to try a new fabric craft, this doll is a lovely place to start. Begin with the simple body shape, work through each sewing step carefully, and then let your creativity take over when it is time for the hair and clothing.
At a Glance
- Draw and cut two matching cloth doll pieces.
- Sew around the shape while leaving an opening.
- Turn, stuff, and neatly close the body.
- Add yarn hair and a simple handmade outfit.
- Finish with a personalized face and decorative details.
Conclusion
Creating a DIY doll is a simple, rewarding craft that lets you combine basic sewing with plenty of imagination. Starting from two fabric pieces, you can build a soft doll with a recognizable face, yarn hair, a handmade outfit, and details that reflect your own style.
The best part is that there is no single correct way to finish your cloth doll. Try different fabrics, hairstyles, dresses, expressions, and accessories until you discover a design you love. Once you have completed one doll, the same basic process can inspire an entire collection of unique handmade characters.
Gather your fabric, cotton, yarn, needle, thread, scissors, and creative ideas, then start stitching. With a little patience and imagination, a few simple materials can become a charming handmade doll that is truly your own.
Tags
DIY Doll Cloth Doll Handmade Doll Doll Sewing Fabric Crafts Easy Sewing Projects DIY Crafts span style=”display:inline-block;background:#f1dce7;color:#68495a;border-radius:20px;padding:8px 14px;margin:4px;font-size:14px;”>Beginner Sewing