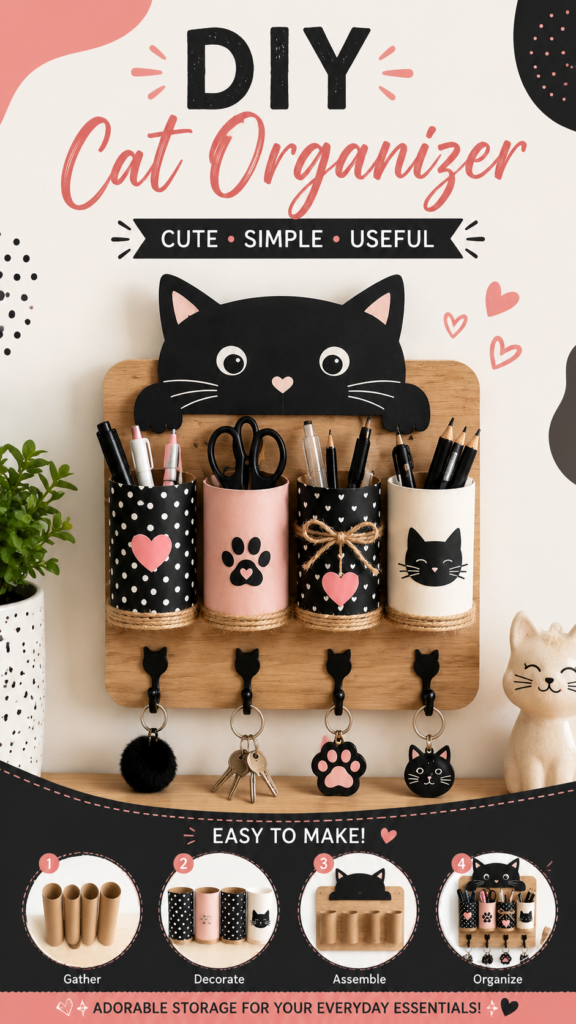
A good organizer does more than keep clutter under control. It can also make a room feel more cheerful, creative, and personal. This DIY organizer combines practical storage with a playful cat-inspired design, turning simple cardboard tubes and a wooden board into a useful wall display for everyday essentials. With decorated storage cups, cute cat details, and small hooks underneath, the finished project is especially appealing for craft rooms, desks, bedrooms, and home offices.
The beauty of this DIY organizer is its balance of function and personality. Instead of hiding pens, scissors, keys, and other small items inside a drawer, you can keep frequently used supplies visible and easy to reach. The project also offers plenty of opportunities to experiment with colors, patterns, textures, and decorative details.
Key Takeaways
- Turn cardboard tubes into practical DIY storage cups.
- Use a wooden board to create a compact wall-mounted organizer.
- Decorate each container with patterns, hearts, paw prints, or cat faces.
- Add hooks underneath for keys, accessories, or small everyday items.
- Choose colors and details that coordinate with your existing room decor.
Why a DIY Organizer Is Worth Making
Small objects have a habit of creating big messes. Pens collect around a desk, scissors disappear into drawers, keys get misplaced, and craft supplies can quickly become difficult to sort. A thoughtfully designed organizer gives each item a home while keeping the things you use most within easy reach.
This particular DIY organizer takes that practical idea a step further. The vertical layout makes efficient use of wall space, while the decorative containers give the piece the appearance of intentional home decor rather than ordinary storage.
Important: The most effective organizers are designed around the items you actually use. Before decorating your containers, think about whether they will hold pens, brushes, scissors, keys, craft tools, or other small essentials. This makes the finished project attractive and genuinely useful.
Materials for This Cute DIY Organizer
The project is based on simple craft materials that are easy to adapt. The image features cylindrical cardboard tubes attached to a wooden backing board, along with decorative paper or paint, twine, hooks, and cat-themed embellishments.
- Several cardboard tubes or sturdy recycled paper tubes
- A wooden board suitable for the desired organizer size
- Black, pink, cream, or other coordinating craft colors
- Decorative paper or patterned materials
- Strong craft adhesive or another suitable method for attaching the containers
- Natural twine for rustic decorative accents
- Small wall or utility hooks
- Paintbrushes and basic craft supplies
- Scissors for cutting decorative materials
- Optional cat-shaped cutouts, paw prints, hearts, or other embellishments
You do not need to copy the exact color combination shown. The black, warm wood, pink, and neutral tones create a charming contrast, but the concept works just as well with pastel colors, earthy shades, bright colors, or a monochrome palette.
How to Make a DIY Wall Organizer
1. Prepare the Cardboard Tubes
Begin by gathering the cardboard tubes you plan to use as storage cups. Try to keep them reasonably similar in height if you want a clean, coordinated appearance. Wipe away dust and make sure each tube is sturdy enough for the supplies you intend to store.
If the tubes are longer than you need, trim them carefully so the contents will be easy to access. For example, shorter cups work well for pens and pencils because the tools remain visible above the rim.
2. Create the Decorative Designs
This is where the organizer becomes personal. The reference design uses a combination of polka dots, tiny hearts, paw-print details, and cat faces. You can recreate the overall playful feeling while choosing your own patterns.
For a simple version, cover a tube with decorative paper. Another option is to paint the tubes and add small shapes once the base layer has dried. A black-and-white pattern paired with one soft accent color can create a modern look without overwhelming the organizer.
Easy Decoration Ideas
- Paint one tube in a solid pastel shade.
- Add simple dots using a contrasting color.
- Cut small hearts from paper for a handmade accent.
- Use paw-print shapes for a playful theme.
- Draw a minimal cat face with whiskers and ears.
- Wrap the lower edge with natural twine for texture.
3. Add Texture With Twine
Twine is a small detail, but it adds a lot of visual interest. In the finished organizer, natural-colored twine wraps around the bottom of the containers and also appears as a decorative bow on one of the cups.
You can use the same approach or keep the design simpler. A single twine band around each container can visually connect different colors and patterns. If you prefer a cleaner contemporary style, skip the twine and let the painted surfaces become the main feature.
4. Arrange the Containers on the Board
Before permanently attaching anything, place the tubes on the wooden board and experiment with spacing. The image shows four storage containers arranged side by side, creating a balanced horizontal composition.
Leave enough room between the cups so the organizer does not look crowded. It is also helpful to consider how you will reach inside each container. A visually perfect arrangement is less useful if the cups are difficult to access.
5. Add the Cat Detail at the Top
The playful cat silhouette above the storage cups is one of the strongest decorative features of the project. It gives the organizer an instantly recognizable personality and visually ties the individual containers together.
You can make a simple cat shape from sturdy craft board, foam board, or another appropriate material. Keep the silhouette uncomplicated so the ears, eyes, whiskers, and paws remain easy to recognize. A contrasting color helps the shape stand out against the wooden backing.
Expert Insight
Think of the organizer as both storage and wall decor. Repeating one or two design elements, such as the same accent color or cat motif, helps different containers look like one coordinated piece even when their patterns are different.
Adding Hooks for Extra Storage
The hooks beneath the containers make this DIY organizer particularly versatile. Instead of using only the upper section for storage, the lower part becomes a convenient place for keys, small bags, accessories, or other lightweight items.
Cat-shaped hooks fit naturally with the theme, but simple black or wooden hooks can create an equally attractive result. Arrange them with even spacing to keep the lower section visually organized.
Before attaching hooks, consider the items you expect to hang from them. Choose suitable hardware and attachment methods for the weight and the surface where the organizer will be installed. If the organizer will be mounted to a wall, use an appropriate mounting method for the wall material.
What Can You Store in It?
A DIY organizer like this can be adapted to many rooms and routines. The cylindrical cups are ideal for tall, narrow objects that are otherwise easy to scatter across a workspace.
- Pens and pencils
- Markers and colored pencils
- Scissors
- Paintbrushes
- Craft tools
- Small rulers
- Makeup brushes
- Desk accessories
- Lightweight craft supplies
- Keys and small accessories on the lower hooks
Because the containers remain open, you can quickly see what is inside. That makes this style of storage especially useful for supplies you reach for frequently.
Creative Ways to Customize Your Organizer
One of the best things about a DIY organizer is that there is no single correct finished look. The basic structure can remain the same while the visual style changes completely.
Try a Soft Pastel Palette
For a gentle bedroom or study space, use blush pink, cream, beige, and muted gray. Keep the patterns small and understated for a calm appearance.
Create a Bold Black-and-White Version
Black and white instantly creates stronger contrast. Add one accent shade, such as pink, to keep the design playful. Polka dots and simple silhouettes work especially well with this approach.
Make It Minimal
If your room has a modern aesthetic, skip most of the patterns. Use neutral tubes, a natural wood board, and one understated cat silhouette. The result can feel more like contemporary wall decor than a traditional craft project.
Give Every Tube a Different Personality
Another fun option is to make each storage cup unique. One can feature dots, another hearts, another a paw print, and another a cat face. Keeping one shared color throughout the designs will prevent the finished organizer from looking too busy.
Where to Use a DIY Cat Organizer
This project is especially suited to spaces where small supplies need to stay visible. Hang it near a desk for stationery, in a craft area for tools, or in a creative workspace for brushes and markers.
It can also become a cheerful decorative feature in a child’s creative space, provided the construction and mounting method are appropriate for the intended environment. The hooks add another layer of usefulness by giving frequently misplaced items a dedicated spot.
Pro Tip: Do not fill every container simply because you have available space. A little empty space makes the organizer easier to use and keeps the finished display looking neat. Group similar supplies together so you can grab what you need without searching.
Simple Tips for a Better Finished Result
- Plan the layout first. Test the position of every tube and hook before attaching anything permanently.
- Keep the containers accessible. Avoid placing them so close together that your hands cannot comfortably reach inside.
- Repeat design elements. Matching colors, patterns, or motifs create a more cohesive appearance.
- Balance decoration with function. Decorative details should not interfere with storage space.
- Consider the wall location. Position the organizer where frequently used items are easy to reach.
- Use suitable mounting hardware. The backing board and hooks should be securely installed according to the weight and wall surface.
At a Glance
- Use recycled tubes as open storage cups.
- Decorate with patterns that match your room.
- Attach the cups to a sturdy wooden backing.
- Add hooks underneath for extra organization.
- Personalize the design with a playful cat theme.
Conclusion: Make Storage Part of the Decor
A DIY organizer does not have to look purely functional. With a little creativity, everyday storage can become a decorative feature that adds charm to your space while helping keep clutter under control. This cat-themed design combines recycled tubes, a simple wooden backing, decorative patterns, twine, and hooks to create a practical piece with plenty of personality.
The project is also easy to make your own. Change the colors, replace the cat details with another favorite motif, experiment with different patterns, or create a more minimalist version for your space. The important idea is to build storage around the things you actually need to organize.
Whether you use it for stationery, craft supplies, brushes, keys, or other small essentials, this DIY organizer offers a simple way to turn unused materials into something useful and eye-catching. A well-planned organizer can make your daily routine easier while giving your room a handmade touch.
Choose your favorite colors, gather a few basic materials, and start creating a storage solution that feels uniquely yours. Cute, practical, and customizable, this is one DIY home organization project that can make everyday clutter much more enjoyable to manage.