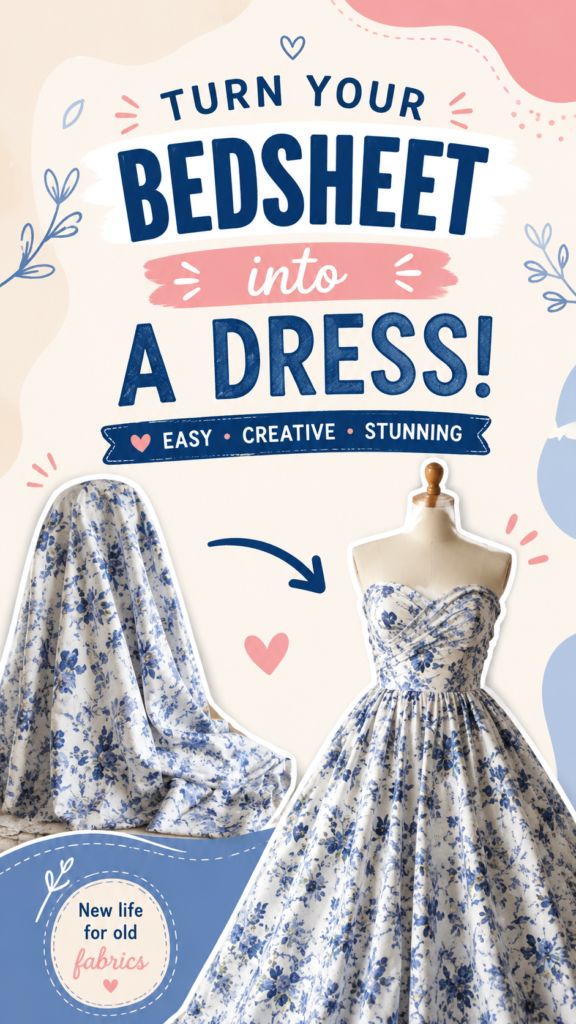
Turning an ordinary bedsheet into a beautiful dress is one of those DIY fashion ideas that feels both creative and surprisingly practical. Instead of letting a pretty floral fabric sit unused in a closet, you can give it a completely new purpose by transforming it into a wearable piece. The result can be feminine, eye-catching, and completely personalized to your style.
A DIY dress project like this is especially appealing for anyone interested in sewing, upcycled fashion, handmade clothing, or affordable wardrobe ideas. A floral bedsheet already provides plenty of visual interest, so the main focus can be on creating a flattering silhouette and making the most of the fabric you have available.
Key Takeaways
- A pretty bedsheet can become the foundation for a stylish DIY dress.
- Floral fabric works beautifully for feminine, casual, and romantic designs.
- A fitted bodice paired with a fuller skirt creates an eye-catching silhouette.
- Planning the fabric placement can make the finished dress look more polished.
- Simple sewing techniques can be adapted to suit different skill levels.
- Upcycling fabric gives old textiles a creative second life.
Why Turn a Bedsheet Into a DIY Dress?
Fabric is often the most expensive part of making clothing, which makes fabric upcycling an appealing alternative. Bedsheets can offer a generous amount of material, allowing you to experiment with dress shapes without immediately investing in new fabric. Vintage sheets, floral prints, soft cotton blends, and decorative patterns can all become interesting starting points for handmade clothing.
The floral fabric shown in this design has a particularly charming look. The blue-and-white pattern creates a classic appearance while still feeling fresh. Because the print is already decorative, the dress does not need complicated embellishments to stand out.
There is also something satisfying about wearing a garment that you created yourself. A DIY dress can be adjusted to your preferred length, neckline, waist placement, skirt volume, and overall style. Rather than searching for a dress that fits every preference, you can build a version that reflects your personality.
Important: The most successful upcycled clothing projects begin with careful fabric planning. Before cutting, consider the print direction, available fabric width, pattern placement, and the amount needed for the bodice and skirt.
Choosing the Right Bedsheet for Your Dress
Not every bedsheet will behave the same way when turned into clothing. Before starting, examine the material closely. A fabric that feels comfortable against the skin and has enough structure to hold the desired shape will generally be easier to work with.
Look at the Fabric Weight
Lightweight fabric can create a soft and flowing skirt, while a slightly heavier material may hold a more structured shape. If your goal is a dress with volume, the fabric should have enough body to support the silhouette without becoming uncomfortable.
Inspect the Condition
Choose a sheet that is clean, intact, and free from significant thinning or damaged areas. Small imperfections can sometimes be worked around during cutting, but heavily worn sections may not provide the durability needed for clothing.
Consider the Print
A floral print can make an excellent statement on a handmade dress. Look at how large the flowers are and how the pattern repeats across the fabric. Smaller prints can create a delicate appearance, while larger botanical designs can produce a more dramatic result.
Planning Your DIY Dress Design
The reference style combines a fitted upper section with a fuller skirt. This creates a classic dress shape that makes the patterned fabric the star of the outfit. The bodice draws attention toward the waist and neckline, while the gathered skirt adds movement and volume.
You do not have to reproduce the exact shape. The beauty of DIY dressmaking is that the basic concept can be adapted. You might create a shorter casual dress, a midi-length version, a sleeveless style, or a dress with straps depending on your preferences and sewing experience.
Start by deciding what kind of silhouette you want. A fitted bodice requires more attention to measurements and shaping, while a relaxed dress can be more forgiving. If you are new to sewing, a simpler shape may be the best place to begin.
Why This Matters
A beautiful fabric cannot compensate for poor planning. Take time to think about the final silhouette before cutting. A simple sketch, rough pattern, or existing garment can help you visualize proportions and reduce unnecessary fabric waste.
Basic Materials for a Bedsheet Dress
The exact supplies depend on your preferred construction method, but a basic sewing setup can be enough for a project like this.
- Clean bedsheet or suitable fabric
- Sewing machine or hand-sewing supplies
- Fabric scissors
- Measuring tape
- Fabric pins or clips
- Matching or coordinating thread
- Chalk or washable fabric marker
- A suitable dress pattern or an existing garment for reference
- Iron and ironing surface
Optional supplies may include interfacing, elastic, closures, lining fabric, or other finishing materials. The design you choose will determine what is actually necessary.
How to Plan the Fabric Before Cutting
One of the easiest mistakes to make during an upcycling project is cutting too quickly. Once fabric has been cut, there is no easy way to restore it. Measure twice and cut carefully.
Wash and dry the bedsheet before beginning whenever the material allows it. This helps remove residue and can reveal how the fabric behaves after washing. Pressing the fabric afterward can also make measuring and cutting much easier.
Lay the fabric flat and identify the areas with the most attractive portions of the floral design. Think about where those flowers will appear on the finished garment. You may want a visually balanced print across the bodice or larger flowers concentrated on the skirt.
Pro Tip: Use paper, an inexpensive test fabric, or an old garment to test the shape before committing your best bedsheet fabric to the final cut. This can reveal fitting issues before they become difficult to correct.
Creating the Bodice
The bodice is the part of the dress that usually requires the most attention to fit. A fitted upper section should sit comfortably without pulling, gaping, or restricting movement.
If you already have a dress pattern that fits you well, it can provide a useful starting point. Another approach is to use a well-fitting garment as a rough guide while remembering that different fabrics behave differently.
The neckline can dramatically change the personality of the finished dress. A sweetheart-inspired neckline creates a romantic appearance, while a straight neckline can feel modern and minimalist. Straps can be added for support and comfort, or the design can be adapted into another style according to your needs.
Take your time when joining bodice pieces. Pinning or clipping the fabric before sewing can help prevent shifting. Pressing seams as you work is another small step that can make homemade clothing look significantly more refined.
Adding a Full, Gathered Skirt
The generous skirt is one of the most visually appealing features of this type of DIY dress. Gathering creates fullness around the waist while allowing the skirt to flow outward toward the hem.
Before gathering, make sure you know the approximate finished waist measurement. The skirt needs to connect neatly to the bodice while leaving enough room for comfortable movement.
Gathering can be created using long sewing stitches that are gently pulled to distribute the fabric. The gathers should be spread as evenly as possible rather than concentrated in only a few areas.
Once the skirt is attached, check the waist seam carefully. Try the garment on before completing final finishing whenever practical. This gives you an opportunity to adjust the fit or redistribute gathers.
Making the Floral Print Look Intentional
Floral fabric can look effortless, but thoughtful placement can take a DIY garment to another level. Pay attention to how the flowers line up at seams and where prominent sections of the print appear.
You do not necessarily need perfect pattern matching throughout the entire garment. However, avoiding awkward cuts through major motifs can make the finished dress appear more deliberate.
Use the Print as the Main Decoration
When the fabric already has a strong floral pattern, keep additional decoration simple. A clean silhouette allows the print to remain the focal point without making the dress feel overly busy.
Coordinate the Details
Blue-and-white floral fabric pairs naturally with simple accessories and neutral footwear. You can also use small details such as a coordinating ribbon, subtle trim, or a simple belt to define the waist.
Finishing Details That Make a Difference
Finishing is what helps transform a homemade garment into something that feels polished. Clean seams, a neat hem, and careful pressing can make a noticeable difference.
Pay special attention to areas that receive frequent movement, such as the waist and neckline. Secure loose threads and inspect seams before wearing the finished dress. If the fabric tends to fray, appropriate seam finishing can help improve durability.
The hem should also be checked carefully. A slightly uneven hem can become obvious on a fuller skirt, especially when the fabric hangs away from the body. Measure from a consistent reference point and press the hem before sewing.
Ways to Customize Your DIY Dress
One of the biggest advantages of making your own dress is the ability to change almost every detail. Once you understand the basic concept, you can create several completely different looks from the same idea.
- Change the dress length for a mini, midi, or longer silhouette.
- Add shoulder straps for extra support.
- Try a square, straight, or rounded neckline.
- Adjust the skirt fullness for a softer or more dramatic shape.
- Add pockets for everyday practicality.
- Use a belt to emphasize the waist.
- Combine floral fabric with a coordinating solid fabric.
- Add subtle trim for a more decorative finish.
These small changes can make the same basic DIY dress concept feel completely different. That flexibility is what makes upcycled sewing projects so enjoyable.
Common Mistakes to Avoid
Even a relatively simple sewing project can become frustrating if the preparation is rushed. One common mistake is failing to account for seam allowances. Always follow the requirements of your chosen pattern or construction method.
Another mistake is assuming that every bedsheet has the same amount of usable fabric. Borders, decorative sections, seams, and worn areas can affect how much material is actually available.
It is also easy to focus so much on appearance that comfort is forgotten. A beautiful dress should still allow you to move, sit, and wear it comfortably. Check the fit around the waist, bust, neckline, and arm areas before considering the project finished.
Why Upcycled Fashion Is Worth Trying
Upcycling turns the sewing process into more than a simple clothing project. It encourages creativity while making use of textiles that might otherwise remain unused. A bedsheet that no longer serves its original purpose can become a completely new item with a different function.
DIY fashion also gives you the opportunity to learn practical skills. Each project can teach you more about fabric behavior, pattern construction, fitting, seams, hems, and garment finishing.
Perhaps most importantly, handmade clothing does not need to be perfect to be valuable. Small imperfections are part of the learning process. With every project, your confidence and technique can improve.
At a Glance
- Start with clean, suitable fabric.
- Plan the dress silhouette before cutting.
- Pay attention to floral print placement.
- Test the fit before completing final seams.
- Press and finish each section carefully.
Final Thoughts
A DIY bedsheet dress is a wonderful example of how creativity can completely transform an everyday textile. With a pretty floral pattern, thoughtful planning, and basic sewing techniques, an unused sheet can become a distinctive piece of handmade fashion.
The key is not to rush the process. Choose your fabric carefully, plan the silhouette, test your measurements, and give attention to the finishing details. Whether you are an experienced sewist or exploring DIY fashion for the first time, this type of project offers plenty of room to experiment.
Most importantly, make the design your own. Change the neckline, adjust the skirt, add pockets, experiment with length, or introduce your favorite finishing details. The best DIY dress is one that feels comfortable, reflects your personal style, and gives a beautiful piece of fabric a fresh new life.
Tags
DIY Dress Bedsheet Dress DIY Fashion Upcycled Fashion Sewing Projects Floral Dress Sewing Ideas Fabric Upcycling