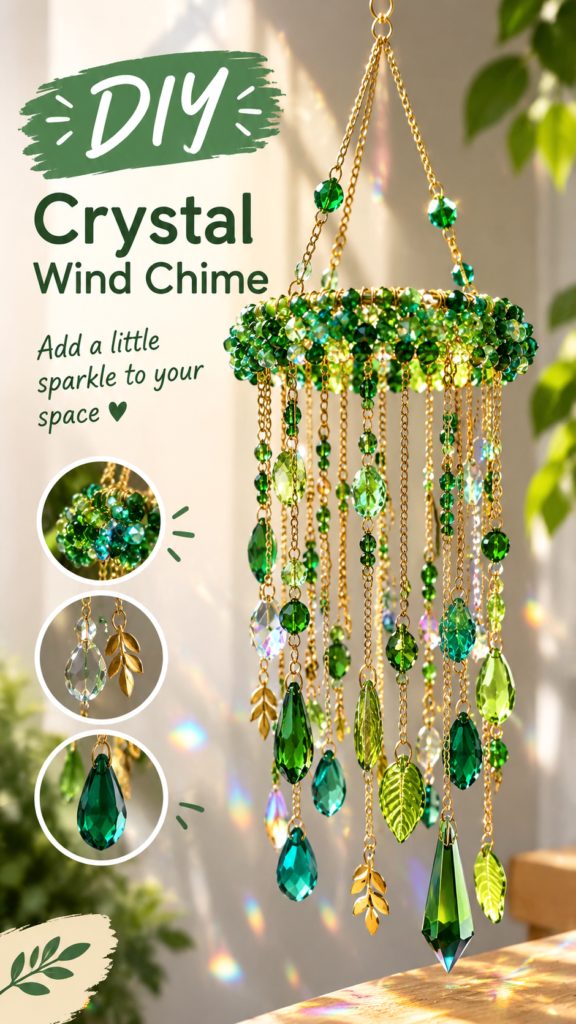
There is something instantly charming about a handmade wind chime. When sunlight catches colorful beads and faceted crystals, the result becomes more than simple decoration. It adds movement, sparkle, texture, and personality to a room, balcony, patio, or garden. This DIY wind chime idea combines delicate gold-tone chains with layers of green, turquoise, and clear beads, creating an elegant piece that looks artistic while still being approachable as a craft project.
If you love handmade home decor, beaded crafts, or colorful DIY projects, wind chimes are a wonderful way to turn small decorative pieces into something eye-catching. You can customize the colors, charms, lengths, and arrangement to create a design that feels completely your own.
Key Takeaways
- Use beads and faceted crystals to create sparkle and visual movement.
- Combine several shades of green for a layered, nature-inspired appearance.
- Gold-tone chain and metal charms add an elegant decorative finish.
- Vary the hanging lengths to give your DIY wind chime a fuller silhouette.
- Customize the design for indoor decor, a balcony, patio, or sheltered garden area.
- Reuse leftover jewelry-making supplies to create a one-of-a-kind craft.
Why DIY Wind Chimes Make Beautiful Decor
Wind chimes are especially appealing because they combine visual decoration with gentle movement. Unlike a wall decoration that stays completely still, a hanging design changes as air moves around it. Beads catch the light, chains shift position, and dangling charms create a sense of depth.
The design shown here takes that idea in a glamorous direction. Instead of relying on traditional tubes or a simple wooden structure, it uses an abundance of beads, crystals, chains, and small botanical-style charms. The combination creates a jewelry-like appearance that can work beautifully as decorative art.
Important: The most attractive DIY wind chimes do not need to use identical components. Mixing different bead shapes, finishes, and sizes can create the layered handmade character that makes a craft feel special.
Materials for a Beaded DIY Wind Chime
You can adapt the materials according to the supplies you already have. The reference design is visually built around a circular top, gold-tone chains, green beads, faceted crystals, and decorative charms. That gives you plenty of room to experiment without needing to reproduce the exact arrangement.
- A lightweight circular frame or ring
- Gold-tone or other decorative jewelry chain
- Assorted green, teal, lime, and clear beads
- Faceted crystal-style pendants
- Decorative metal charms, such as leaves
- Small jump rings
- Jewelry pliers
- Wire cutters or chain cutters
- Beading wire, cord, or suitable jewelry findings
- A strong hanging ring or loop
For a more colorful version, introduce shades of blue, amber, pink, or purple. For a softer design, use clear, pale green, and champagne-colored components. The beauty of this craft is that there is no single correct palette.
Choosing Beads and Crystals
Faceted pieces are particularly effective because their surfaces reflect light. Round beads provide visual rhythm, while larger teardrop, diamond, or geometric pendants become focal points. Smaller beads can fill gaps between larger decorative elements.
Try combining opaque, transparent, and translucent pieces rather than choosing only one finish. This creates depth and helps the wind chime look interesting from different angles.
How to Design Your DIY Wind Chime
Before attaching anything permanently, place your beads and charms on a table. This simple planning step can save considerable time and makes it easier to create a balanced composition.
1. Start With the Circular Frame
The circular upper section acts as the foundation for the entire design. Choose a frame that is lightweight enough to hang comfortably but sturdy enough to support the decorative strands.
Wrap or attach your chain around the frame in evenly spaced sections. You can keep the spacing precise for a structured appearance or vary it slightly for a more organic handmade look.
2. Create the Hanging Support
The top of the wind chime needs a secure suspension point. Several chains can meet at a central ring, creating a triangular support structure. This approach also adds another decorative element above the main circular frame.
Check that the three or more support sections are approximately balanced before moving forward. A balanced suspension system will help the finished piece hang naturally.
3. Prepare the Decorative Strands
Cut multiple pieces of chain in different lengths. Longer strands can form the outer edges while shorter pieces can fill the center. Avoid making every strand exactly the same length, because variation creates the cascading effect that makes this style so visually appealing.
Add beads and charms at different intervals. A large crystal near the bottom of one strand can be balanced by several smaller beads on another. This keeps the design from looking too symmetrical.
4. Layer Green Beads for Depth
The rich green palette is one of the strongest features of this design. Use darker emerald-like beads alongside brighter lime and turquoise pieces. Clear or pale crystals can be placed between them to create contrast.
Think about color distribution as you work. Rather than placing all the dark beads together, spread them throughout the design. The same principle works with brighter accent pieces.
Mix Shapes, Not Just Colors
Different shapes can make a handmade wind chime feel much more sophisticated. Combine round beads with faceted drops, geometric pendants, small leaves, and irregular decorative pieces. The varied silhouettes create interest even when the color palette remains simple.
5. Add Decorative Charms
Small metal charms can provide a beautiful contrast against colorful glass or crystal-style beads. Leaf shapes work especially well with green tones because they reinforce the natural color story without overwhelming the sparkling elements.
Place charms selectively. A few well-positioned accents often look more polished than attaching a charm to every strand.
Expert Insight
Treat the wind chime like a piece of jewelry for your home. Start with a dominant color, add one or two supporting shades, then use metallic accents and clear pieces to create contrast.
- Keep heavier pendants on secure findings.
- Use different strand lengths for a graceful cascading effect.
- Leave enough space between strands so individual pieces remain visible.
How to Create a Balanced Arrangement
One of the easiest ways to improve a DIY wind chime is to think about visual weight. Large crystals naturally attract attention, so distribute them rather than placing several large pieces next to each other.
Imagine the circular frame divided into sections. Place one prominent pendant in one area, then repeat or balance that visual weight farther around the frame. Smaller beads can bridge the spaces between larger accents.
Pro Tip: Hold the unfinished wind chime from its hanging point every few minutes. Viewing it vertically will reveal empty areas, crowded sections, and uneven strand lengths much more clearly than inspecting everything flat on a table.
Ways to Customize Your DIY Wind Chime
The green-and-gold combination is elegant, but your own version can reflect any decorating style. This project is particularly easy to personalize because the individual strands can be changed independently.
Create a Boho-Inspired Version
Use earthy beads, natural wood pieces, warm metal accents, and irregular shapes. Keep the strands slightly uneven for a relaxed handmade appearance.
Try a Minimalist Color Palette
For a cleaner look, choose mostly clear beads with one accent color. Silver-tone chain can replace gold-tone chain, while a few larger geometric pendants can provide the main visual interest.
Make a Bright and Playful Design
Use multiple colors and cheerful beads to create a lively decorative piece. This approach works well when you want a craft that feels colorful and energetic rather than elegant and understated.
Turn It Into a Thoughtful Handmade Gift
A personalized wind chime can make a lovely handmade gift because the color palette can be chosen around someone’s favorite shades or home decor. You can also create a smaller version when working with a limited supply of beads and charms.
Where to Display a Handmade Wind Chime
A decorative wind chime can bring sparkle to many areas of the home. Hang it near a bright window where natural light can pass through translucent beads and create reflections across nearby surfaces.
A covered patio or sheltered balcony can also be a great location. If you plan to place the piece outdoors, choose materials that are appropriate for the amount of moisture, sunlight, and movement the finished craft will encounter.
For indoor decorating, consider hanging it in a reading corner, creative workspace, entryway, bedroom, or beside a sunny plant. The cascading shape pairs naturally with greenery and other textured decor.
Tips for Making Your Wind Chime Look More Polished
- Repeat colors: Spread your main colors throughout the design instead of grouping them in one area.
- Vary lengths: Use several strand lengths to create depth and movement.
- Mix finishes: Combine shiny metal, transparent beads, and faceted pieces for contrast.
- Check the balance: Make sure the hanging frame remains stable once decorative strands are attached.
- Secure every connection: Close jump rings and attachment points carefully, especially for larger pendants.
- Keep the design breathable: Too many pieces in one small area can hide the individual details.
Let the Light Do the Decorating
One of the biggest advantages of using faceted beads and crystals is the way they interact with light. Place your finished piece somewhere bright enough to highlight the transparent and reflective surfaces. Even a simple change in lighting can make the colors appear completely different throughout the day.
This is also why clear and pale pieces are worth including. They do not compete with stronger colors, but they can catch highlights and add an airy quality to the finished wind chime.
A Simple Creative Project With Endless Possibilities
DIY wind chimes are a perfect example of how a collection of small craft supplies can become something much more impressive when they are thoughtfully arranged. A few chains, beads, crystals, and charms can be transformed into a layered decoration with plenty of personality.
The green-and-gold style is especially striking because it combines a fresh botanical color story with the polished appearance of metallic accents. You can follow that inspiration closely or use it as a starting point for your own palette.
The key is to experiment. Lay out different combinations, compare strand lengths, move the larger pendants around, and take a step back before making final connections. Handmade decor does not need to be perfectly symmetrical to look beautiful. In fact, a little variation is often what gives it character.
Quick Points
- Choose a strong circular base.
- Layer beads, crystals, chains, and charms.
- Vary the strand lengths for movement and depth.
- Use sunlight to highlight faceted pieces.
- Customize the colors to match your space.
Conclusion: Make Your Own Sparkling Wind Chime
A DIY wind chime can be as simple or elaborate as you want it to be. The layered crystal design shown here demonstrates how colorful beads, delicate chains, metallic charms, and thoughtful arrangement can turn an ordinary hanging craft into a statement piece.
Start with a small collection of materials and focus on building one beautiful strand at a time. Experiment with green, turquoise, clear, and gold tones, or create an entirely different palette that fits your home. With varied textures, different pendant shapes, and carefully balanced lengths, you can create a handmade wind chime that feels personal and completely original.
Most importantly, enjoy the process. The charm of DIY decor comes from making something that reflects your own creativity. Save this idea for your next crafting session and let your favorite beads and charms become a sparkling piece of handmade home decor.
Tags
DIY Wind Chimes Wind Chime Ideas Beaded Wind Chimes DIY Home Decor Crystal Crafts Handmade Decor Garden Craft Ideas span style=”display:inline-block; background:#e7f1e9; color:#245c3b; border-radius:20px; padding:7px 13px; margin:4px; font-size:14px;”>Beaded Crafts