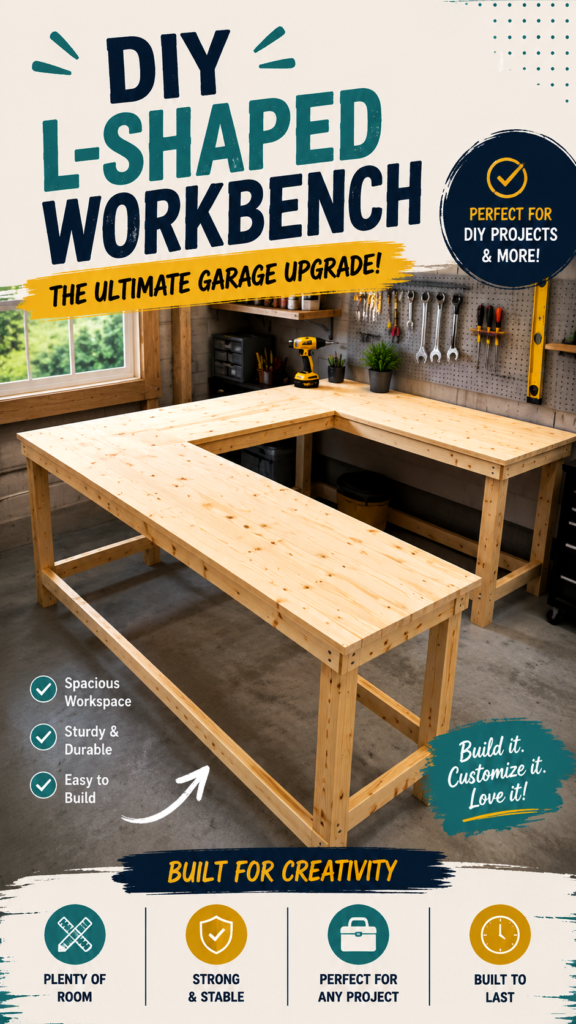
A good desk can completely change the way a workspace feels, and you do not always need an expensive piece of furniture to get there. A DIY desk gives you the freedom to choose the size, shape, materials, and layout that work best for your space. The L-shaped wooden desk shown here is a great example of a practical build that combines a generous work surface with a simple, sturdy structure. Whether you need a home office desk, craft station, study space, or flexible workshop surface, this style offers plenty of room to spread out while making smart use of available floor space.
Key Takeaways
- An L-shaped DIY desk creates a spacious and flexible work area.
- Wood offers a warm, natural look that works well in many spaces.
- A simple frame can provide practical support without making the design overly complicated.
- Custom sizing lets you adapt the desk to a garage, office, craft room, or study area.
- Thoughtful layout planning can improve both comfort and organization.
- Finishing and protecting the wood can help the desk stay attractive with regular use.
Why Choose a DIY Desk?
Store-bought desks can be attractive, but they are often designed around standard room sizes and common needs. A DIY desk is different. You can decide exactly how much workspace you want, where the desk should sit, and how much storage or legroom you need. That flexibility is especially useful when a room has an unusual shape or when one desk needs to serve several purposes.
The design pictured here takes advantage of an L-shaped layout. Instead of using a single straight surface, the desk extends in two directions, creating separate zones within the same workspace. One section can be used for a computer or paperwork while the other can hold tools, craft supplies, books, or an additional project.
Important: The biggest advantage of building your own desk is not simply saving money. It is the ability to create furniture around the way you actually work. Before cutting any material, think about your daily activities, equipment, preferred working height, and the amount of surface area you genuinely need.
The Appeal of an L-Shaped Desk
An L-shaped desk is a particularly useful choice when you want a large workspace without placing one enormous rectangular desk in the center of a room. The two connected surfaces naturally create zones and can fit neatly into a corner or along adjoining walls.
The pictured design has a generous wooden surface and an open base. That open construction keeps the lower portion visually light and leaves room for chairs, storage containers, tools, or other equipment. It also makes the desk feel more like a flexible workbench than a traditional office desk.
Create Separate Work Zones
One of the easiest ways to make an L-shaped desk more functional is to give each section a purpose. For example, the longer side can become a primary computer or writing area, while the shorter side can be dedicated to crafts, planning, cutting, assembling, or organizing supplies.
This approach can make a large surface feel more organized. Instead of moving everything whenever you switch tasks, different activities can have their own space. The arrangement is also helpful for anyone who likes to keep a project set up while using another part of the desk.
Choosing Wood for a DIY Desk
Wood is a popular material for DIY desks because it is versatile, approachable, and visually warm. The pale boards in this design create a clean appearance while allowing the natural grain and knots to remain part of the finished look.
When selecting boards, look for pieces that are reasonably straight and suitable for the size of surface you want to create. The desktop should feel comfortable and stable rather than excessively thin or flexible. Inspect each board before assembly and plan how the pieces will be positioned so the finished surface has a consistent appearance.
Think About the Desktop Surface
A desk surface needs to balance appearance with practicality. A smooth surface is pleasant for writing, crafting, using a keyboard, or handling small projects. If the desk will see heavy workshop use, a durable protective finish can make maintenance easier.
The natural light color of unfinished or lightly finished wood can also brighten a workspace. For a more personalized result, you could consider a clear protective finish, a subtle stain, or paint on the frame while leaving the desktop natural.
Planning the Desk Before You Build
Good planning is what turns a collection of boards into useful furniture. Start by measuring the area where the desk will live. Pay attention to doors, windows, shelving, electrical outlets, walkways, and anything else that could interfere with the finished structure.
Next, decide how deep each section should be. A deeper desktop gives you more working room, but it also takes up more floor space. For a compact room, a shallower design may be easier to live with. In a garage or spacious workshop, you may have more freedom to create a substantial surface.
Measure for Comfort
Desk height is another important consideration. A surface that is too high or too low can make long work sessions uncomfortable. Think about the chair you intend to use and how your arms, keyboard, tools, or other frequently used objects will sit on the desktop.
It is also worth considering the space beneath the desk. The open frame in this design provides generous legroom, which can be especially useful if the desk is used while sitting for extended periods.
Expert Insight
- Measure the complete footprint before buying or cutting wood.
- Keep frequently used items within easy reach on the main work surface.
- Plan support points beneath long desktop sections to reduce unwanted movement.
Building a Simple Desk Frame
The frame shown in the design uses a straightforward leg-and-support approach. The desktop rests on a series of vertical supports connected by horizontal pieces. This type of construction is appealing for DIY furniture because the structure is easy to understand and can be adapted to different dimensions.
A strong frame should support the desktop without excessive wobbling. Pay attention to the connections between legs and horizontal supports. Square, carefully aligned joints can make a noticeable difference to the finished desk.
For an L-shaped design, the corner deserves particular attention. Both desktop sections need adequate support, and the connection between them should feel solid. Take your time during assembly rather than rushing through the final joins.
Pro Tip: Assemble the frame on a reasonably level surface and check alignment as you go. Small adjustments are much easier to make during construction than after the entire desk has been assembled.
Making the Desk Work for Different Spaces
Although this style has a workshop-inspired appearance, an L-shaped DIY desk can work in many environments. The basic idea is flexible enough to become a home office workstation, student desk, craft table, creative studio surface, or hobby workspace.
Home Office
For a home office, one section can hold a monitor and keyboard while the second section provides room for notebooks, paperwork, a printer, or planning materials. Cable management can also be incorporated into the layout so the surface remains clean.
Craft and Creative Workspace
Crafters often need more surface area than a conventional desk provides. An L-shaped layout creates room for materials, tools, works in progress, and finished pieces without forcing everything into one small area.
Garage or Workshop
The open construction also makes this design well suited to a garage or workshop. The large surface can provide a dedicated place for measuring, assembling, sorting, or completing projects. Because the desk is built rather than purchased as a fixed office unit, you can adapt its dimensions to the space available.
Simple Ways to Customize a DIY Desk
Customization is one of the most enjoyable parts of a DIY desk project. Once the basic structure is planned, you can adjust the appearance and functionality to match your needs.
- Add a lower shelf for boxes, books, or frequently used supplies.
- Install hooks or a small organizer along an accessible wall.
- Use a clear finish to highlight the natural wood appearance.
- Paint the frame for contrast while keeping the top in a natural finish.
- Add simple cable-management solutions for computers and electronics.
- Adjust the length of each section to suit the room.
- Include rolling storage underneath if you need flexible organization.
The key is to customize the desk around real habits rather than adding features simply because they look interesting. A useful workspace should make everyday tasks easier.
Finishing Your Wooden Desk
Once the structure is complete, the finish can dramatically change the character of the desk. Sanding the surface can help remove rough areas and create a more comfortable working surface. Pay particular attention to edges and corners that will be touched frequently.
A natural clear finish can preserve the light wood appearance seen in the design, while a stain can bring out different tones in the grain. Paint is another option, particularly for the supporting frame. Choose a finish appropriate for the type of use the desk will receive and allow it to cure properly before placing equipment or supplies on the surface.
Keeping Your DIY Desk Organized
A large desk is only helpful when you can actually use the space. Start by dividing the surface into practical zones. Keep everyday items close, store occasional-use supplies underneath or nearby, and leave at least one clear section for active work.
The open space beneath the pictured desk can also be useful for organization. Storage bins, rolling carts, stools, or other movable pieces can be positioned there without permanently changing the desk itself.
At a Glance
- L-shaped layout provides generous workspace.
- Natural wood creates a warm, versatile look.
- Open framing allows flexible storage underneath.
- Custom dimensions make the design adaptable.
- Multiple work zones help keep projects organized.
Conclusion
A DIY desk can be much more than a basic piece of furniture. With a thoughtful layout, a sturdy wooden frame, and a spacious surface, it can become the central station for work, creativity, studying, hobbies, and weekend projects. The L-shaped design shown here is especially appealing because it provides plenty of usable workspace while keeping the construction straightforward and adaptable.
The best DIY desk is the one designed around your space and your routine. Measure carefully, plan your work zones, choose materials that suit the intended use, and give attention to stability and finishing. Whether you build a compact desk for a home office or a generous workstation for a garage, the result can be a practical workspace that feels truly your own.