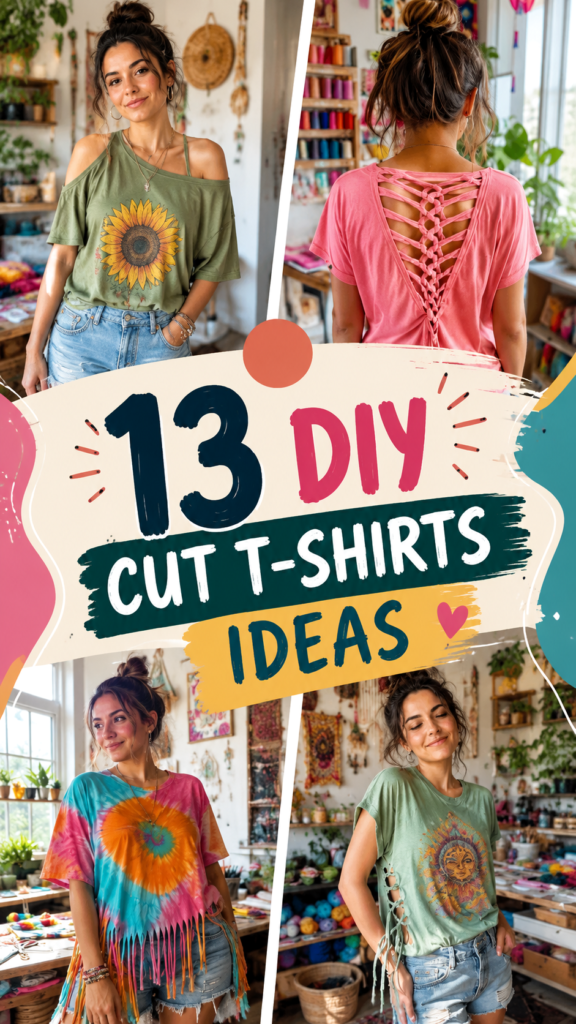
Old T-shirts do not have to stay tucked away in the back of your closet. With a pair of sharp fabric scissors, a little creativity, and a few simple cutting techniques, an ordinary tee can become a completely different piece of clothing. From open-back details and side cuts to fringed hems and relaxed oversized styles, cut tshirt diy projects are an easy way to refresh your wardrobe without spending much money.
The best part is that many T-shirt transformations require little or no sewing. You can experiment with the neckline, sleeves, hem, back, and sides to create a look that feels casual, playful, or fashion-forward. Whether you are customizing an old favorite or giving a thrifted shirt a second life, these ideas make DIY fashion approachable and fun.
Key Takeaways
- Choose a roomy T-shirt when trying detailed cuts for the first time.
- Plan and mark your design before making permanent cuts.
- Use fringes, side openings, and back details to add personality.
- No-sew T-shirt projects are ideal for quick wardrobe updates.
- Wash and wear your finished shirt gently while you test the durability of the cuts.
Why Cut T-Shirt DIY Projects Are So Popular
DIY fashion has a special appeal because it lets you create something that feels personal. Instead of searching for the exact shirt you have in mind, you can start with a basic tee and change it yourself. A simple alteration can turn a plain shirt into a statement piece that works with jeans, denim shorts, leggings, or layered outfits.
Cut T-shirt projects are also beginner-friendly. Unlike more advanced sewing projects, many designs depend on simple straight cuts, small openings, or decorative slits. Cotton and cotton-blend tees are especially convenient because the fabric is flexible and easy to manipulate.
Important: The key to a successful DIY T-shirt makeover is restraint. It is always easier to make another small cut than it is to repair a cut that has already gone too far.
The visual inspiration for these styles centers on creative, casual clothing that combines comfortable everyday T-shirts with handmade details. The results can range from subtle and understated to colorful and dramatic, depending on the shirt and the cutting pattern you choose.
What You Need for a Cut T-Shirt DIY
You do not need a large craft collection to get started. Most T-shirt transformations can be completed with a few basic supplies you may already have at home.
- Old or inexpensive T-shirt: Choose something you are comfortable experimenting with.
- Sharp fabric scissors: Clean scissors help create smoother edges and more controlled cuts.
- Fabric chalk or washable marker: Useful for planning lines before cutting.
- Ruler or measuring tape: Helpful when you want symmetrical details.
- Flat work surface: A table makes it easier to position the shirt accurately.
- Optional embellishments: Fabric paint, patches, beads, or other decorative details can be added after the cutting is complete.
Before starting, wash the shirt and allow it to dry completely. This gives you a more reliable idea of its actual shape and helps remove wrinkles that could affect your measurements.
13 Cut T-Shirt DIY Ideas to Try
1. Simple Side Cut T-Shirt
Side cuts are one of the easiest ways to transform a basic tee. Make a series of horizontal cuts along one or both sides, then gently stretch the fabric to soften the edges. You can keep the openings small for a subtle effect or make them longer for a more noticeable design.
This style works particularly well with oversized shirts because the relaxed shape gives the cuts room to create movement without making the shirt feel too tight.
2. Lace-Up Side Design
Take the side-cut idea a step further by creating narrow strips of fabric that can be tied or woven together. This creates a lace-up effect while allowing you to adjust how open the sides look.
For a balanced appearance, mark both sides before cutting. Keeping the openings similar in size will make the finished shirt look intentional rather than accidental.
3. Open-Back T-Shirt
An open-back design can turn a standard tee into a completely different style. Carefully remove a section from the back while leaving enough fabric around the shoulders and sides to maintain the shape of the shirt.
You can create a large opening, a smaller geometric shape, or a series of connected strips. This is especially effective when layered over a fitted tank or worn as a casual warm-weather piece.
4. Crisscross Back Cut
For a more detailed variation, create several horizontal strips across the back and connect them with carefully spaced vertical cuts. When gently stretched, the strips can form a decorative crisscross appearance.
This technique looks intricate, but the design begins with simple cuts. The important part is measuring the spacing before you pick up the scissors.
5. Fringe Hem T-Shirt
Turn a basic shirt into a playful fringe top by cutting narrow vertical strips along the bottom hem. Keep the strips approximately the same width for a clean look, or vary the lengths slightly for a more relaxed handmade effect.
Fringe works beautifully with casual outfits, especially when paired with denim shorts or jeans. You can also knot individual strips to create additional texture.
6. Cropped T-Shirt
A cropped tee is one of the quickest transformations you can make. Decide where you want the new hem to sit, mark the line across the shirt, and cut slowly from one side to the other.
Try the shirt on before making the final cut whenever possible. Remember that you can always remove more fabric later.
7. Off-Shoulder Cut
Give a classic T-shirt a softer silhouette by reshaping the neckline so it sits lower across the shoulders. Start conservatively and gradually widen the opening until you reach the desired shape.
An off-shoulder cut can make a loose tee feel more feminine and relaxed without requiring complicated construction.
Expert Insight
- Lay the shirt completely flat before measuring or cutting.
- Make a paper or chalk template if your design has repeated shapes.
- Stretch each cut gently after finishing to see how the fabric naturally settles.
8. Sleeveless T-Shirt
Removing the sleeves can instantly change the character of a T-shirt. Follow the existing armhole as a guide, then refine the shape gradually rather than cutting a large section away at once.
You can leave a narrow shoulder section for a classic tank-inspired shape or make the openings wider for a loose workout or summer look.
9. Cutout Shoulder Detail
If you want something more subtle than a sleeveless shirt, create a small opening around the shoulder area. A curved or teardrop-shaped cutout can add visual interest while keeping most of the original shirt intact.
This is a great project when you want to experiment with DIY clothing but do not want to completely change the silhouette.
10. Decorative Neckline
Instead of changing the whole shirt, focus on the neckline. You can widen a traditional crew neck, create a soft scoop shape, or add small decorative openings around the collar.
Draw the new neckline first and check the shape from several angles. A smooth curve usually creates a more polished result than trying to cut freehand immediately.
11. Layered Slit Design
Long, narrow slits can create a layered texture without removing a large amount of fabric. Try placing several parallel cuts on the back, front, or sides of the shirt.
Keep the spacing consistent for a modern geometric appearance. Once the cuts are complete, gently pull the fabric to encourage the edges to curl naturally.
12. Colorful Upcycled T-Shirt
Cutting does not have to be the final step. A transformed tee can become even more expressive when combined with color. Fabric paint, simple dye effects, patches, or contrasting fabric details can give your finished piece a completely different personality.
When working with a colorful design, let the shape of the cuts remain relatively simple so the overall shirt does not become visually overwhelming.
13. Mixed Cut and Tie T-Shirt
Combine several beginner techniques into one design. For example, you can crop the hem, add side slits, and finish the openings with small knots. This creates a custom shirt that feels more detailed while still relying on straightforward techniques.
Mixed designs are also a great way to use leftover fabric creatively. Small strips from the hem or sleeves can sometimes become ties or decorative elements rather than going straight into the scrap pile.
How to Make Clean and Even Cuts
The quality of your tools and preparation can make a big difference. Dull scissors tend to pull the fabric, while sharp scissors can create cleaner lines with less effort.
Start by placing the T-shirt on a flat surface. Smooth out wrinkles without stretching the fabric. If the shirt has seams, use them as natural reference points when positioning your design.
- Decide on the final style before cutting.
- Mark important lines with washable chalk or a suitable fabric marker.
- Measure both sides if the design needs to be symmetrical.
- Make small cuts first and test the fit.
- Stretch the cut edges gently to see how they respond.
- Trim uneven sections only after checking the shirt on your body.
Pro Tip: If you are nervous about cutting an expensive or favorite shirt, practice the technique on an old tee first. The practice version can help you understand how much the fabric curls, stretches, and changes shape after cutting.
Choosing the Right T-Shirt for DIY Cutting
Not every T-shirt will behave exactly the same way. A soft, flexible tee is usually easier for beginners than a thick, structured fabric. Oversized shirts provide more material to experiment with, making them particularly useful for open backs, side cutouts, and fringe designs.
Consider the existing shape of the shirt as well. A fitted tee may work beautifully for a cropped style, while a loose shirt can be ideal for an oversized transformation. Graphic tees can also make interesting DIY projects because the original artwork can become part of the finished design.
Before cutting, inspect the seams and fabric for damage. If the shirt is already stretched or worn around a particular area, avoid placing your most important cuts there.
Styling Your DIY Cut T-Shirt
A newly customized tee can become the centerpiece of a casual outfit. Pair a cropped design with high-waisted jeans or denim shorts. A loose fringed shirt can create a relaxed weekend look, while an open-back style can work nicely as a layering piece.
Accessories can also change the mood. Simple jewelry, sneakers, sandals, a casual bag, or a denim layer can each push the outfit in a different direction.
For colorful or heavily detailed shirts, keep the rest of the outfit relatively simple. If your T-shirt has a dramatic cutout pattern, let that feature stand out rather than competing with too many additional details.
Common DIY T-Shirt Mistakes to Avoid
One of the most common mistakes is cutting too quickly. Once fabric has been removed, there is no easy way to put it back. Start with a conservative design and make gradual changes.
Another mistake is forgetting that fabric can stretch. A narrow slit may become significantly wider once the shirt is worn or gently stretched. Leave enough material between openings to maintain the structure of the garment.
- Do not cut while the shirt is being worn.
- Avoid making large cuts before testing a small section.
- Do not skip measuring when creating symmetrical designs.
- Avoid pulling the fabric aggressively during cutting.
- Check the finished shirt for loose or overly thin sections before wearing it regularly.
Caring for Your Customized T-Shirt
Once your DIY project is finished, gentle care can help preserve the new shape. Follow the care instructions on the shirt whenever possible, and consider turning a heavily customized tee inside out before washing.
Avoid unnecessary stretching around delicate cutout areas. If you notice an opening becoming larger than intended, stop wearing the shirt until you can reinforce or adjust the design.
With simple care, a customized T-shirt can remain a fun part of your casual wardrobe for a long time.
Quick Points
- Start simple and build confidence with each project.
- Mark your design before making permanent cuts.
- Oversized tees offer plenty of room for experimentation.
- Mix cropping, fringe, slits, and ties for a custom look.
- Let the T-shirt’s original color and graphic guide your design choices.
Final Thoughts on Cut T-Shirt DIY
A great cut tshirt diy project does not need to be complicated. The most appealing transformations often begin with a basic shirt and one simple idea, such as changing the neckline, opening the sides, creating a fringe hem, or adding an interesting back detail.
What makes these projects so enjoyable is the freedom to experiment. You can follow a familiar technique, adjust the measurements, combine several ideas, or create something completely personal. An old T-shirt that once felt ordinary can become a fresh wardrobe favorite with just a few thoughtful cuts.
Start with a shirt you are willing to experiment on, take your time with the first few cuts, and remember that creativity works best when you give yourself permission to try. Save your favorite ideas, gather your scissors, and turn that forgotten T-shirt into something worth wearing again.