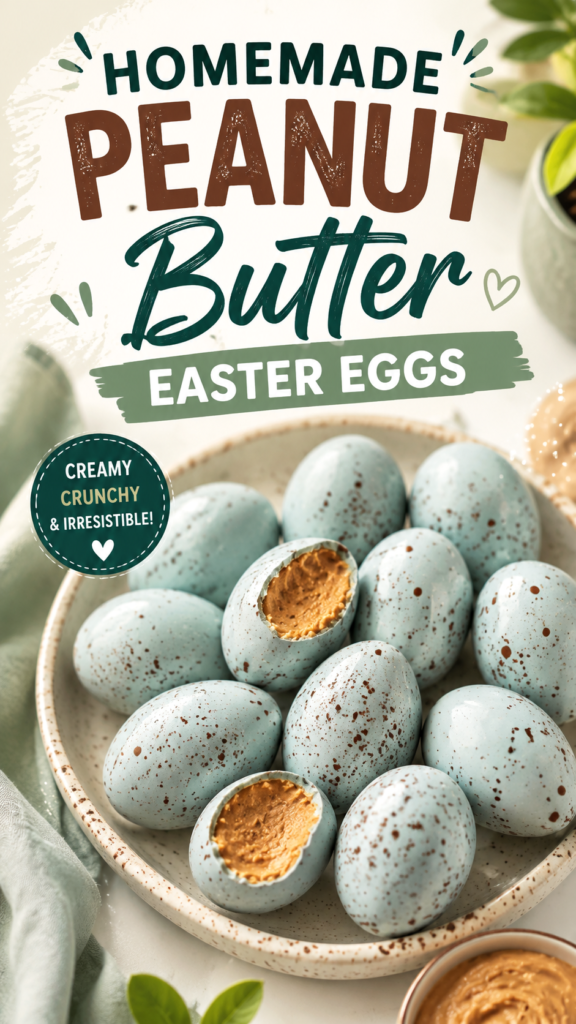
These homemade peanut butter Easter eggs are the kind of festive treat that instantly brings a little springtime charm to the dessert table. With their soft pastel-blue coating, playful chocolate speckles, and creamy peanut butter center, they look special enough for an Easter celebration while still feeling like a fun DIY kitchen project. If you love easy Easter desserts, homemade candy, or peanut butter treats, this idea is a wonderful one to save for spring.
Key Takeaways
- Homemade peanut butter Easter eggs are a fun alternative to store-bought Easter candy.
- An egg-shaped form gives these treats their classic Easter look.
- A pastel coating creates a soft spring-inspired finish.
- Chocolate speckles add a charming, handmade appearance.
- Cutting a finished egg in half reveals the creamy peanut butter center.
- These treats are ideal for Easter parties, dessert tables, gifting, or weekend baking.
Why Homemade Peanut Butter Easter Eggs Are So Fun
Easter is a perfect excuse to make something colorful, playful, and a little different from the usual cookies and cupcakes. Homemade peanut butter Easter eggs combine two familiar favorites, peanut butter and chocolate, in a shape that instantly feels festive.
The visual appeal is a major part of the fun. The eggs shown here have a muted pastel-blue exterior covered with small brown speckles, giving them the appearance of naturally decorated spring eggs. Once one is cut open, the contrast between the cool-toned shell and rich golden peanut butter filling makes the treat even more tempting.
Important: The best homemade Easter treats do not need complicated decoration. A simple pastel coating, a few contrasting speckles, and an egg shape can turn an everyday peanut butter candy into a centerpiece-worthy dessert.
The Appeal of the Peanut Butter and Chocolate Combination
Peanut butter and chocolate work beautifully together because their flavors balance one another. The nutty, rich filling provides a creamy contrast to the sweetness of the outer chocolate layer. That familiar combination also makes these Easter eggs approachable for guests who prefer classic flavors.
The texture contrast adds another reason to love them. A soft peanut butter center surrounded by a firm chocolate coating creates a satisfying bite. Depending on the type of peanut butter used, the filling can be exceptionally smooth or have a little extra texture.
What You Need for Homemade Easter Eggs
One of the advantages of this Easter DIY is that the concept is straightforward. You can build the treats around a small group of familiar ingredients and then focus your creativity on the shape and decoration.
- Peanut butter for the creamy center
- A sweetener or binding ingredient suitable for your preferred filling consistency
- Chocolate or confectionery coating for the outer shell
- Food coloring suitable for creating a pastel shade
- A contrasting chocolate or decorating mixture for the speckled finish
- Optional toppings or sprinkles for additional Easter decoration
The exact quantities can be adjusted depending on how many Easter eggs you want to make and how thick you want the shell to be. If you are experimenting for the first time, making a small batch is a convenient way to test the filling texture and coating technique before preparing a larger quantity.
Choosing the Peanut Butter
For a smooth, classic center, creamy peanut butter is an easy choice. It creates the rich texture visible when the eggs are cut open. If you enjoy a little texture, a crunchy variety can add small pieces of peanut throughout the filling.
Pay attention to consistency. A filling that is too loose can be difficult to shape, while a mixture that is excessively firm may become difficult to mold into neat eggs. The goal is a mixture that can hold its shape comfortably.
Picking a Pastel Chocolate Coating
The pastel-blue finish is what gives these treats their distinctive Easter personality. Soft blue works especially well because it contrasts beautifully with the warm golden peanut butter filling and darker decorative speckles.
You do not have to copy the same color. Pastel pink, lavender, pale yellow, mint green, or creamy white can all create a spring-inspired look. For a coordinated Easter dessert table, consider choosing one main pastel shade and using a second color for small decorative details.
How to Make Peanut Butter Easter Eggs
The process can be broken into a few simple stages: prepare the filling, shape the eggs, chill them, coat them, and decorate the finished shells. Taking your time during the shaping and coating stages will make the final result look much more polished.
1. Prepare the Peanut Butter Filling
Begin by combining your peanut butter filling ingredients until the mixture is evenly blended. You are looking for a texture that is soft enough to work with but firm enough to maintain an egg shape.
If the mixture feels too soft, chilling it can make shaping easier. If it feels too dry or crumbly, adjust the mixture gradually rather than adding a large amount of liquid at once.
2. Shape the Filling Into Eggs
Divide the mixture into portions and shape each one into an oval. Gently narrow one end and round the other to create a recognizable egg silhouette. The eggs do not need to be perfectly identical. Slight variations can actually enhance the homemade appearance.
For a more consistent batch, portion the filling before shaping. This helps each egg have a similar size and makes the finished platter look balanced.
3. Chill Before Coating
Chilling the shaped filling is an important step because it makes the pieces easier to handle. A firmer center is less likely to lose its shape when dipped into the coating.
Arrange the shaped eggs on a lined tray with a little space between them. Once they have firmed up, they should be much easier to coat cleanly.
4. Prepare the Pastel Coating
Melt the chocolate or confectionery coating according to the product directions. If you want the soft blue appearance shown in this style of Easter treat, add an appropriate food coloring gradually until you reach the desired pastel shade.
Keep the color light and delicate for a springtime effect. A muted pastel shade allows the darker speckles and golden filling to stand out without making the dessert look overly busy.
5. Coat the Eggs
Working with one chilled egg at a time, coat it with the prepared chocolate mixture. Allow excess coating to drip away before placing the egg back on the lined tray.
A smooth coating does not have to be perfectly flawless. Small variations in thickness can contribute to the handmade character that makes DIY Easter candy so appealing.
6. Add the Speckled Finish
The speckled appearance is a simple detail that makes these peanut butter Easter eggs especially eye-catching. Once the pastel coating has set enough to hold the decoration, add small irregular brown spots across the surface.
You can create a delicate scattering of tiny dots or use a more varied pattern with a mixture of small and slightly larger marks. Keeping the speckles irregular gives the eggs a natural, hand-decorated appearance.
Expert Insight
- Chill the shaped peanut butter centers before dipping so they are easier to handle.
- Use a restrained amount of food coloring to maintain a soft pastel appearance.
- Vary the size and placement of speckles for a more natural handmade finish.
Tips for Better Homemade Easter Candy
Making chocolate-covered treats at home becomes much easier when you prepare your workspace before starting. Line your tray, organize your ingredients, and have your decorating tools ready. This keeps the process moving while the coating is workable.
Keep the Shapes Consistent
Try to portion the filling evenly before shaping. A small scoop or kitchen scale can help if you want a uniform batch. When the eggs are arranged together on a plate, similar sizes create a more polished presentation.
Do Not Overcomplicate the Decoration
The pastel shell is already visually distinctive. You do not need layers of sprinkles, edible glitter, and elaborate toppings to make these Easter treats attractive. A few carefully placed details can have a bigger impact than excessive decoration.
Pro Tip: If you want the finished eggs to look especially polished in photographs, place a few whole eggs beside one or two cut-open eggs. The combination shows both the decorative exterior and the creamy peanut butter center.
Creative Ways to Customize Easter DIY Eggs
Once you have the basic technique down, there are plenty of ways to personalize the treats. The egg shape gives you a simple canvas for experimenting with colors, textures, and decorations.
Try Different Pastel Colors
Create a mixed batch using several spring colors instead of coating every egg in the same shade. A combination of pale blue, pink, yellow, lavender, and green can create a cheerful Easter candy assortment.
Experiment With Speckles
Speckles can be subtle or bold. A fine scattering gives the eggs a delicate appearance, while larger spots create a more playful look. You can also change the contrasting color to coordinate with the outer coating.
Make Them Smaller for Party Trays
Miniature versions can be useful when you are serving several desserts. Smaller peanut butter eggs are easy to arrange on a platter alongside cookies, cupcakes, fruit, or other Easter sweets.
How to Serve Homemade Peanut Butter Easter Eggs
Presentation can turn a simple homemade candy into a memorable Easter dessert. Arrange the eggs on a ceramic plate, shallow serving bowl, or decorative tray. Soft linens and spring greenery can complement the pastel colors without competing with the food.
For an especially appealing display, place several whole eggs together and include a couple of cut-open pieces. The exposed peanut butter center creates an inviting focal point and helps guests immediately understand what is inside.
These treats can also be arranged in small food-safe bags or boxes for homemade Easter gifts. A simple ribbon or seasonal sticker can add a thoughtful finishing touch while keeping the focus on the handmade candy.
When to Make These Easter Treats
Homemade peanut butter Easter eggs are a great weekend project because much of the preparation can be divided into manageable stages. You can prepare and shape the filling first, chill it, and then complete the coating and decoration afterward.
They are also well suited to Easter gatherings because the finished pieces can be arranged together on a serving platter. If you are preparing them ahead of time, store them appropriately according to the ingredients and coating you use, and keep them away from excessive heat or direct sunlight.
A Fun Project for Families
The decorating stage can be particularly enjoyable as a shared kitchen activity. Adults can handle tasks that require heat or careful dipping, while children can participate in suitable decorating steps under supervision.
Let everyone choose a pastel color or create their own speckle pattern. The small differences between each egg make the finished batch feel personal and handmade.
Why This Easter DIY Is Worth Saving
There is something satisfying about taking familiar ingredients and transforming them into a dessert that looks completely different. Peanut butter Easter eggs have the comfort of a classic candy while the pastel shell and speckled finish give them a seasonal twist.
They also offer plenty of room for creativity without requiring elaborate decorating skills. You can keep the design minimal, experiment with several colors, or create a whole assortment of personalized Easter eggs.
At a Glance
- Classic peanut butter and chocolate flavor
- Festive egg-shaped presentation
- Soft pastel coating for a spring look
- Easy speckled decoration
- Great for Easter parties and homemade gifts
Conclusion: A Sweet and Creative Easter DIY
Homemade peanut butter Easter eggs are a charming way to bring a little creativity into your spring baking. The combination of a creamy peanut butter center, sweet chocolate coating, pastel color, and playful speckles makes each egg feel festive without requiring complicated decoration.
Whether you are preparing an Easter dessert table, looking for a homemade candy project, or simply want to try a fun seasonal treat, this idea is easy to personalize. Change the coating color, experiment with the speckles, make the eggs larger or smaller, and create a presentation that suits your celebration.
Most importantly, have fun with the process. The beauty of an Easter DIY is that the finished treats do not have to look perfectly identical. A little variation makes them feel homemade, thoughtful, and made especially for the occasion.
Save this Easter DIY idea for your next spring baking session and turn a simple peanut butter treat into something colorful, festive, and worth sharing. These homemade Easter eggs are proof that a few thoughtful details can make an everyday favorite feel completely celebration-ready.