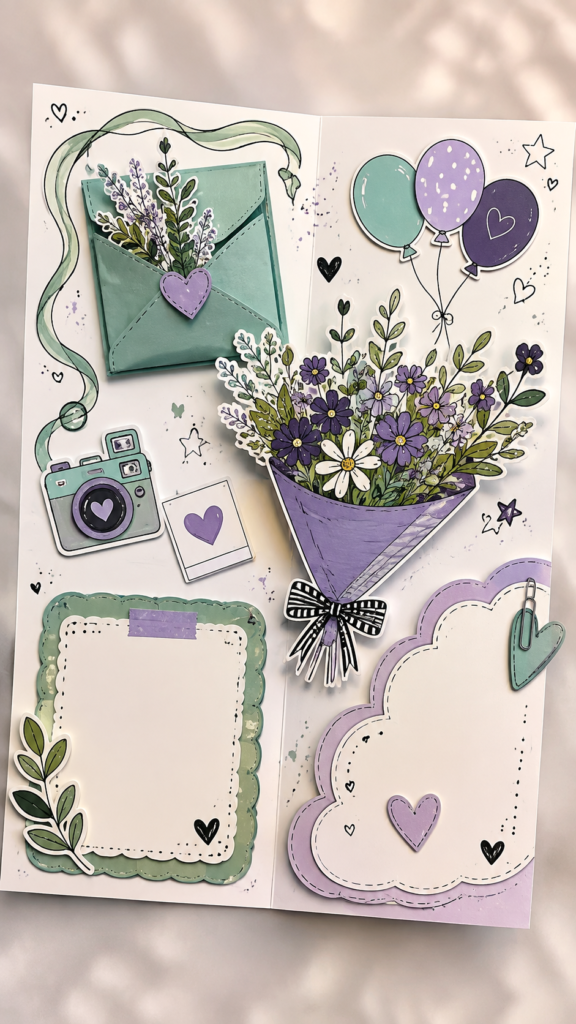
There is something special about a handmade birthday card that a store-bought card cannot quite capture. A few layers of paper, a cheerful bouquet, colorful balloons, playful doodles, and a handwritten message can turn a simple card into a keepsake. DIY birthday cards are also a wonderful way to slow down, get creative, and make something that feels personal without requiring complicated craft skills.
This style of birthday card combines the charm of scrapbook crafts with a fresh, cheerful stationery aesthetic. Think layered paper shapes, floral illustrations, envelopes, balloons, hearts, decorative borders, and small camera or photo-inspired details. The result is colorful without feeling crowded, making it a great source of inspiration for anyone searching for easy handmade birthday card ideas.
Key Takeaways
- Layered paper creates an attractive handmade look with simple materials.
- Flowers, balloons, hearts, and envelopes add instant birthday appeal.
- Soft greens, lavender, purple, cream, and black accents create a modern palette.
- Blank message panels leave plenty of room for a heartfelt personal note.
- Small details such as stitching, doodles, stickers, and paper clips make the design feel unique.
Why DIY Birthday Cards Feel More Personal
A birthday card does not need expensive supplies or elaborate techniques to feel meaningful. The most memorable handmade cards often have one thing in common: they look as though someone took time to make them specifically for the recipient.
A DIY birthday card gives you complete freedom to choose the colors, decorations, message, and overall mood. You can create something soft and elegant for a close friend, bright and playful for a child, or simple and sophisticated for someone who prefers minimal designs.
The scrapbook-inspired style shown here works especially well because it combines several small elements instead of relying on one large decoration. A flower bouquet becomes the visual centerpiece, while balloons, an envelope, a camera illustration, hearts, and decorative frames fill out the composition.
Important: The strongest handmade cards usually have one clear focal point. Choose a main element, such as a bouquet or oversized birthday message, then use smaller decorations to support it rather than compete with it.
Build Your Card Around a Simple Focal Point
Before cutting paper, decide what you want the recipient to notice first. In a floral birthday card, a large paper bouquet can naturally become the centerpiece. In another design, the focal point might be an oversized birthday greeting, a layered gift box, or a large heart.
Once you have chosen the centerpiece, arrange the supporting elements around it. This creates visual hierarchy and makes the card easier to read. It also prevents the handmade design from becoming a collection of unrelated decorations.
Try a Layered Floral Bouquet
Flowers are one of the easiest ways to create an eye-catching birthday card. You can use paper flowers, floral stickers, hand-drawn flowers, printed illustrations, or simple cutout shapes. Combine different flower sizes with leafy stems to make the arrangement feel full and dimensional.
For a modern scrapbook effect, slightly overlap the flowers and leaves. A few pieces can extend beyond the edge of the bouquet wrapper. This gives the arrangement a playful, handmade appearance and makes it feel more three-dimensional.
Use Balloons for a Festive Touch
Balloons instantly communicate celebration. They are also easy to recreate using paper cutouts or simple drawings. Try combining three balloons in different sizes and adding thin string lines that meet at a small bow.
For a coordinated look, use one or two colors from the floral arrangement in the balloons. Small dots, stars, or hand-drawn highlights can give plain balloon shapes more personality without making them difficult to create.
Choose a Fresh Color Palette
Color can completely change the personality of a handmade birthday card. The soft combination of mint green, sage, lavender, purple, cream, and black accents creates a cheerful but slightly sophisticated look. It feels playful enough for a birthday while still looking polished.
Start with two main colors and one neutral. For example, mint and lavender can be your primary colors, while cream provides a calm background. A small amount of black can then be used for outlines, lettering, doodles, and tiny decorative details.
- Mint and sage: ideal for envelopes, borders, leaves, and background accents.
- Lavender and purple: perfect for flowers, hearts, balloons, and decorative layers.
- Cream and white: useful for writing spaces and keeping the design visually balanced.
- Black: best used sparingly for outlines, handwritten details, and small doodles.
Keeping the palette consistent is one of the easiest ways to make a DIY card look professionally designed. Even if every element is handmade, repeating the same few colors helps the finished composition feel intentional.
Create Dimension With Paper Layers
Flat paper can become surprisingly dimensional when you combine layers. Start with a sturdy base, then add decorative panels, frames, cutouts, and raised pieces. Foam adhesive or small pieces of double-sided foam tape can lift certain elements slightly above the surface.
Layering is especially effective for envelopes, hearts, flowers, balloons, and scalloped frames. You can also create depth by placing a darker paper shape behind a lighter one, creating a subtle shadow effect.
Add Handmade Stitching Details
Decorative stitching is a simple way to make paper elements resemble fabric or scrapbook embellishments. You can draw short dashed lines with a fine black pen around a heart, frame, envelope, or label.
If you enjoy paper crafting, real thread can also be used around selected pieces. Keep the stitching limited to a few important shapes so the card remains clean and readable.
Why This Matters
Small decorative details create the handmade character people love about scrapbook-style cards. You do not need to decorate every inch. A few carefully placed hearts, stars, dots, stitched borders, and doodles can make a simple design feel thoughtfully finished.
Make Space for a Meaningful Message
One of the most useful features of a handmade birthday card is a dedicated writing area. Decorative designs can be beautiful, but the personal message is often what the recipient remembers most.
Consider adding a large blank panel with a scalloped border, cloud shape, rounded rectangle, or framed opening. Keep the surrounding decorations relatively light so the message remains easy to read.
Short Birthday Messages to Inspire You
If you are not sure what to write, keep the message warm and genuine. You do not need a long paragraph. A few sincere sentences can be enough.
- “Wishing you a beautiful birthday filled with happy little moments.”
- “Hope your day is as wonderful and colorful as you are.”
- “Cheers to another year of memories, laughter, and new adventures.”
- “So grateful to celebrate another special year with you.”
Pro Tip: Match the message to your relationship with the recipient. A short inside joke, shared memory, or personal compliment will usually make a handmade birthday card feel far more special than a generic greeting.
Use Small Decorative Elements With Purpose
Small accents are what give scrapbook-inspired birthday cards their charm. Hearts, stars, dots, leaves, paper clips, ribbons, tiny flowers, and camera motifs can fill empty areas and create connections between larger elements.
The key is moderation. Too many unrelated embellishments can make a card look busy. Instead, repeat a few motifs throughout the design. If you use hearts near the message panel, for example, add one or two smaller hearts near another section for visual consistency.
A camera or photo-inspired element can also add a fun memory-making theme. It works particularly well for cards intended for friends or family because it subtly suggests shared moments and photographs.
Easy DIY Birthday Card Layout Ideas
You can adapt the same visual approach to several different layouts. The goal is not to reproduce one exact design, but to use the underlying ideas of layering, balance, and personalization.
Floral Centerpiece Card
Place a large paper bouquet in the lower or central portion of the card. Add a small envelope or greeting panel above it and leave a generous writing space below. This layout works beautifully with floral paper, hand-cut leaves, and dimensional flower stickers.
Celebration Collage Card
Combine balloons, hearts, stars, ribbons, small flowers, and framed notes. Keep each decoration relatively small and create a clear message area in the center. This approach is especially good when you want a playful card packed with personality.
Envelope Surprise Card
Create a small paper envelope and place a miniature note, flower, or decorative insert inside. The recipient gets a tiny surprise before even reaching the main message. A contrasting heart seal or sticker can make the envelope stand out.
Simple Materials to Keep on Hand
You can create this style of birthday card with basic craft supplies. There is no need to purchase every decorative element at once. Start with a small collection and build it over time.
- Cardstock in cream, white, mint, sage, lavender, or purple
- Craft scissors and a precision cutting tool
- Double-sided tape or paper-safe adhesive
- Foam adhesive for raised elements
- Fine black pens for outlines and doodles
- Decorative stickers or paper embellishments
- Ribbon, thread, or twine for small accents
- Optional scrapbook paper for backgrounds and layers
How to Keep a Handmade Card Looking Polished
A handmade card can be playful without looking messy. The secret is to create a little structure before adding decorative details. Decide where the focal point will go, reserve space for the message, and choose your color palette before cutting everything.
It also helps to test your arrangement before gluing. Lay the pieces on the card base and move them around until the composition feels balanced. Take a quick photo with your phone if necessary, then use it as a reference while assembling the final version.
Pay attention to spacing around the edges. Leaving a small amount of breathing room makes the design feel cleaner and gives decorative shapes room to stand out.
Important: Handmade does not have to mean complicated. A limited palette, one strong focal point, consistent outlines, and intentional spacing can make even very simple paper pieces look cohesive and thoughtfully designed.
Make the Card Your Own
The best part of DIY birthday cards is that there are no strict rules. Change the flowers to match the recipient’s favorite colors. Replace balloons with stars or butterflies. Add photographs, handwritten memories, initials, or a tiny pocket containing a personal note.
You can also turn the design into a reusable crafting formula. Choose one focal element, two or three supporting decorations, a small writing area, and a consistent palette. From there, change the details for every birthday and create a completely different card without starting from scratch.
For children, brighter colors and larger shapes can make the design more playful. For adults, muted colors, botanical illustrations, simple lettering, and restrained embellishments can create a more elegant look. The same basic handmade techniques work for both.
At a Glance
- Style: colorful scrapbook-inspired handmade birthday card
- Main elements: flowers, balloons, envelopes, hearts, frames, and doodles
- Best palette: soft green, lavender, purple, cream, and small black accents
- Easy technique: layer paper shapes with foam adhesive for dimension
- Personal touch: finish with a handwritten birthday message or shared memory
Conclusion: Turn Simple Paper Into a Memorable Birthday Card
DIY birthday cards are a beautiful reminder that thoughtful gifts do not have to be complicated. With a few pieces of cardstock, a coordinated color palette, simple paper layers, and a heartfelt message, you can create something that feels personal from the moment it is opened.
Floral bouquets, balloons, envelopes, hearts, photo-inspired details, and playful doodles make an especially cheerful combination. Use these ideas as a starting point, then adjust the colors and decorations to suit the person you are celebrating.
Whether you are making a card for a best friend, family member, coworker, or someone special, focus on the details that make your relationship unique. That personal touch is what transforms a handmade craft into a meaningful birthday keepsake. Gather your favorite papers, start cutting, and let the design grow naturally.
Tags
DIY Birthday Cards Handmade Birthday Cards Birthday Card Ideas Paper Craft Ideas Scrapbook Cards Creative Card Making Birthday Crafts Personalized Cards