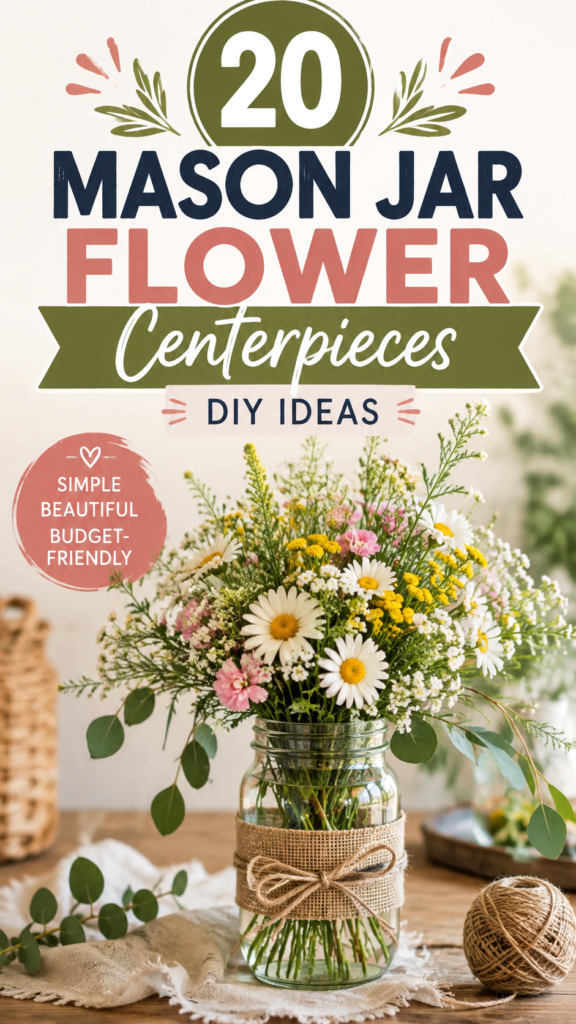
DIY floral arrangements are one of the easiest ways to bring color, texture, and a welcoming touch to your home without needing an elaborate setup. A simple glass mason jar filled with daisies, delicate white flowers, pink blooms, yellow accents, and fresh greenery can become a beautiful centerpiece with surprisingly little effort. The relaxed, gathered-from-the-garden look shown here is especially appealing because it feels natural rather than overly formal.
Whether you are decorating a dining table, preparing a centerpiece for a celebration, refreshing a kitchen counter, or simply looking for a creative weekend project, mason jar flower arrangements offer plenty of possibilities. With a few flowers, some greenery, and simple materials such as burlap and twine, you can create a charming arrangement that looks thoughtful while remaining approachable and budget-friendly.
Key Takeaways
- Use a mix of flower sizes, shapes, and textures to create a naturally full arrangement.
- Mason jars make simple, versatile vases for rustic and farmhouse-inspired decor.
- Combine focal flowers with filler blooms and greenery for balanced visual interest.
- Burlap and twine can quickly transform an ordinary jar into a charming centerpiece.
- Vary flower heights and let a few stems extend outward for a relaxed garden-inspired look.
- Choose seasonal flowers when possible for an arrangement that feels fresh and effortless.
Why DIY Floral Arrangements Are So Appealing
There is something naturally inviting about a loose bouquet of flowers displayed in a simple jar. Unlike highly structured floral designs, casual arrangements allow stems to move in different directions, creating an organic silhouette. The result feels warm, cheerful, and personal.
DIY floral arrangements are also flexible. You do not need an exact list of flowers to recreate the look. The beauty comes from combining whatever complementary blooms are available. White daisies can provide a bright foundation, while pink flowers add softness, yellow blooms bring warmth, and delicate filler flowers create lightness between larger blossoms.
The most important design principle is balance rather than perfection. A beautiful DIY bouquet should feel naturally gathered, with enough variation in height, color, and texture to keep the eye moving.
How to Choose Flowers for a Mason Jar Centerpiece
The easiest way to build a successful flower arrangement is to think in categories instead of trying to match a specific bouquet. You can choose a few flowers from each category and combine them into a cohesive design.
Start With a Focal Flower
Focal flowers are the blooms that immediately attract attention. In a relaxed arrangement, these can be larger daisies, fuller pink flowers, or another bloom with a noticeable shape. You do not need many focal flowers. A small number distributed throughout the bouquet can create plenty of visual interest.
Add Smaller Filler Flowers
Small white flowers are especially useful because they soften the spaces between larger blooms. They also add an airy quality to the arrangement. Tiny filler flowers can extend beyond the main bouquet, helping the design look abundant without requiring a large number of expensive flowers.
Finish With Plenty of Greenery
Greenery gives the bouquet structure and helps connect all the flower colors. Long stems can create height, while rounded leaves can soften the edges of the arrangement. A combination of upright foliage and trailing greenery works particularly well for a rustic mason jar centerpiece.
Creating the Relaxed Garden-Inspired Look
The arrangement shown in this style has an intentionally informal shape. Instead of trimming every stem to exactly the same length, the flowers are allowed to rise to different heights. Some stems sit close to the jar while others extend outward, creating movement.
To achieve this effect, begin by selecting a few taller stems for the center and upper portion of the bouquet. Add medium-height flowers around them, then fill open areas with smaller blooms and greenery. Step back occasionally as you work. Looking at the bouquet from a short distance makes it easier to notice areas that feel too dense or too empty.
Do not worry if the bouquet looks slightly uneven. That unevenness is part of its charm. A perfectly symmetrical arrangement can feel formal, while an irregular silhouette gives the centerpiece a fresh, garden-inspired personality.
Expert Insight
When arranging mixed flowers, build outward instead of simply filling the jar from the center. A few stems angled slightly left and right can make the bouquet look larger, more natural, and more visually interesting.
How to Style a Mason Jar for a Rustic Centerpiece
The vase itself can become part of the decoration. A clear mason jar is an excellent starting point because it lets the stems and water remain visible while keeping attention on the flowers. Its familiar shape also works beautifully with rustic, farmhouse, cottage, and casual country-inspired interiors.
For an extra decorative touch, wrap a section of the jar with burlap. The neutral texture contrasts nicely with delicate flowers and green foliage. A piece of twine tied around the burlap adds another layer of texture while keeping the design simple.
Simple Mason Jar Decoration Ideas
- Wrap the middle of the jar with a narrow strip of burlap.
- Tie natural twine into a simple bow.
- Use a small piece of lace for a softer cottage-inspired finish.
- Leave the jar mostly uncovered for a clean and minimal appearance.
- Add a small handwritten label for a personalized event centerpiece.
The key is to avoid adding too many decorative elements. Flowers should remain the main attraction. A single textural accent such as burlap or twine is often enough to give the jar a finished appearance.
Step-by-Step DIY Floral Arrangement
Creating a mason jar flower centerpiece can be simple even if you have never arranged flowers before. Follow these basic steps and adjust the proportions according to the size of your jar.
1. Prepare the Jar
Wash the mason jar thoroughly and fill it with fresh water. If you are using freshly cut flowers, make sure the inside of the jar is clean. This provides a simple, fresh foundation for your bouquet.
2. Trim the Stems
Cut the flower stems at different lengths rather than making every stem identical. Remove leaves that would sit below the water line. This keeps the visible arrangement cleaner and allows the flowers to sit more comfortably in the jar.
3. Add the Greenery
Begin with several greenery stems to establish the overall shape. Position some vertically and allow others to angle gently outward. This creates a framework that makes it easier to place the flowers.
4. Place the Focal Flowers
Add your larger flowers next. Spread them throughout the bouquet rather than clustering them all in one area. This creates better color distribution and gives the arrangement a balanced appearance from multiple angles.
5. Fill the Gaps
Use smaller white blooms and delicate filler flowers to fill visible gaps. Do not pack every opening tightly. Leaving small spaces allows the arrangement to breathe and keeps it from looking too heavy.
6. Adjust the Shape
Rotate the jar and inspect the bouquet from different sides. Move stems until the arrangement looks balanced. Let a few flowers sit higher than the rest and allow some greenery to extend beyond the main silhouette.
7. Add the Finishing Detail
Wrap the jar with burlap and twine if you want a rustic finish. Place the completed centerpiece on a wooden table, linen runner, or neutral textured surface to emphasize its relaxed character.
Color Combinations That Work Beautifully
The flower arrangement style pictured here uses a cheerful combination of white, yellow, pink, and green. This palette feels fresh without becoming overwhelming. White flowers provide visual breathing room, yellow introduces warmth, pink creates a soft accent, and greenery ties everything together.
You can adapt this idea to different seasons and decorating styles. For a softer look, combine white flowers with pale pink blooms and muted greenery. For a brighter centerpiece, add more yellow and warm-toned flowers. For a minimalist design, keep the palette mostly white and green.
- Fresh and cheerful: white, yellow, green, and soft pink.
- Classic: white flowers with abundant greenery.
- Soft cottage: blush pink, cream, white, and delicate foliage.
- Rustic: natural greens, white flowers, and warm yellow accents.
- Modern: limit the palette to two flower colors with plenty of greenery.
Where to Display DIY Flower Centerpieces
A mason jar flower arrangement is versatile enough to work in many areas of the home. Its casual appearance makes it especially suitable for spaces where you want decoration to feel warm rather than formal.
Dining Table
Place one jar in the center of the table for a simple focal point. If your table is long, several smaller jars can be arranged in a loose row. Keep the arrangements low enough that people can comfortably see across the table.
Kitchen Counter
A small mason jar bouquet can instantly brighten a kitchen counter or open shelf. The combination of glass, flowers, and greenery works particularly well alongside wood and neutral textures.
Entryway
A cheerful bouquet near an entryway creates an inviting first impression. Pair it with a small tray, woven basket, or other natural-textured decor for a cohesive look.
Special Occasions
DIY flower centerpieces can also be adapted for birthdays, showers, casual dinners, brunches, outdoor gatherings, and other celebrations. Using several matching mason jars creates consistency while keeping the overall style relaxed.
Why This Matters
- A simple jar allows the flowers to remain the visual focus.
- Natural textures such as burlap and twine make inexpensive materials feel intentional.
- A relaxed arrangement can be changed easily as flowers become available.
Tips for Making Your Bouquet Look Fuller
If your arrangement looks sparse, resist the urge to simply add more large flowers. Instead, introduce layers. Greenery can increase the visual size of the bouquet, while small filler flowers can occupy empty areas without making the arrangement feel crowded.
Another useful technique is to vary the height of the stems. Keeping every bloom at the same level can make the bouquet look flat. Taller stems create dimension, while shorter flowers bring attention toward the front of the jar.
Pro Tip: Turn the arrangement as you build it. Working from only one angle can create a bouquet that looks balanced from the front but uneven from the sides. Rotating the jar helps you create a centerpiece that looks attractive from every direction.
How to Keep the Arrangement Looking Fresh
Fresh flowers generally benefit from clean water and a clean container. Check the water regularly and replace it when it becomes cloudy. Removing leaves that sit underwater can also help keep the jar cleaner.
Keep the arrangement away from locations where it will be exposed to excessive heat or direct sunlight. A cooler, comfortable indoor location can help flowers remain attractive for longer. Remove individual blooms as they fade so the remaining flowers continue to look fresh.
These simple habits do not require complicated floral supplies. The goal is simply to provide the flowers with a clean and comfortable environment while keeping the display neat.
Make the Idea Your Own
One of the best things about DIY floral arrangements is that there is no single correct version. The mason jar can be decorated differently, the flowers can change with the season, and the color palette can be adapted to your room.
Try adding more greenery for a botanical look, using mostly white flowers for a calm centerpiece, or introducing brighter blooms for a playful arrangement. You can also experiment with different jar sizes to create a collection of complementary centerpieces.
If you enjoy rustic decor, combine the flowers with wood, linen, woven materials, and natural fibers. For a cleaner modern style, leave the glass jar uncovered and use a restrained color palette. The same basic DIY technique can fit surprisingly different decorating styles.
At a Glance
- Choose a clear mason jar as a simple vase.
- Combine focal flowers, filler blooms, and greenery.
- Vary stem heights for a natural silhouette.
- Add burlap and twine for rustic texture.
- Display the finished bouquet on a neutral, textured surface.
Conclusion: Simple Flowers, Beautiful Results
Creating a DIY floral arrangement does not have to involve complicated techniques or expensive supplies. A mason jar, a handful of complementary flowers, some greenery, and a simple decorative accent can become a beautiful centerpiece with plenty of personality.
The charm of this style comes from its relaxed appearance. Daisies, delicate filler flowers, colorful blooms, and leafy stems come together in a way that feels fresh and approachable. Adding burlap and twine gives the jar a rustic finish, while the clear glass keeps the arrangement light and uncomplicated.
Whether you are decorating for a special occasion or simply want to make an everyday room feel brighter, these DIY floral arrangement ideas offer an easy place to start. Experiment with colors, textures, heights, and seasonal flowers until you find a combination that feels like your own.
The best centerpiece is often the one that feels effortless. Start with what you have, embrace natural variation, and let the flowers provide the personality. A simple mason jar can turn an ordinary table into a warm and welcoming space.