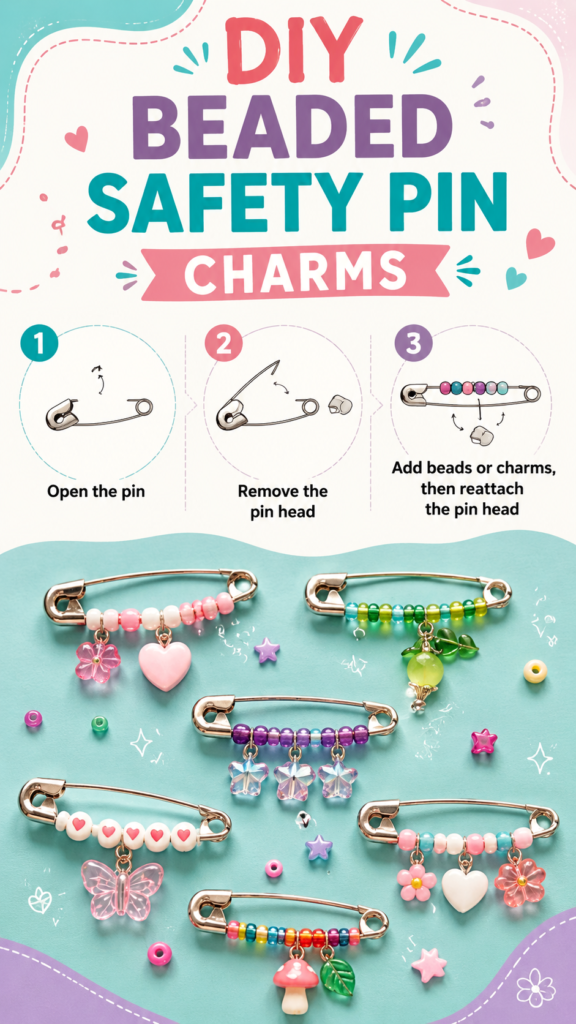
DIY pins are a fun way to turn simple craft supplies into colorful accessories with personality. A basic safety pin can become a miniature piece of handmade art when you add rows of beads, playful charms, and carefully chosen colors. The finished pieces can be used to decorate bags, jackets, backpacks, pencil cases, fabric accessories, or gifts.
What makes these beaded safety pin crafts especially appealing is how approachable they are. You do not need a complicated pattern or a large collection of supplies to get started. A few beads, a charm or two, and a suitable safety pin can create a completely different look. You can keep the design soft and pastel, make it bright and colorful, or choose a simple palette for a more understated accessory.
Key Takeaways
- Safety pins can become charming handmade accessories with beads and decorative charms.
- Mixing bead colors and shapes creates endless DIY pin combinations.
- Small charms can give each pin a distinct theme and personality.
- Simple layouts are beginner-friendly and easy to customize.
- DIY pins make thoughtful additions to bags, clothing, gifts, and craft projects.
Why DIY Pins Are Such a Fun Craft
The appeal of DIY pins comes from their combination of simplicity and creativity. Unlike larger craft projects that can require hours of preparation, a beaded pin can be designed in a relatively small workspace using only a handful of components. That makes it a great project for anyone who enjoys making personalized accessories without committing to a complicated technique.
The designs shown in this style of craft use safety pins as the foundation, then add colorful beads along the central bar. Small hanging charms provide another layer of decoration. Hearts, flowers, butterflies, stars, leaves, and other playful shapes can completely change the character of the finished piece.
The best part of making DIY pins is that there is no single correct design. Your color combinations, bead arrangement, and charm choices can make every pin look different.
What You Need to Make Beaded Safety Pin Charms
One reason these DIY pin ideas are so accessible is the short supply list. You can adapt the materials according to the size and style of the pin you want to create.
- Decorative safety pins
- Small craft beads
- Seed beads or other small round beads
- Decorative charms
- Small jump rings for attaching charms
- Bead containers or a small tray for organizing supplies
- Small jewelry-making pliers when needed for opening or closing jump rings
For a design inspired by colorful beaded pins, try collecting beads in several shades rather than buying only one color. Pastel pink, white, purple, green, blue, and bright multicolor beads can all work beautifully together. Heart-shaped beads, flowers, butterflies, stars, leaves, and other decorative pieces can then be added as focal points.
Choosing the Right Safety Pin
The safety pin is the foundation of the project, so choose one that has enough room for the beads you want to use. A longer pin gives you more space for a larger bead arrangement, while a smaller pin can be ideal for a subtle accent.
Look for a sturdy pin with a smooth bar and a secure closure. The beads should sit comfortably along the bar without preventing the pin from opening and closing normally.
How to Make DIY Beaded Pins
The basic process is straightforward. The reference design demonstrates a simple three-stage approach: open the pin, remove the appropriate pin head or component when the pin design allows it, add the beads or charms, and then reassemble the pin.
Step 1: Open the Pin
Start by opening the safety pin carefully. Give yourself enough workspace to see the bar and the closure clearly. If the pin has a removable component designed for adding beads, follow the construction of that particular pin rather than forcing it apart.
Work slowly during this stage. The goal is to create enough access for the beads while keeping the pin intact and functional.
Step 2: Prepare the Beads and Charms
Before placing anything onto the pin, arrange your beads on a clean surface. This makes it easier to experiment with color combinations before committing to the final design.
For example, you could create a repeating pattern using pink and white beads, alternate green and yellow beads, or build a rainbow-inspired arrangement. Another option is to use one dominant color and add a contrasting charm for visual interest.
Try a Simple Color Pattern
A simple repeating sequence can make a DIY pin look polished without requiring advanced design skills. Try arrangements such as pink, white, pink, white, or green, blue, green, blue. For a more playful finish, use several colors in a loose rainbow sequence.
Step 3: Add the Beads
Once you have selected your arrangement, slide the beads onto the appropriate section of the pin. Keep checking that the beads are sitting securely and that the pin still has enough movement to open and close.
You can fill much of the available bar with beads for a colorful statement piece, or leave some of the metal visible for a cleaner look. Both approaches can work well.
Step 4: Add Decorative Charms
Charms are where the design can really become personal. A heart can create a sweet and cheerful look, while a butterfly adds a delicate touch. Flowers can create a colorful spring-inspired style, and stars can add a playful accent.
Attach charms using suitable small rings or connectors. If you are working with jewelry findings, small pliers can help you open and close the connection neatly. Make sure every charm is firmly attached before using the finished pin.
Step 5: Reassemble and Check the Pin
After the beads and charms are in place, return the removable component to its original position if your safety pin design requires this. Check the finished pin from several angles.
The beads should remain in place, the charms should hang freely, and the safety mechanism should still function correctly. A quick inspection at this stage can prevent loose pieces from becoming a problem later.
Expert Insight
Think of the beads as the color foundation and the charms as the focal point. A balanced design usually looks more intentional when one element takes the lead instead of every component competing for attention.
Creative DIY Pin Ideas to Try
Once you understand the basic technique, you can create many different styles from the same materials. The examples pictured in this craft style demonstrate how different colors and charm combinations can make each safety pin feel unique.
Pastel Heart Pin
Use soft pink, white, and light-colored beads, then finish the design with a heart charm. This combination has a sweet, gentle appearance and works especially well for personalized accessories or handmade gifts.
Colorful Flower Pin
Combine bright beads with a small flower charm for a cheerful accessory. You can use several bead colors or choose one color family for a coordinated appearance.
Butterfly Charm Pin
Clear or pastel butterfly charms can create a delicate look. Pair them with pink, purple, blue, or white beads for a soft palette, or use contrasting colors for something more eye-catching.
Green Nature-Inspired Pin
Green beads paired with leaf-shaped or similarly themed charms can create a fresh, nature-inspired accessory. Add a contrasting bead in yellow or a lighter green to give the design more dimension.
Rainbow Beaded Pin
For a playful design, arrange beads in multiple colors. You can create a deliberate rainbow sequence or mix the shades for a more spontaneous handmade appearance.
How to Choose Colors for DIY Pins
Color is one of the easiest ways to change the personality of a handmade pin. If you want a soft and delicate result, choose related pastel shades. For a bolder accessory, combine contrasting colors. A simple neutral base can also make colorful charms stand out.
Another useful approach is to choose one main color and two supporting shades. For example, purple can be the dominant color with white and pink as accents. Green can be paired with yellow and clear beads. This keeps the design colorful while preventing it from looking visually crowded.
Pro Tip: Lay all your beads and charms out before assembling the pin. Seeing the complete combination at once makes it much easier to adjust the colors, spacing, and focal charm.
Ways to Use Handmade Beaded Pins
DIY pins are small, but they can add a noticeable personal touch to everyday items. Once finished, they can be used wherever a secure decorative pin is appropriate.
- Decorate backpacks and school bags.
- Add color to jackets or fabric accessories.
- Personalize pencil cases and craft bags.
- Create small handmade gifts for friends and family.
- Use several coordinated pins together for a larger decorative display.
- Make seasonal or color-themed collections.
They can also be a fun way to use leftover beads from other craft projects. Instead of letting small quantities of beads sit unused in a craft box, turn them into miniature accessories with a purpose.
Tips for Making Better DIY Pins
Keep the Beads Proportional
Small beads are generally easier to arrange on a safety pin than oversized pieces. Choose bead sizes that leave enough room for the pin to operate properly. Large decorative elements are often better suited as hanging charms rather than pieces placed directly along the bar.
Avoid Overloading the Pin
It can be tempting to keep adding beads and charms, especially when you have many beautiful options available. However, too many pieces can make the pin heavy and crowded. A small selection of well-matched decorations often creates a cleaner result.
Create Repeating Designs
Repeating colors or shapes can make a handmade pin appear more organized. Try placing the same color at regular intervals or alternating two shades. You can also use matching charms on multiple pins to create a coordinated set.
Check Every Connection
Before using or gifting a finished pin, check that every bead and charm is secure. Pay particular attention to connecting rings and any removable components. A few seconds of inspection can make the finished craft much more reliable.
Making DIY Pins a Fun Group Craft
Beaded safety pin crafts can also work well as a shared creative activity. Because the basic process is simple, each person can choose their own colors and charms while using the same basic materials.
Set out bowls of beads, separate the charms by type, and let everyone create a design that reflects their personal style. One person might prefer pastel colors and hearts, while another might choose bright rainbow beads and playful shapes.
This also makes the project useful for creating coordinated sets. Everyone can use a shared color palette while choosing different charm combinations, resulting in pins that look related without being identical.
A Simple Way to Plan Your Next Pin
If you are unsure where to begin, use a three-part design formula: choose a color palette, select a bead pattern, and pick one focal charm. This gives you enough structure to create a polished pin while still leaving plenty of room for experimentation.
- Choose two to four coordinating bead colors.
- Arrange the beads in a simple repeating or balanced pattern.
- Select one charm that complements the color palette.
- Assemble the pin carefully and check its movement.
- Make small adjustments until the finished design feels balanced.
Once you have made one pin, the process becomes even easier. You can experiment with different bead patterns, change the focal charm, or create an entire collection around a favorite color combination.
Quick Points
- Start with a sturdy safety pin and appropriately sized beads.
- Plan your color pattern before assembling the pin.
- Use charms as focal details rather than overcrowding the design.
- Check every connection before wearing or gifting the finished piece.
- Mix and match designs to create a personalized collection.
Conclusion: Make DIY Pins Your Own
DIY beaded safety pins prove that creative accessories do not have to be complicated. With a simple safety pin, a selection of colorful beads, and a few decorative charms, you can create small handmade pieces that feel personal and fun.
The most enjoyable part is experimenting. Try pastel combinations, bright rainbow patterns, repeating bead sequences, or charm-focused designs. Change the colors, swap the shapes, and create pins for different moods, seasons, outfits, or gifts.
Whether you are new to crafting or already enjoy making handmade accessories, DIY pins are an easy project to keep in your creative rotation. Start with one simple design, learn what combinations you like, and then build a collection of personalized beaded pins that are completely your own.
Tags
DIY Pins Beaded Pins Safety Pin Crafts DIY Accessories Beaded Crafts Charm Crafts Easy DIY Crafts Handmade Accessories