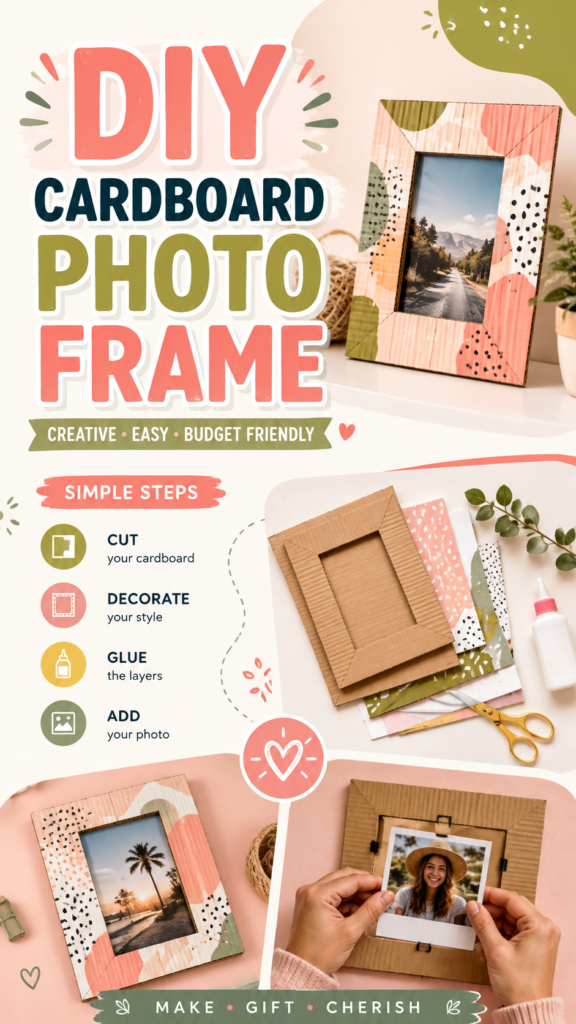
Looking for a creative way to display your favorite memories without spending a lot on store-bought decor? DIY picture frames are an easy and rewarding craft that can turn simple cardboard, paper, and everyday supplies into something personal and beautiful. A handmade frame can be customized to match your room, celebrate a special photo, or become a thoughtful handmade gift. With a few basic materials and some imagination, you can create a stylish picture frame that feels completely your own.
Key Takeaways
- Cardboard is an inexpensive and versatile base for DIY picture frames.
- Decorative paper, paint, fabric, and patterns can completely change the finished look.
- A simple frame can be adapted for photos, artwork, notes, or handmade gifts.
- Layering cardboard creates a more dimensional and polished frame.
- Personal details make handmade frames especially meaningful.
Why DIY Picture Frames Are Worth Making
Picture frames are small details that can make a big difference in a home. They give photographs a finished appearance while helping personal memories become part of your decor. Making your own frame adds another layer of meaning because you can choose every detail, from the shape and size to the colors and decorative finish.
The cardboard frame idea shown in this craft concept is especially approachable because cardboard is easy to cut, lightweight, inexpensive, and widely available. Instead of treating packaging materials as waste, you can give them a second life as useful home decor.
Important: The best DIY picture frames do not need complicated construction. A clean shape, carefully measured opening, attractive paper, and thoughtful finishing details can create a result that looks polished while remaining simple enough for a beginner.
Materials for a Simple DIY Picture Frame
One of the biggest advantages of making a DIY picture frame is that you can work with materials you already have at home. The basic structure can be made from corrugated cardboard, while the surface can be customized with decorative supplies.
Basic Materials
- Clean, sturdy cardboard
- A ruler or measuring tool
- Pencil for marking measurements
- Scissors or a craft knife
- Craft glue
- Decorative paper or scrapbook paper
- A favorite printed photograph
Optional Decorating Supplies
You can take the project in many different directions by adding paint, patterned paper, fabric scraps, stickers, ribbon, stamps, markers, or small decorative accents. The reference concept uses layered patterns and soft colors to create a cheerful handmade appearance, but there is no need to follow one particular style.
For a minimalist room, try neutral paper and a simple border. For a playful craft project, mix several patterns. If the frame is intended as a gift, choose colors that reflect the recipient’s personality or the mood of the photograph.
How to Make a DIY Cardboard Picture Frame
The basic construction is straightforward. The key is to measure carefully and keep the frame symmetrical. Taking a little extra time during the measuring stage can make the finished project look much more professional.
1. Choose Your Photo Size
Start by selecting the photograph you want to display. Place it on a flat surface and decide how much of the photo should remain visible. This will determine the size of the opening in the front of the frame.
If you want a border around the photograph, make the outer frame noticeably larger than the image. A wider border gives you more room to add decorative paper or patterns and can make a small photograph feel more prominent.
2. Measure and Mark the Cardboard
Place your cardboard on a stable work surface. Use a ruler and pencil to mark the outer dimensions of the frame. Then mark the inner opening where the photograph will be visible.
For a classic rectangular frame, keep the lines straight and parallel. If you prefer a more artistic appearance, you can experiment with rounded corners, angled edges, or an unusual outer shape. Simple geometry is usually the easiest place to begin.
3. Cut the Frame Shape
Carefully cut along the outer edges first. Next, remove the center section to create the opening for the photograph. When using a craft knife, work slowly on a protected surface and keep your hands away from the cutting path.
If the cardboard has corrugated layers, a sharp cutting tool can help produce cleaner edges. Avoid rushing through corners because uneven cuts can become noticeable after the frame is decorated.
4. Add a Second Layer for Dimension
One clever way to make a cardboard picture frame look more substantial is to layer pieces of cardboard. A second frame placed behind or around the first can create depth and give the project a more finished appearance.
Pro Tip: Before gluing multiple layers together, stack them without adhesive and check that the edges line up. This simple test makes it much easier to correct uneven pieces before they become permanent.
5. Decorate the Surface
This is where your DIY picture frame becomes personal. Cover the cardboard with decorative paper, paint it in a favorite color, or combine several materials for a collage-inspired effect.
Patterned scrapbook paper works particularly well because it can add visual interest without requiring advanced artistic skills. You can use one design across the entire frame or cut different patterns into sections and arrange them around the border.
6. Attach the Photo
Once the frame is completely dry and decorated, position your photograph behind the opening. Make sure the image is centered before securing it. Depending on the design, you can attach the photo directly to the back of the frame or create a simple backing layer that holds it in place.
A removable setup is useful when you want to change photographs regularly. If the frame is intended as a permanent gift, a secure backing can help keep everything aligned.
Creative Ways to Decorate DIY Picture Frames
The structure of a cardboard frame can stay simple while the decoration changes completely. That makes this project suitable for many home decor styles and occasions.
Try a Patterned Paper Collage
Combine small pieces of coordinating scrapbook paper to create a patchwork border. Mixing soft colors with simple patterns can give the frame a cheerful handmade feel. Keep the palette consistent so the finished design feels intentional rather than crowded.
Keep It Minimal
Minimalist DIY picture frames can be just as attractive as highly decorated designs. Paint the cardboard in a single neutral shade, leave some of the natural texture visible, or add one small decorative detail near a corner.
Create a Colorful Kids’ Craft
A simple cardboard frame is also a fun craft for children with age-appropriate supervision. Let kids choose the colors, patterns, and decorations. Their finished frame can become a display for a family photograph, drawing, or special memory.
Make a Handmade Gift
A personalized picture frame can be a thoughtful handmade present for birthdays, celebrations, teachers, friends, or family members. Add a meaningful photograph and decorate the frame around the colors or theme of the memory.
Why This Matters
A handmade frame is more than a container for a photograph. It gives an ordinary memory a personal setting. Choosing materials, colors, and patterns that connect with the photo can make the finished piece feel intentional and meaningful.
Tips for a More Professional Finish
Small details can make a big difference when you are creating cardboard crafts. Clean measurements, neat edges, and careful adhesive application will help your DIY picture frame look less like a quick craft and more like finished decor.
Measure Twice, Cut Once
Before cutting the center opening, double-check the measurements against the actual photograph. It is much easier to adjust a pencil line than to repair a piece of cardboard that has already been cut too small.
Use Adhesive Sparingly
Too much glue can cause paper to wrinkle or cardboard to soften. Apply a thin, even layer and press surfaces together gently. Give each section enough time to set before adding another layer.
Coordinate Your Colors
Choose two or three main colors and one optional accent shade. This approach makes it easier to create a cohesive frame, especially when combining multiple patterns.
Important: Let the photograph guide your design. Pulling one or two colors from the image can make the frame and photo feel naturally connected, even when the materials themselves are simple.
How to Display Your Handmade Frame
Once your frame is finished, decide where it will have the most visual impact. A handmade picture frame can sit on a shelf, dresser, desk, bedside table, or other stable surface. Several small frames can also be grouped together to create a personalized display.
For a relaxed arrangement, combine different frame sizes while keeping a common color palette. For a cleaner appearance, use frames with similar proportions and align their edges. The natural texture of cardboard can work especially well with cozy, casual, creative, and handmade interiors.
DIY Picture Frame Ideas for Different Occasions
One simple frame design can be adapted for countless occasions. For a birthday, use cheerful colors and add a favorite memory. For a family gift, choose a meaningful photograph and a classic border. For seasonal decor, change the paper and embellishments to suit the time of year.
You can also create frames for travel photographs, pet pictures, children’s artwork, friendship memories, or special milestones. Because the basic construction is inexpensive, experimenting with several styles is easy.
Easy Variations to Try
- Layered frame: Stack two or more cardboard borders to create depth.
- Paper collage frame: Combine several complementary scrapbook papers.
- Painted frame: Use one bold shade or a soft neutral for a clean look.
- Textured frame: Add fabric, ribbon, or other lightweight materials.
- Memory frame: Pair a meaningful photograph with a handwritten note.
At a Glance
- Start with sturdy cardboard and accurate measurements.
- Build dimension by layering frame pieces.
- Personalize the border with paper, paint, or patterns.
- Coordinate the frame with the photograph for a polished result.
- Use the finished piece as decor or a thoughtful handmade gift.
Final Thoughts on DIY Picture Frames
DIY picture frames prove that beautiful home decor does not have to be expensive or complicated. With cardboard, a few basic craft supplies, and a little creativity, you can turn a simple material into a personalized display for the photographs and memories you love.
The most appealing part of this project is its flexibility. You can keep the design natural and minimalist, cover it with colorful patterns, build multiple layers for dimension, or create a completely different style for every photograph. The basic technique stays simple while the creative possibilities are almost endless.
Whether you are searching for an easy weekend craft, affordable home decor, a creative cardboard project, or a handmade gift idea, DIY picture frames are a great place to start. Choose a favorite photo, gather a few materials, and give your next memory a frame that is just as personal as the moment itself.