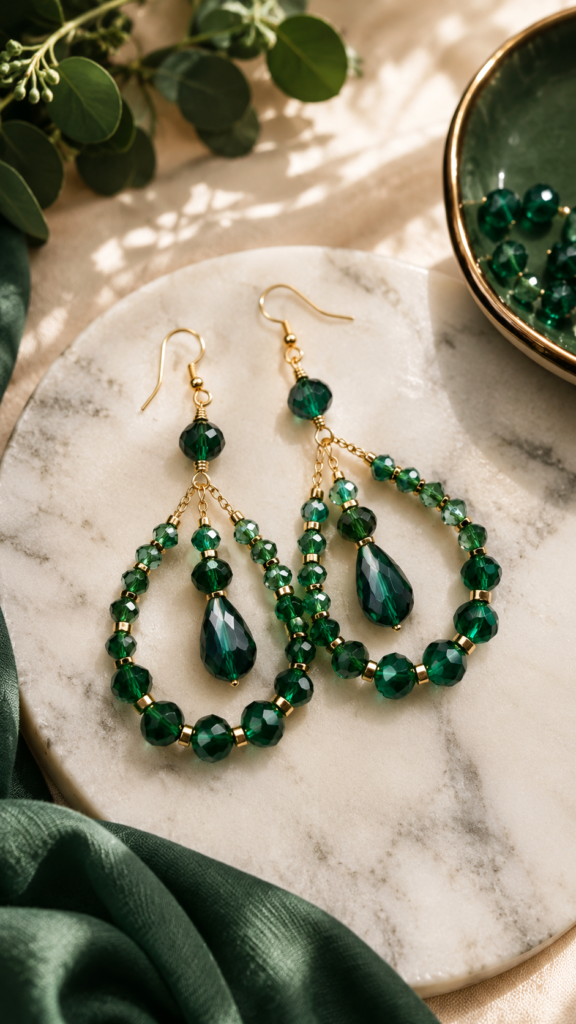
Elegant green beaded earrings can turn a simple outfit into something memorable, and this style shows just how much impact handmade jewelry can have. Faceted green beads, delicate gold-tone findings, fine chains, and teardrop-shaped crystals come together to create a polished statement accessory with a handcrafted feel. The design is detailed without looking overly complicated, making it a beautiful source of inspiration for anyone interested in DIY jewelry, beaded earrings, and creative accessories.
Key Takeaways
- Layered bead strands can create a rich statement earring silhouette.
- Deep green beads pair beautifully with warm gold-tone accents.
- Faceted beads add sparkle and visual movement as they catch the light.
- A teardrop pendant gives handmade earrings an elegant finishing detail.
- Simple jewelry-making components can be combined into a sophisticated-looking design.
The Beauty of Green Beaded Jewelry
Green jewelry has a naturally distinctive quality. It can feel earthy, fresh, elegant, or dramatic depending on the shade and materials used. In this design, the rich emerald-like green creates the visual focus, while the gold-tone details add warmth and contrast. The result is a pair of earrings that feels refined enough for a dressy occasion but creative enough to work as an everyday statement piece.
The faceted surfaces are especially important to the overall look. Instead of appearing flat, the beads reflect small points of light as the earrings move. This gives the design energy and makes the jewelry look different from one angle to the next. When paired with delicate chains, the beads also create a sense of movement that works beautifully for drop earrings.
Important: The most appealing part of a statement jewelry design is often the balance between detail and simplicity. A limited color palette, repeated bead shapes, and carefully placed focal pieces can make a handmade project look cohesive rather than crowded.
Understanding the Earring Design
The earrings feature a classic drop silhouette with several decorative elements working together. A gold-tone hook provides the starting point, followed by a larger green bead that acts as a visual transition. From there, multiple strands of smaller beads and chain extend downward and outward, creating a graceful layered shape.
At the center, a larger faceted teardrop pendant serves as the focal point. Surrounding bead strands frame this pendant, helping draw the eye toward the middle of the design. Larger round beads near the lower portion add weight and visual rhythm, while smaller beads help create a gradual transition between the components.
This arrangement is useful inspiration for DIY jewelry makers because it demonstrates a simple design principle: repetition creates unity. When the same green color and similar faceted finishes appear throughout the earrings, even multiple strands feel like part of one intentional composition.
Why Layering Works So Well
Layering is one of the easiest ways to make handmade earrings look more elaborate. Instead of relying on one long strand, several shorter strands can be arranged at different lengths. This creates depth and gives the earrings a soft cascading effect.
For a balanced result, the longest element does not necessarily need to contain the largest number of beads. A focal pendant can be placed toward the center while lighter strands surround it. This keeps the design visually interesting without making the bottom appear too heavy.
Choosing Beads for DIY Statement Earrings
Bead selection has a major influence on the finished appearance of handmade jewelry. For a design inspired by these earrings, consider combining several sizes while keeping the color family consistent. Round faceted beads can provide sparkle, while teardrop beads create an elegant focal point.
Transparent or semi-transparent green beads can produce a lighter, glass-like effect. Deeper opaque or translucent green beads can make the earrings feel richer and more dramatic. Combining two or three related green tones can also add dimension without introducing too many competing colors.
- Faceted round beads: Ideal for adding sparkle and repeated visual texture.
- Teardrop beads: Excellent as focal elements at the center or bottom of a design.
- Small accent beads: Useful for filling gaps and creating smooth transitions.
- Gold-tone spacers: Add warmth and visually separate clusters of green beads.
- Delicate chain: Creates movement and helps achieve a graceful layered effect.
Creating a Cohesive Color Palette
A cohesive palette can make a dramatic difference in DIY jewelry. Deep green works particularly well with gold because the warm metallic finish contrasts with the cool richness of the beads. The combination feels sophisticated without requiring a large number of materials.
If you prefer a softer look, try combining forest green with muted olive or pale green accents. For a bolder style, use several shades of emerald and darker green. Silver-tone findings can also be substituted for gold if you want a cooler, more contemporary appearance.
Expert Insight
- Choose one dominant bead color and let metallic findings act as accents.
- Repeat your focal color across every strand to keep the composition connected.
- Use different bead sizes to create depth without relying on many colors.
Essential Supplies for a Similar DIY Project
You do not need an extensive jewelry-making collection to experiment with this style. A few basic findings and tools can be enough to build layered beaded earrings. The exact supplies will depend on the size and structure you want, but the design can be adapted easily.
- A pair of earring hooks or another preferred earring finding.
- Green faceted beads in several sizes.
- One or two larger teardrop-shaped focal beads.
- Small gold-tone or silver-tone spacer beads.
- Fine jewelry chain for the layered sections.
- Headpins, eyepins, or jewelry wire for connecting components.
- Round-nose and chain-nose jewelry pliers.
- A small wire cutter for trimming excess material.
The advantage of working with individual components is flexibility. You can change the number of beads, adjust the strand lengths, or replace the focal pendant without redesigning the entire concept. That makes this type of DIY jewelry especially useful for experimenting with personal style.
How to Plan the Earrings Before Assembly
Before connecting anything permanently, arrange your beads on a flat surface. This lets you compare proportions and decide which components should become the focal point. Place the largest teardrop element in the center and arrange smaller bead strands around it.
Try creating one earring first as a design sample. Once you are happy with the arrangement, use it as a guide for the second earring. This is much easier than assembling both pieces at once and discovering that the strand lengths or bead patterns do not match.
Build From the Top Down
Starting near the earring hook can make the construction easier to manage. Create the upper connection first, then add the central bead and work toward the decorative strands. Keep the connections secure while allowing enough movement for the beads to hang naturally.
When working with several strands, vary their lengths slightly. A perfectly uniform arrangement can look rigid, while subtle differences create the cascading appearance that makes chandelier-style earrings so attractive.
Keep the Weight in Mind
Statement earrings can become uncomfortable if too many heavy beads are concentrated in one area. If you want a substantial appearance without excessive weight, use smaller beads for some of the outer strands and reserve the largest piece for the focal point.
Pro Tip: Lay both earrings side by side during assembly and compare them frequently. Matching the overall silhouette is more important than making every individual bead placement perfectly identical.
Styling Green Beaded Earrings
One of the best features of deep green jewelry is its versatility. The rich color can complement neutral clothing such as cream, beige, black, white, and soft gray. It can also work beautifully with earthy shades including brown, olive, tan, and muted botanical tones.
For a minimalist outfit, statement earrings can provide the main decorative element. A simple top or dress allows the beadwork to remain the focus. If your clothing already includes patterns, consider choosing accessories with a simpler silhouette so the overall look stays balanced.
The gold-tone details in the design also make these earrings easy to pair with other warm accessories. A delicate bracelet, simple ring, or understated necklace can echo the metallic accents without competing with the statement earrings.
Ways to Personalize the DIY Design
The beauty of handmade jewelry is the ability to change almost every detail. Use the pictured concept as inspiration rather than a fixed pattern. You can create a shorter pair for everyday wear, extend the strands for a more dramatic look, or simplify the construction for a beginner-friendly project.
- Swap emerald green for sapphire blue, ruby red, smoky gray, or soft lavender.
- Replace gold-tone findings with silver or antique-finish components.
- Use fewer strands for a cleaner and lighter silhouette.
- Add tiny charms for a personalized finishing touch.
- Combine matte and faceted beads for a more textured appearance.
- Create matching bracelets or necklaces using the same bead palette.
You can also create seasonal variations. Dark green and warm metallic accents work beautifully for autumn and winter-inspired accessories, while lighter greens can create a fresh spring or summer interpretation. The basic structure remains useful even when the colors change.
Tips for Making Handmade Jewelry Look Polished
Small details often determine whether a handmade jewelry project looks casual or refined. Consistent spacing, clean connections, balanced strand lengths, and a deliberate color palette can make a significant difference.
Take time to close each loop neatly and trim excess wire cleanly. Keep the bead arrangement symmetrical when making a matching pair, especially around the main focal piece. If the design includes several strands, check that none are twisted before finishing the connections.
It is also worth photographing your project from different angles while you work. A design that looks balanced from above may hang differently when worn. Testing the movement before completing the final connections can help you make adjustments early.
A Simple Approach for Beginners
If you are new to DIY jewelry, do not feel pressured to reproduce a complex layered design immediately. Start with one strand of green beads and a single focal pendant. Once you are comfortable making basic loops and connecting components, add a second strand.
From there, experiment with bead sizes and lengths. Each new layer teaches you something about proportion and balance. The process becomes much easier once you understand how different components behave when suspended from an earring hook.
Most importantly, treat the first version as a creative experiment. Handmade jewelry does not need to be flawless to be beautiful. Slight variations can become part of its charm, especially when the overall design feels intentional.
Quick Points
- Use deep green beads as the main visual focus.
- Add gold-tone accents for warmth and contrast.
- Layer different strand lengths for movement.
- Choose one larger pendant as the focal detail.
- Keep proportions balanced for comfortable, polished earrings.
Conclusion
Green beaded earrings are a wonderful example of how a handful of thoughtfully chosen jewelry components can become an eye-catching handmade accessory. The combination of faceted beads, delicate chain, warm metallic accents, and a dramatic teardrop centerpiece creates a design that feels elegant while still offering plenty of room for creativity.
Whether you are an experienced jewelry maker or trying your first beaded accessory, this style provides a flexible starting point. Change the colors, adjust the strand lengths, simplify the layers, or add your own favorite details. With a little experimentation, you can transform the same basic idea into a piece that reflects your personal style.
The best DIY jewelry projects balance creativity with intention. Choose a focused color palette, give your focal piece room to shine, and let each layer contribute to the overall shape. Those simple principles can help turn everyday beads into jewelry that feels truly special.