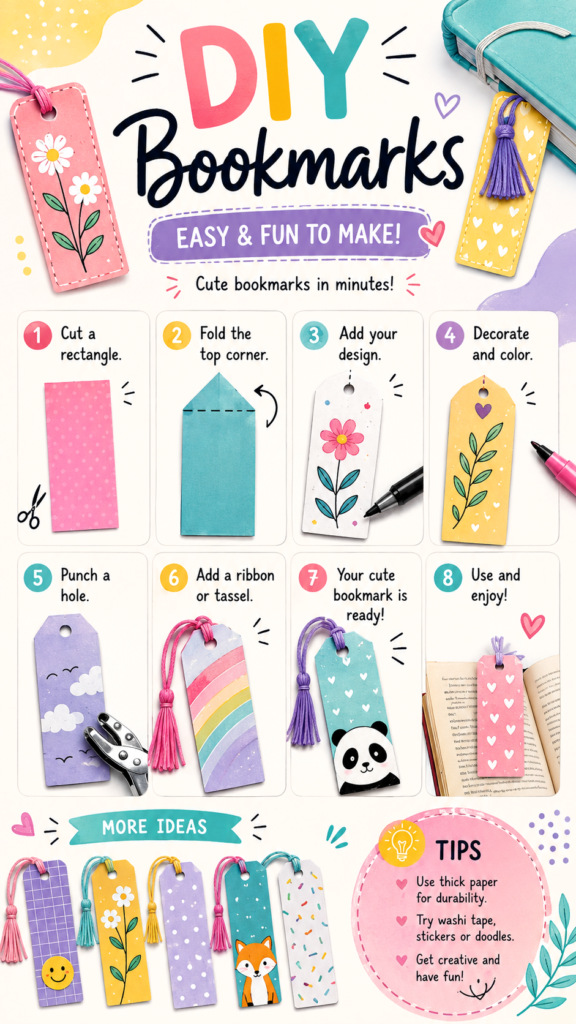
DIY bookmarks are one of those simple craft ideas that can turn an ordinary reading routine into something more colorful, personal, and fun. With just a few basic materials, such as thick paper, markers, ribbon, stickers, and a hole punch, you can create handmade bookmarks that reflect your favorite colors, patterns, hobbies, or moods. From cute floral designs to playful animal characters and bright tassel bookmarks, there are endless ways to make every page marker feel special.
One of the best things about DIY bookmarks is that they are beginner-friendly. You do not need advanced crafting skills, expensive supplies, or complicated equipment. A simple rectangle of sturdy paper can become a beautiful bookmark with a little imagination. Add a folded corner, decorate the surface, punch a hole, and finish it with a ribbon or tassel. The result is a practical handmade craft that is useful for school, home, gifting, and everyday reading.
Key Takeaways
- DIY bookmarks are easy, affordable, and suitable for beginners.
- Thick paper or cardstock helps handmade bookmarks last longer.
- Simple folded corners can create a distinctive bookmark shape.
- Drawings, stickers, hearts, flowers, and patterns make each design personal.
- Ribbons and tassels add color, texture, and a finished look.
- Handmade bookmarks also make thoughtful small gifts.
Why DIY Bookmarks Are a Fun and Creative Craft
A handmade bookmark is small enough to finish quickly, but it still gives you plenty of room for creativity. You can experiment with colors, shapes, illustrations, textures, and decorative details without needing to commit to a large project. This makes DIY bookmark ideas especially appealing for quick crafting sessions.
Bookmarks are also practical. Unlike crafts that sit on a shelf, a handmade bookmark can be used again and again. Every time you open a book, you get to enjoy the design you created. A cheerful flower, a colorful pattern, a cute animal, or a simple heart can add personality to an ordinary reading moment.
Important: The best DIY bookmark projects balance creativity with durability. A beautiful design is even more enjoyable when the bookmark is made from sturdy paper and finished carefully enough to survive repeated use.
These projects are also easy to customize for different ages and interests. Children can enjoy simple coloring and sticker designs. Teens may prefer modern patterns, pastel themes, cute characters, or detailed doodles. Adults can create elegant floral bookmarks, minimalist designs, or handmade gifts for friends and family.
Basic Supplies for Easy DIY Bookmarks
You can start making DIY bookmarks with supplies you may already have at home. The exact materials will depend on the style you want, but a few basics are enough for most beginner projects.
Choose the Right Paper
Thick paper is one of the most important materials for a durable bookmark. Cardstock is a popular choice because it is sturdy while still being easy to cut, fold, and decorate. Heavy craft paper can also work well for simple designs.
- Cardstock for a strong, durable bookmark
- Colored paper for bright and playful designs
- Patterned paper for quick decorative backgrounds
- Watercolor paper for painted or artistic bookmarks
- Recycled paper for simple eco-friendly craft projects
Regular printer paper can be used for practice, but it may bend or tear more easily. If you love a design made on thinner paper, consider attaching it to cardstock for extra strength.
Decorating Tools and Details
Markers, colored pencils, pens, stickers, and craft supplies can all help transform a plain piece of paper into a unique bookmark. You do not need to use everything. Even a simple design with one or two colors can look polished and attractive.
Popular decoration ideas include:
- Hand-drawn flowers and leaves
- Small hearts and stars
- Cute animal illustrations
- Simple geometric patterns
- Pastel color combinations
- Rainbow or gradient details
- Small stickers or washi tape accents
- Handwritten words or short reading-themed phrases
How to Make a Simple DIY Bookmark Step by Step
A rectangular paper bookmark is one of the easiest designs to make. It gives you a clean surface for decoration and can be customized in countless ways.
1. Cut a Bookmark Shape
Start with a rectangular piece of cardstock or thick paper. A long, narrow shape works well because it fits comfortably between book pages. You can make the bookmark as simple or as decorative as you like.
For a different look, trim the top corners into angles or round them slightly. Changing the top shape is an easy way to make a basic bookmark look more original.
2. Fold the Top Corner for Extra Style
A folded top corner can add an interesting design feature. Fold one upper corner diagonally and press the crease firmly. This simple technique creates a tag-like shape that looks especially cute when combined with colorful patterns or illustrations.
You can also use the folded area as part of the decoration. Add a contrasting color, a pattern, or a small doodle to make the shape stand out.
3. Add Your Favorite Design
This is where the project becomes personal. Choose a theme and decorate the front of the bookmark. Floral designs are great for a soft and cheerful look, while animals, clouds, hearts, and simple patterns create a playful style.
Try to leave a little open space around the edges so the design does not feel crowded. A clean layout often makes handmade crafts look more polished, even when the illustrations themselves are simple.
4. Color and Finish the Design
Use colors that work well together. Pastel pink, purple, blue, yellow, and teal can create a soft, creative look. Brighter combinations can make the bookmark feel energetic and playful.
Once the main artwork is complete, add small finishing details such as dots, tiny hearts, stars, leaves, or simple border lines. These small accents can make a handmade bookmark look more intentional without requiring a complicated design.
5. Punch a Hole at the Top
If you want to add a ribbon or tassel, punch a small hole near the top of the bookmark. Keep the hole far enough from the edge so the paper does not tear easily during use.
A hole punch is the easiest option, but you can also use a suitable craft tool if you are working carefully. Make sure the hole is large enough for the ribbon or cord you plan to use.
6. Add a Ribbon or Tassel
A ribbon or tassel can instantly make a simple bookmark look more finished. Choose a color that matches or contrasts with your design. Thread the ribbon through the hole and tie it securely.
For a handmade tassel, wrap embroidery thread or yarn several times, tie one end together, trim the loops, and attach the finished tassel to the bookmark. This detail adds movement and texture while making the bookmark easy to spot between pages.
Expert Insight
A bookmark does not need a complicated illustration to look memorable. A simple shape, a coordinated color palette, and one standout detail, such as a tassel, floral drawing, or playful pattern, can create a strong handmade design.
Cute DIY Bookmark Ideas to Try
Once you know the basic process, you can experiment with different themes. The small size of a bookmark makes it easy to try several designs in one craft session.
Floral Bookmarks
Flowers are a timeless choice for handmade bookmarks. Draw a single large flower, a group of small blooms, or a simple leafy stem. Soft pinks, yellows, purples, and greens can create a cheerful spring-inspired look.
Cute Animal Bookmarks
Animal designs can make reading feel even more fun. A small panda, bunny, fox, or other friendly character can become the center of the bookmark. Keep the shapes simple and expressive for an easy DIY craft that still has plenty of personality.
Colorful Pattern Bookmarks
Patterns are ideal if you do not want to draw detailed pictures. Try dots, stripes, tiny hearts, abstract shapes, clouds, or simple repeating lines. You can also mix several patterns across different bookmarks to create a coordinated collection.
Personalized Bookmarks
Make a bookmark more meaningful by adding a name, initials, favorite colors, or a small symbol connected to the recipient’s interests. Personalized bookmarks are especially nice for small gifts, party favors, classroom projects, or thoughtful handmade surprises.
Pro Tip: Make several bookmarks at once. Preparing multiple paper shapes before decorating allows you to test different colors and themes while using the same basic materials.
Tips for Making Handmade Bookmarks Last Longer
Because bookmarks are handled often and stored inside books, a little extra care can make them more durable. Start with thick paper whenever possible and avoid attaching decorations that may fall off easily.
Use Thick Paper
Cardstock is usually stronger than ordinary paper and helps the bookmark keep its shape. If you are using thinner decorative paper, attach it to a stronger backing.
Keep Decorations Flat
Flat designs work especially well inside books. Markers, colored pencils, thin stickers, and light paper accents are practical choices because they are less likely to bend pages.
Create Clean Edges
Take a moment to trim the bookmark neatly. Straight, clean edges can make a simple DIY project look much more polished. If you want a softer finish, round the corners slightly.
Why Handmade Bookmarks Make Great Gifts
A DIY bookmark may be small, but it can feel surprisingly personal. It is easy to create a design around someone’s favorite colors, interests, or reading habits. Because the project is inexpensive and quick, you can make several bookmarks for different people without spending much money.
Handmade bookmarks are suitable for book lovers, students, teachers, friends, and family members. They can also be paired with a favorite book or included as part of a small gift. A set of bookmarks with different themes can make a charming handmade present.
For group activities, DIY bookmarks work well because everyone can begin with the same basic materials and finish with a completely different result. This makes the craft suitable for creative afternoons, school activities, birthday projects, or relaxed family crafting.
Why This Matters
- A handmade bookmark combines creativity with everyday usefulness.
- Simple supplies can produce highly personalized results.
- Small craft projects are a great way to experiment with new designs and color combinations.
How to Make Your DIY Bookmarks More Creative
Once you feel comfortable with the basic design, challenge yourself to try something new. Change the shape, create a matching set, or choose a theme for each bookmark. You could make one collection with flowers, another with cute animals, and another with colorful abstract patterns.
You can also combine techniques. Add a folded corner to a patterned bookmark, attach a tassel to a floral design, or use stickers alongside hand-drawn details. Layering a few simple ideas can create a unique result without making the project difficult.
Try a Matching Collection
Creating several bookmarks in the same color family can make the project feel cohesive. Use different designs but repeat a few colors across the collection. This is a simple way to create handmade bookmarks that look coordinated while still allowing each piece to have its own personality.
Mix Simple and Detailed Designs
Not every bookmark needs to be heavily decorated. Pair a detailed design with a simpler one. A clean bookmark with a single flower or a small heart can look just as charming as a more elaborate illustration.
DIY Bookmarks at a Glance
Quick Points
- Start with thick paper for a stronger bookmark.
- Use folded corners or shaped tops for extra visual interest.
- Decorate with flowers, hearts, animals, patterns, or stickers.
- Add a ribbon or tassel for a colorful finishing touch.
- Create multiple designs and experiment with different themes.
Conclusion: Make Reading More Personal with DIY Bookmarks
DIY bookmarks are proof that small craft projects can have a big creative impact. With a simple piece of sturdy paper and a few decorative materials, you can create something colorful, useful, and completely personal. Whether you prefer flowers, cute animals, bright patterns, soft pastel colors, or playful tassels, there is no single right way to make a bookmark.
The most enjoyable part of this craft is the freedom to experiment. Start with a basic rectangle, try a folded corner, add your favorite design, and finish it with a ribbon or tassel. Each bookmark can become a tiny piece of art that makes reading more enjoyable and helps bring a little creativity into everyday life.
Gather your paper, choose your colors, and let your imagination guide the design. A handmade bookmark is quick to create, easy to personalize, and always useful. Once you make one, you may find yourself wanting to create an entire collection.