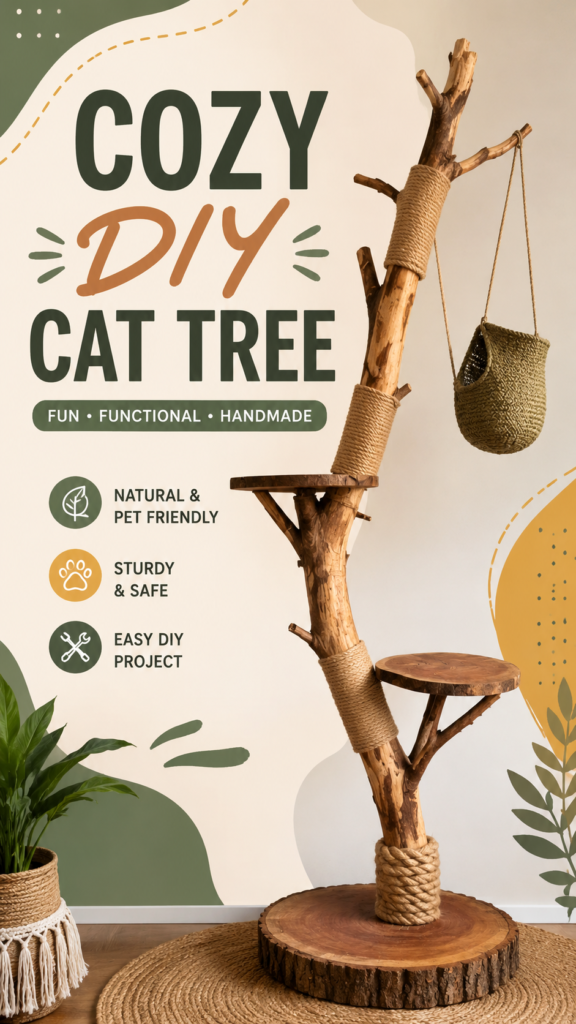
A DIY cat tree can be much more than a place for your cat to climb. With a natural branch, sturdy wooden platforms, sisal rope, and a little creativity, you can create a piece of cat furniture that feels like part of your home rather than an oversized pet accessory. The rustic design shown here combines climbing space, scratching surfaces, elevated resting spots, and a cozy hanging basket into one attractive vertical structure.
This type of homemade cat tree is especially appealing if you love natural materials and warm, earthy home decor. Instead of relying on a bulky commercial tower, the design uses the organic shape of a tree branch as its main structure. The result is functional, visually interesting, and adaptable to your available space.
Key Takeaways
- A natural branch can become the main feature of a unique DIY cat tree.
- Sisal or jute-style rope provides useful scratching and climbing surfaces.
- Wooden platforms create elevated places for climbing, sitting, and resting.
- A broad, heavy base is essential for keeping a tall cat tree stable.
- The design can be customized to suit your cat, room, and decorating style.
- Thoughtful placement can make a cat tree both practical for pets and attractive in your home.
Why a DIY Cat Tree Is Worth Making
Cats naturally enjoy vertical spaces. An elevated perch gives them an opportunity to observe their surroundings, move between different levels, and retreat to a comfortable spot. A well-designed cat tree brings those instincts into an indoor environment while giving you control over the appearance and layout.
The design pictured here is a great example of how a cat tree can combine several useful features without looking overly complicated. A central wooden branch creates the climbing framework, while smaller branches support platforms. Sections wrapped with rope provide texture and scratching opportunities, and the hanging woven basket adds another elevated resting area.
Important: A beautiful cat tree still needs to be structurally secure. Stability should always come before decoration. Every platform, rope section, attachment point, and hanging element should be firmly secured before allowing a cat to use the finished project.
A Natural Look That Blends With Home Decor
One of the strongest features of a rustic DIY cat tree is its appearance. Natural wood introduces warmth and character, while neutral rope keeps the color palette understated. The combination works particularly well with bohemian, rustic, farmhouse, Scandinavian-inspired, and nature-focused interiors.
The irregular shape of a real branch also gives every project a distinctive personality. Rather than producing identical straight levels, you can work with the branch’s natural curves and forks to determine where platforms and climbing sections belong.
Planning Your Homemade Cat Tree
Before cutting, drilling, or wrapping anything, spend some time planning the overall structure. The image provides inspiration for a tall vertical design, but the exact dimensions should depend on your room and the size and activity level of your cat.
Start by thinking about the main path your cat will follow. Ideally, the tree should offer a natural progression from the lower base toward the higher platforms. Branches can create interesting changes in direction, while platforms provide secure places to pause.
Choose the Right Location
Placement can make a huge difference in how useful your DIY cat tree becomes. Cats often enjoy being able to watch household activity, look toward windows, or observe the room from above. A quiet corner may work well for a resting-focused tower, while a brighter area near a window can make an appealing observation station.
Leave enough clearance around each platform for your cat to move comfortably. Avoid placing a tall structure where it could block a doorway, interfere with furniture movement, or be easily knocked over.
Think Vertically
A vertical design is useful when floor space is limited. Instead of spreading multiple platforms across a wide footprint, a branch-style cat tree takes advantage of unused height. The pictured arrangement demonstrates this approach with several levels distributed along one central trunk.
When planning your own version, avoid making every platform line up directly above the previous one. Slight changes in position can create a more interesting climbing route and give your cat different viewpoints.
Materials for a Rustic DIY Cat Tree
The appeal of this project comes from its relatively simple material palette. The exact supplies will vary according to your design, but the visual concept centers around wood, rope, platforms, and a solid base.
- Natural wooden branch: Choose a strong, appropriately sized piece with a shape that supports your planned layout.
- Wooden platforms: Round or irregularly shaped pieces can complement the natural appearance of the branch.
- Sisal rope: Use it around selected sections of the trunk and branches to create scratching and gripping areas.
- Strong base: A thick wooden slab or similarly stable foundation helps support the vertical structure.
- Fasteners: Appropriate screws, brackets, or other hardware should be selected according to the construction method and materials.
- Optional woven basket: A securely attached basket can create an additional lounging or hiding area.
The bark-edged wooden base shown in the design adds a particularly attractive rustic detail. A thick wood slice can visually anchor the tree while reinforcing the connection between the natural branch and the rest of the room.
Selecting and Preparing Wood
If you are using a branch from outdoors, it should be carefully inspected and properly prepared before it becomes part of indoor furniture. Look for obvious signs of decay, weakness, insects, cracks, or unstable sections. The branch should be completely dry and strong enough for the intended structure.
Remove loose material and rough areas that could cause injury. Smooth sharp edges and inspect the wood again after preparation. The goal is to retain the natural character without leaving dangerous splinters or unstable pieces.
Building the Main Structure
The central branch is the defining feature of this type of cat tree. Its shape determines where you can place platforms, rope-wrapped sections, and resting areas. Rather than forcing a complicated design, let the natural forks of the branch help guide the layout.
Start With the Base
The base is one of the most important parts of the entire project. A tall cat tree creates leverage when a cat jumps onto an upper platform, so a narrow or lightweight foundation can become unstable.
Use a broad, substantial base that provides enough support for the height of the structure. Position the main trunk securely and check that it remains upright before adding additional components.
Once the trunk is positioned, test the structure gently before proceeding. It should feel solid rather than flexible or top-heavy. If there is noticeable movement, address the foundation and attachment points before continuing.
Add the Platforms
The wooden platforms shown in the design provide clear resting points along the trunk. A lower platform can serve as a transition point, while a higher platform can become a favorite observation spot.
Give each platform enough surface area for your cat to stand, sit, or curl up comfortably. Round wood slices create a natural appearance, but other shapes can work just as well. Sand the edges thoroughly and make sure the attachment method is strong and secure.
Expert Insight
The best DIY cat tree is designed around movement, not just appearance. Create a comfortable route between levels, vary the heights, and provide enough stable surfaces for your cat to pause between climbs. A visually impressive structure becomes much more useful when its layout encourages natural movement.
Using Rope for Scratching and Grip
The rope-wrapped sections are one of the most recognizable details in the pictured cat tree. Wrapping selected portions of the trunk gives the structure a handcrafted appearance while creating textured surfaces that can be useful for scratching and climbing.
Keep the rope tightly wrapped so that it does not become loose during use. Work methodically around the branch, maintaining consistent tension as you move from one section to another. The finished result should look neat while remaining functional.
Create Different Texture Zones
You do not necessarily need to cover every part of the tree with rope. Leaving portions of natural wood exposed creates visual contrast and allows the character of the branch to remain visible.
Concentrate rope on sections where your cat is most likely to climb or scratch. This approach can also reduce the amount of material required while making the final design feel more intentional.
Adding a Hanging Cat Basket
The woven hanging basket in the design adds a cozy element that immediately makes the cat tree feel more inviting. It also introduces a different type of resting space compared with the wooden platforms.
If you include a hanging basket, pay particular attention to how it is attached. The suspension points should be secure, and the basket should not swing unpredictably or interfere with nearby branches and platforms.
Consider the basket’s position carefully. It should be accessible without forcing your cat to make an awkward jump. Leave enough room around it for comfortable entry and exit.
How to Make the Cat Tree Safer
Safety deserves as much attention as the visual design. Cats can jump, twist, climb, and land with surprising force, so every part of a tall structure needs to be evaluated from a practical perspective.
- Check the stability of the base before adding height.
- Secure the main branch firmly so it cannot rotate or shift.
- Inspect every platform attachment point.
- Make sure rope ends are secured and cannot become loose.
- Remove sharp edges, protruding hardware, and splintered wood.
- Test the structure carefully before letting your cat climb on it.
- Continue checking the tree periodically after it is in use.
Pro Tip: Do not judge stability only when the cat tree is empty. Think about what happens when your cat jumps onto the highest platform or suddenly changes direction. A strong base and secure connections are the foundation of a successful homemade cat tree.
Personalizing Your DIY Cat Furniture
Once the basic structure is secure, there are plenty of ways to make the cat tree your own. The natural style shown here works beautifully with simple materials, but you can adapt the concept to match almost any interior.
Choose a Complementary Color Palette
Natural wood and neutral rope already create a warm palette. If your room features earthy colors, you can keep the materials completely natural. For a cleaner modern look, you might prefer lightly finished wood and simple neutral platforms.
Avoid adding unnecessary decoration to surfaces your cat will climb or scratch. Practicality should remain the priority, with decorative details reserved for areas where they will not interfere with movement.
Adjust the Layout for Your Cat
Every cat has different habits. Some cats prefer high observation points, while others may spend more time scratching, climbing, or relaxing in enclosed spaces. Watch how your cat uses existing furniture and let those behaviors influence your design.
A playful climber may appreciate multiple levels and branch transitions. A cat that prefers quiet lounging may benefit more from spacious platforms and a comfortable basket.
Making a Rustic Cat Tree Part of Your Home
One reason this DIY cat tree stands out is that it looks like intentional furniture. The natural branch, wood slices, woven materials, and earthy textures create a cohesive visual story.
Instead of hiding the cat tree away, consider treating it as part of the room’s design. Place it where the natural materials complement nearby furniture, rugs, baskets, plants, or wooden accents.
The goal is not to make the cat tree disappear. A well-designed piece can become an interesting focal point while still giving your pet a dedicated place to climb and relax.
Common DIY Cat Tree Mistakes to Avoid
Many homemade cat furniture projects look simple, but a few planning mistakes can reduce their usefulness. The most common issue is focusing on appearance before structure.
- Using an unstable base: A tall design needs a foundation that can handle movement.
- Making platforms too small: Cats need comfortable surfaces for landing and resting.
- Leaving sharp edges: Sand wood carefully before assembly.
- Using loose rope: Wrapping should remain secure during repeated use.
- Creating difficult jumps: Platforms should form a practical climbing route.
- Overloading the design: Too many accessories can make the structure cluttered and harder to navigate.
Why Natural Cat Furniture Has So Much Appeal
Natural materials bring warmth and texture into a room, and they can make pet furniture feel less disconnected from the rest of the decor. Wood has unique grain patterns, branches have irregular silhouettes, and woven rope adds tactile interest.
There is also something satisfying about transforming a simple natural material into a useful piece of furniture. A DIY cat tree gives you the freedom to experiment with proportions and placement while creating something designed specifically for your space.
For people who enjoy handmade home projects, the process can be just as rewarding as the finished result. Each branch, platform, and rope-wrapped section contributes to a one-of-a-kind piece.
At a Glance
- Natural branch structure for a rustic appearance
- Wooden platforms for elevated resting spots
- Rope-wrapped areas for texture and scratching
- Wide base for improved stability
- Optional woven basket for cozy lounging
Conclusion: Build a Cat Tree With Character
A DIY cat tree is a creative way to combine practical cat furniture with personal home style. The rustic branch design shown here demonstrates how a few natural-looking materials can become a multi-level climbing and resting station with plenty of visual character.
The most important part of the project is thoughtful construction. Start with a stable base, choose strong materials, secure every connection, and create a layout that allows your cat to move comfortably between levels. Once the structure is safe and functional, you can focus on the fun details such as rope wrapping, wooden platforms, woven baskets, and natural finishes.
Whether you build a tall statement piece or a smaller homemade cat tree for a compact room, the same principles apply. Make it sturdy, comfortable, accessible, and suited to your cat’s habits. With a little planning, DIY cat furniture can become one of those rare projects that is genuinely useful for your pet while also adding warmth and personality to your home.
Tags
DIY Cat Tree Homemade Cat Tree DIY Cat Furniture Natural Cat Tree Cat Climbing Tower Rustic Cat Furniture DIY Pet Projects Cat Scratching Post