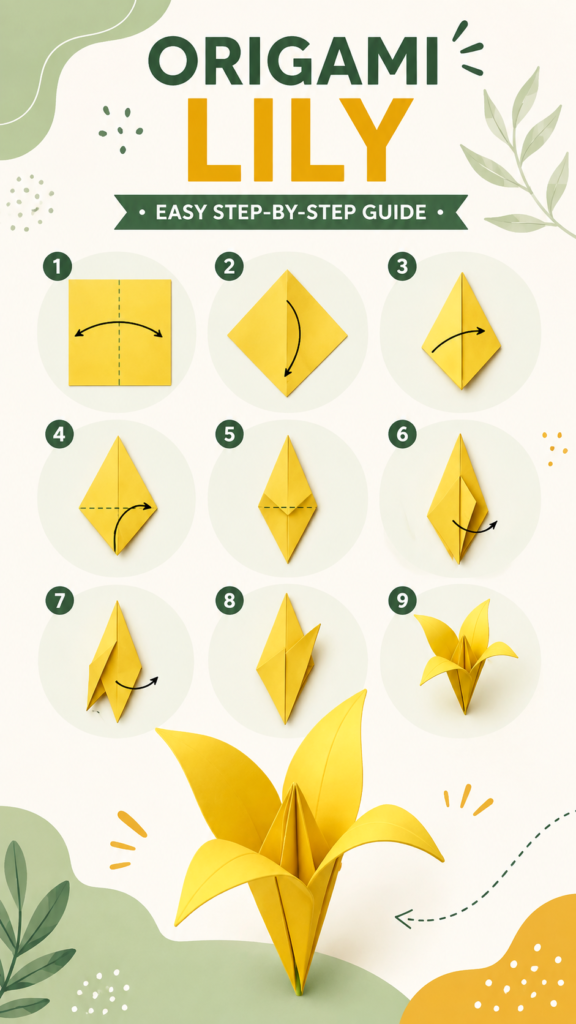
Origami is one of those crafts that proves you do not need expensive supplies to make something beautiful. With a single sheet of paper, a few careful folds, and a little patience, you can create an elegant origami lily that looks delicate enough to display as handmade decor. This simple origami flower project is especially appealing for beginners because the finished shape feels impressive while the process can be broken into manageable steps.
An origami lily is also a wonderful introduction to paper folding. The project encourages careful observation, accurate creases, and a steady approach rather than complicated tools or materials. Whether you are looking for an easy origami craft, a relaxing weekend activity, a handmade decoration, or a creative project to try with children, this paper flower is a great place to begin.
Key Takeaways
- A simple square sheet of paper can become an elegant origami lily.
- Accurate folds and sharp creases make the finished flower cleaner and more defined.
- The step-by-step process makes this project approachable for beginners.
- Yellow paper creates a bright, cheerful flower, but many paper colors can work beautifully.
- Origami flowers can be used for handmade decor, crafts, gifts, and creative displays.
Why Make an Origami Lily?
Paper flowers have a timeless charm, and an origami lily offers that charm without requiring scissors, glue, wire, or complicated craft equipment. The beauty comes from the folds themselves. As the paper changes from a flat square into a layered flower, each crease contributes to the final shape.
The pictured design uses bright yellow paper, giving the finished lily a warm and cheerful appearance. The open petals create a recognizable floral silhouette, while the central folds add dimension. It is a great example of how simple geometric folding can produce something that feels organic and decorative.
Important: The most successful origami projects are usually built on patience rather than speed. Take time to align corners and edges before pressing each crease. Small improvements in accuracy at the beginning can make a noticeable difference in the final flower.
What You Need for This Origami Craft
One of the best things about this origami lily DIY is how minimal the supply list can be. Traditional paper folding is designed around working with a sheet of paper, so you can start without a large collection of craft supplies.
- One square sheet of paper: Choose a color you enjoy, such as yellow, pink, white, orange, or soft green.
- A flat work surface: A table or desk gives you enough room to make accurate folds.
- Your hands and a little patience: Careful finger pressure is enough to create most of the necessary creases.
For a beginner-friendly experience, use paper that folds easily without being excessively thick. Very thin paper can be difficult to shape once several layers overlap, while extremely stiff paper may resist the smaller folds needed to define the petals.
How to Fold an Origami Lily Step by Step
The visual tutorial breaks the project into a sequence of numbered folding stages. Following the order is important because each fold prepares the paper for the next one. Instead of trying to force the final flower shape immediately, focus on creating a neat foundation and gradually shaping the layers.
Step 1: Begin With a Square
Start with a square piece of origami paper. Place it flat in front of you and identify the center line by folding the paper carefully and then opening it again. The crease should be visible enough to guide the following folds.
Try to keep the corners aligned. If the edges drift while you fold, the center can become uneven, which may make later steps more difficult.
Step 2: Shape the Initial Diamond
Continue folding the paper so that the square begins to form a diamond-like shape. Press along the fold with your fingertips to establish a clean crease.
This stage creates the structural foundation of the flower. It may look simple, but accurate positioning here helps the later layers line up properly.
Step 3: Fold Toward the Center
Bring one side toward the central crease as shown in the tutorial sequence. The paper begins to become narrower and more layered. Make sure the edges meet the intended crease rather than stopping noticeably short of it.
Use your fingernail or the side of a fingertip to reinforce the fold. A defined crease gives you better control when opening and shaping the layers later.
Step 4: Continue the Side Fold
Fold the next section inward according to the same general structure. At this point, the paper starts to resemble a narrow diamond or kite shape.
Keep the model flat while making the crease. Avoid rushing into the three-dimensional shaping stage before the main folds are properly established.
Step 5: Build the Center Structure
The fifth stage strengthens the central structure of the flower. Several layers now overlap, creating the compact form that will eventually support the petals.
Check that the top and bottom points remain reasonably aligned. If the model looks slightly uneven, gently adjust the layers before reinforcing the crease.
Step 6: Begin Opening the Layers
Now the project becomes more visually interesting. A folded section is opened and shaped outward, beginning to reveal the future petal structure.
This is a good moment to slow down. The paper is becoming three-dimensional, so aggressive folding can leave unwanted wrinkles. Use gentle pressure and shape the layers gradually.
Expert Insight
The transition from flat folds to open petals is where patience matters most. Rather than pulling the paper sharply, guide each layer into position and reinforce only the creases that need definition.
- Keep your folds symmetrical whenever possible.
- Shape petals gradually instead of forcing them open.
- Use clean, firm creases for the central structure.
Step 7: Form the First Petal
Open another folded layer and guide it outward to form one of the lily’s petals. The shape should begin to look more like a flower rather than a folded geometric model.
Do not worry if your first petal is not perfectly curved. Origami allows you to make small adjustments by changing the angle and gently shaping the paper.
Step 8: Refine the Petal Layers
Continue opening and shaping the remaining sections. The narrow folded model expands as additional petals are revealed. Pay attention to the spacing between the petals so that the flower looks balanced from the front.
At this stage, the project becomes a satisfying transformation. What started as a flat square has developed into a recognizable three-dimensional flower through a series of carefully planned folds.
Step 9: Open and Shape the Lily
The final step is to gently spread the petals and give the flower its finished form. Adjust each petal until the composition feels balanced and natural.
You can slightly curve the petals outward with your fingers to create a softer floral appearance. The central section should remain more structured, helping the flower hold its shape.
Pro Tip: Do not judge your origami lily too early. Many paper flowers look ordinary while they are still tightly folded and become much more attractive once the final petals are opened and shaped.
Tips for Cleaner Origami Folds
A successful origami craft is often less about complicated techniques and more about precision. A few simple habits can make the folding process easier and improve the finished result.
- Align before creasing. Hold the edges or corners together before pressing down firmly.
- Crease with intention. Once the alignment is correct, run your fingertip along the fold to make it crisp.
- Work on a flat surface. A stable table makes it easier to maintain symmetry.
- Slow down around layered sections. Several layers of paper can shift if you move too quickly.
- Shape the petals gently. Curving the paper gradually helps prevent unwanted wrinkles.
Choosing Paper for an Origami Flower
Paper choice can completely change the personality of your origami lily. Bright yellow creates a cheerful flower similar to the featured design, while pastel colors can produce a softer and more delicate look.
Try experimenting with pink for a romantic arrangement, white for a minimalist display, orange for a warm autumn-inspired project, or several colors for a playful paper flower collection. Patterned paper can also add visual interest, although beginners may find solid colors easier to work with because the creases are easier to see.
The most important factor is flexibility. The paper should be easy enough to fold neatly but sturdy enough to hold the flower’s shape once the petals are opened.
Creative Ways to Use Your Origami Lily
Once you have completed one flower, you can decide how to display it. An individual origami lily can make a charming desk decoration, while several flowers can be arranged into a colorful paper bouquet.
- Create a small handmade centerpiece using several paper flowers.
- Use finished lilies as decorative elements for a craft display.
- Make a collection of flowers in different colors and sizes.
- Add handmade paper flowers to cards or creative gift presentations.
- Use the project as a relaxing screen-free afternoon craft.
One of the nicest aspects of DIY origami is that every finished flower can have its own character. Slight variations in petal curves and crease depth can make a handmade arrangement feel more natural and personal.
Why Origami Is a Great Beginner Craft
Origami combines creativity with simple problem-solving. You begin with a flat sheet and follow a sequence of transformations until a new form appears. That process can be both engaging and satisfying.
An origami lily is particularly rewarding because the finished object is decorative as well as handmade. Beginners can practice basic folds while gradually learning how paper responds to pressure, direction, layering, and shape.
It is also an accessible craft for people who want a low-mess activity. Unlike many DIY projects, there is no need for paint, glue, glitter, or a long list of specialty supplies. A sheet of paper can be enough to get started.
Common Mistakes to Avoid
If your first origami lily does not look exactly as expected, that is completely normal. Paper folding becomes easier with practice, and many common problems can be corrected by improving alignment and crease control.
Uneven Creases
If a fold is slightly off-center, the error can become more visible as additional layers are added. Take a moment to align the paper before making each major crease.
Forcing the Petals Open
Petals should be shaped gradually. Pulling too hard can create unwanted creases or weaken the paper. Gentle pressure gives you more control over the final silhouette.
Using Paper That Is Too Difficult to Fold
Very thick paper may be frustrating when several layers overlap. If you are learning the technique for the first time, choose a lightweight paper that holds a crease without requiring excessive force.
At a Glance
- Craft: Origami lily
- Skill level: Beginner-friendly
- Main supply: Square paper
- Best tip: Focus on accurate creases
- Creative use: Handmade floral decoration
Make Your Own Origami Lily
Creating an origami lily is a simple way to turn an ordinary sheet of paper into something decorative and surprisingly dimensional. The numbered folding process makes the project easier to follow, while the final petal shaping gives you room to add your own creative touch.
Start with one square sheet, work carefully through each fold, and remember that precision matters more than speed. Once you become comfortable with the basic sequence, try different paper colors and make several flowers to create your own handmade collection.
Whether you are completely new to paper folding or already enjoy DIY crafts, this origami flower is a rewarding project to keep in your craft rotation. Save the tutorial, gather a sheet of paper, and give yourself a little time to enjoy the process. The transformation from a simple square to a blooming paper lily is the part that makes this craft so satisfying.