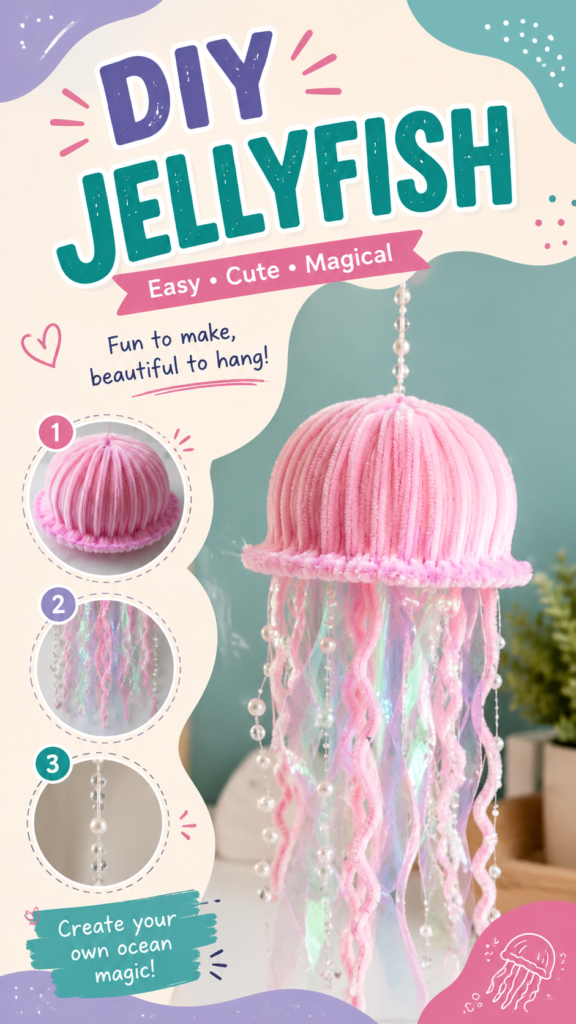
Some craft projects are simply fun to make, while others become memorable pieces of decor that instantly bring personality to a space. A cute DIY jellyfish craft falls into the second category. With a soft rounded top, flowing tentacles, pastel colors, translucent materials, and sparkling bead details, this playful project combines easy crafting with an eye-catching finished result.
The charm of a DIY jellyfish decoration comes from its movement and texture. Soft strands can curl and sway, clear elements can catch the light, and layered materials can create an underwater-inspired look without requiring complicated techniques. Whether you are searching for cute DIY ideas, creative handmade decor, a fun weekend project, or a whimsical craft to personalize, this jellyfish-inspired design offers plenty of possibilities.
What makes this type of project especially appealing is how flexible it can be. You can create a pastel jellyfish for a dreamy bedroom, use bright colors for a playful party decoration, or choose shimmering materials for a more magical finished piece. The basic idea remains simple, but the creative details can make every version look completely unique.
Key Takeaways
- A cute DIY jellyfish craft combines soft textures, flowing strands, beads, and decorative details.
- The project can be adapted with different colors, materials, sizes, and hanging styles.
- Layered tentacles create movement and help the finished jellyfish look more dimensional.
- Pastel shades, iridescent materials, and clear beads can create a whimsical ocean-inspired effect.
- This craft works well as handmade decor, a creative activity, or inspiration for other cute DIY projects.
Why Cute DIY Jellyfish Crafts Are So Popular
Jellyfish are naturally interesting because of their shape. Their rounded bodies and long flowing tentacles already resemble a decorative object, making them perfect inspiration for creative crafts. A handmade version can exaggerate those features with soft fabric, yarn, ribbons, beads, curly strands, or transparent materials.
The result is a project that feels both playful and artistic. A jellyfish craft does not need to look realistic to be beautiful. In fact, many of the most appealing designs use imaginative colors that would not appear on a real jellyfish. Soft pink, lavender, aqua, peach, mint, and iridescent tones can turn the project into a dreamy decorative piece.
Important: The visual appeal of a cute DIY jellyfish often comes from contrast. Combining a soft, textured top with lighter, flowing tentacles creates depth and movement, making the finished craft look more interesting from different angles.
Another reason this project works so well for modern craft inspiration is that it photographs beautifully. A finished jellyfish can become a statement piece when hung near a window, displayed against a simple background, or placed in a creative corner. The long tentacles naturally create vertical movement, while the rounded top provides a strong focal point.
Choosing Materials for a Whimsical Jellyfish Craft
One of the best parts of making a jellyfish craft is experimenting with materials. You do not need to use one specific supply list. Instead, think about the overall effect you want to create. Do you want the project to look soft and cozy, shiny and dreamy, colorful and playful, or elegant and decorative?
Materials for the Jellyfish Bell
The bell, or rounded top section, is the visual center of the project. Textured materials work especially well because they add detail even before the tentacles are attached. Soft yarn, fabric strips, lightweight felt, textured paper, foam, or other craft-friendly materials can all create a layered appearance.
A pastel pink bell can create a sweet and whimsical look, but other color choices work just as well. Blue and turquoise can feel more ocean-inspired, while lavender and silver can create a dreamy decorative style. You can also combine several shades to add subtle dimension.
Materials for the Tentacles
The tentacles are where the craft can become especially creative. Mixing several materials usually produces a richer result than using only one. Consider combining ribbon, curled strips, translucent fabric, yarn, beaded strings, lightweight decorative chains, or other flexible craft materials.
Different lengths can also make a major difference. If every strand is exactly the same length, the jellyfish may look stiff. A combination of long, medium, and shorter tentacles creates a more natural and decorative shape. Curled pieces add playful movement, while straighter strands can create a softer, floating effect.
Beads and Clear Decorative Details
Clear beads and pearl-like accents are especially effective because they can resemble floating water droplets or bubbles. They also catch the light and add a delicate finishing touch. A few decorative beads may be enough, so there is no need to cover every strand.
For a lighter look, place beads at different heights along selected tentacles. For a more detailed project, combine small and larger beads to create visual variety. Keeping the embellishments slightly irregular can make the design feel more handmade and less repetitive.
Expert Insight
The most successful decorative crafts usually repeat a few visual elements rather than using every available material. Choose a small color palette, repeat one or two accent details, and let the flowing shapes do the rest of the work.
How to Build a DIY Jellyfish Decoration
Before starting, it helps to think of the project as three main sections: the rounded bell, the tentacles, and the hanging support. Breaking the craft into these simple stages makes the process easier to manage.
1. Create the Rounded Top
Begin by shaping a lightweight base into a dome or rounded cap. The exact method can vary depending on the materials you choose. Once the basic form is ready, cover or decorate it with your selected texture. Layering soft material from top to bottom can create a ribbed or flowing appearance.
Focus on creating a neat lower edge because this is where the tentacles will eventually attach. A decorative trim can help hide attachment points and give the jellyfish a more finished appearance.
2. Prepare the Hanging Tentacles
Cut or arrange your tentacle materials in different lengths. Before attaching them permanently, lay them out beneath the bell to see how the colors and textures work together. This small planning step can prevent the finished project from becoming too crowded or uneven.
- Start with a few longer statement tentacles.
- Add medium-length strands between them.
- Include shorter curly or beaded details for texture.
- Step back and check the overall balance before securing everything.
Try to distribute different colors and textures across the full width of the jellyfish. If all the clear material is placed on one side or all the ribbons are grouped together, the project may feel visually heavy in one area.
3. Add Movement and Sparkle
This is the stage where the craft starts to feel special. Add beads, transparent strands, curled ribbons, or other lightweight details. The goal is not to fill every empty space. Leaving some room between the tentacles allows the individual elements to move and remain visible.
Pro Tip: Use lightweight embellishments whenever possible. A jellyfish craft looks best when the tentacles can hang naturally and move freely. Heavy decorations can pull the strands downward and make the design lose its soft, floating effect.
4. Finish the Hanging Section
A decorative hanging string can turn the jellyfish into a wall or ceiling decoration. Clear beads, small pearl-like details, or a simple cord can add vertical interest above the bell. Make sure the support is secure enough for the weight of the finished project.
If the jellyfish is meant to hang in a room, test how it looks from several directions. The front may appear balanced while the side view reveals tangled strands. Adjusting the tentacles before the project is displayed can make a noticeable difference.
Creative Color Ideas for a Cute DIY Jellyfish
Color plays a major role in the mood of the finished craft. Soft pink and translucent details create a sweet, dreamy look, but the same design can be transformed simply by changing the palette.
Pastel Ocean Palette
Combine pink, mint, aqua, lavender, and soft blue. This palette works well for whimsical decor and gives the jellyfish a light, airy appearance.
Monochrome Soft Pink
Use several shades of pink, from pale blush to deeper rose. Add clear or pearl-like accents to prevent the design from looking flat.
Bright Rainbow Style
For a more playful version, use colorful ribbons and strands beneath a simple neutral or pastel bell. This approach is especially useful for cheerful craft projects where color is the main focus.
Iridescent and Shimmering Details
Translucent materials with a subtle color shift can create a polished decorative look. Pair them with a simple bell in one main color so the shimmering tentacles remain the star of the design.
Ways to Personalize Your DIY Jellyfish Craft
One of the biggest advantages of a handmade project is that there is no single correct version. Personal details can make a simple idea feel completely your own.
- Change the size: Make a small hanging decoration or a larger statement piece.
- Mix textures: Combine soft, smooth, clear, and curly materials.
- Create a themed palette: Choose colors that match a room, event, or creative display.
- Add subtle accents: Use beads, pearls, or small decorative elements for extra detail.
- Vary the tentacles: Use different lengths and shapes to make the jellyfish look more dynamic.
Personalization is also useful when creating several jellyfish together. You can use one basic structure while giving each piece a different color combination or tentacle style. A collection of handmade jellyfish can create a more dramatic visual display than a single piece.
Common Mistakes to Avoid
Creative crafts are meant to be enjoyable, but a few common design choices can make the finished result look less polished. Fortunately, most of these problems are easy to avoid.
Using Too Many Different Materials
Texture is important, but too many unrelated materials can make the project look cluttered. Choose a few materials that work well together and repeat them throughout the design.
Making Every Tentacle the Same
Uniform tentacles can create a stiff appearance. Varying the lengths, thicknesses, and shapes helps create the soft, floating look that makes a jellyfish craft so appealing.
Overloading the Design with Decorations
Beads and sparkling accents look beautiful when used thoughtfully. If every strand is heavily decorated, however, the tentacles can become difficult to distinguish. A few carefully placed details often create a stronger result.
Cute DIY Ideas Inspired by the Same Style
If you enjoy the soft, whimsical look of a handmade jellyfish, there are many other cute DIY projects that use similar techniques. Hanging mobiles, pastel wall decor, decorative garlands, fabric ornaments, and beaded crafts can all benefit from layered textures and flowing details.
You can also adapt the jellyfish shape into a themed decoration. Use soft ocean colors for a coastal-inspired craft, bright shades for a cheerful creative project, or a more neutral palette for modern handmade decor. The key design idea is simple: combine one strong central shape with lightweight details that add movement.
Creative Takeaway: A successful cute DIY project does not need complicated construction. A clear idea, a cohesive color palette, and a few memorable details can transform simple materials into something that feels thoughtful and display-worthy.
At a Glance
- Best feature: Flowing tentacles create movement and visual interest.
- Easy upgrade: Add clear beads or pearl-like details for a polished finish.
- Color tip: Use two to five coordinating shades instead of too many unrelated colors.
- Design tip: Mix long, medium, and short strands for more dimension.
- Creative value: The project can be adapted into many cute handmade decor ideas.
Conclusion: A Cute DIY Project Full of Creative Possibilities
A handmade jellyfish is more than a simple craft. It is an opportunity to experiment with color, texture, movement, and decoration in one creative project. The rounded bell gives the design a strong focal point, while the flowing tentacles allow endless room for personalization.
Whether you choose soft pastel colors, shimmering clear materials, curly ribbons, delicate beads, or a completely different style, the basic idea remains wonderfully flexible. That makes this project a great source of inspiration for anyone looking for cute DIY ideas that feel imaginative without being overly complicated.
The most appealing version will be the one that reflects your own creative taste. Keep the color palette cohesive, balance the textures, vary the tentacle lengths, and leave enough space for the details to move. With a few simple materials and thoughtful design choices, a DIY jellyfish craft can become a playful piece of handmade decor that is fun to create and beautiful to display.
Tags
Cute DIY DIY Jellyfish Easy Crafts Creative Crafts Handmade Decor Pastel Crafts DIY Projects Craft Inspiration