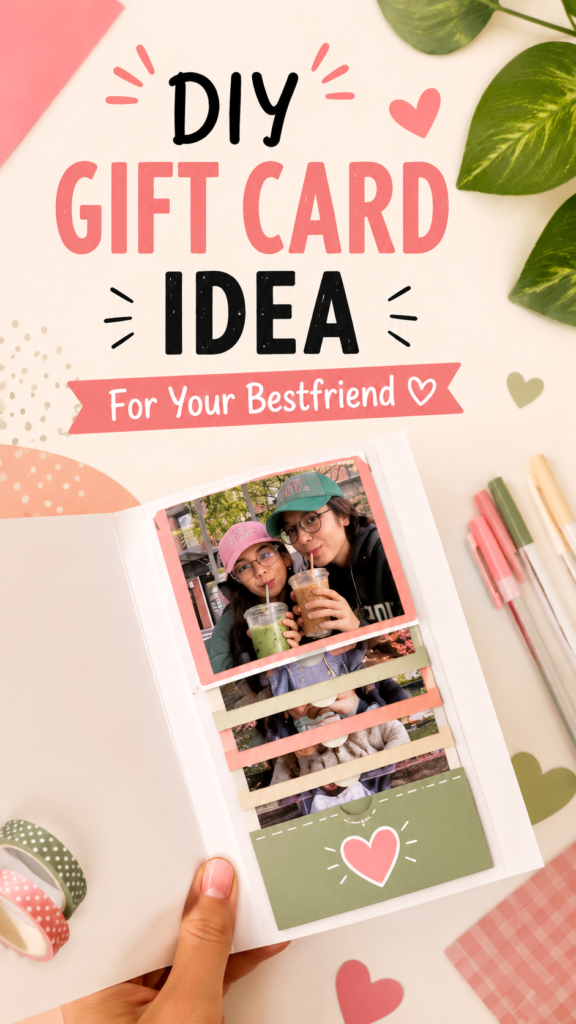
A handmade card can turn a simple gift into a meaningful memory, especially when it is designed around the moments you share with someone special. This DIY card idea combines photographs, colorful paper strips, playful details, and a clever pull-out style to create a keepsake that feels personal from the moment it is opened. Instead of buying a standard greeting card, you can use a few basic craft supplies and favorite photos to make something that tells a story.
The design is especially appealing for best friends, birthdays, friendship milestones, thank-you gifts, or just because. Its layered photo-card format gives the recipient something to explore, making the card feel more like a tiny scrapbook than an ordinary note. With a few adjustments, the same concept can also become a romantic card, graduation keepsake, holiday greeting, or personalized memory book.
Key Takeaways
- Create a personalized DIY card using photos and simple paper-crafting supplies.
- Use layered strips to create a fun reveal when the card is opened.
- Choose colors and decorations that match the recipient’s personality.
- Add handwritten messages to make the card feel more personal.
- Reuse the same layout for birthdays, friendship gifts, anniversaries, and celebrations.
- Keep the design balanced so the photos remain the main visual feature.
Why DIY Cards Make Such Meaningful Gifts
Store-bought cards are convenient, but handmade cards have a different kind of charm. A DIY card gives you the opportunity to choose every small detail, from the photographs and colors to the message written inside. That personal involvement is what makes handmade cards memorable.
A photo card can be particularly meaningful because photographs capture real experiences. A favorite café visit, vacation snapshot, funny selfie, celebration, or everyday moment can instantly bring back a shared memory. Combining several photos into one handmade design creates a small visual timeline of the relationship.
Important: The strongest handmade cards are not necessarily the most complicated. A simple layout with meaningful photos, thoughtful colors, and a genuine handwritten message can have more emotional impact than a heavily decorated design.
What Makes This DIY Card Design Stand Out?
The featured concept uses an open card as the foundation and turns the inside into a miniature photo display. A larger photograph sits near the top, while smaller horizontal photo sections appear beneath it. Decorative paper strips separate the images, creating layers and giving the card a playful handmade appearance.
The combination of photography and paper crafting makes the card visually interesting from several angles. Rather than placing one photograph in the center and leaving the rest of the card empty, the layered arrangement encourages the recipient to look through the entire design.
The Photo Reveal Effect
One of the most charming parts of this idea is the pull-out or layered reveal effect. Several narrow strips can be arranged over photographs so that opening or pulling the elements reveals more of the memories underneath. This adds an interactive quality that makes the card feel like a small craft project rather than a flat piece of paper.
You do not need a complicated mechanism to achieve the effect. Carefully measured strips of cardstock can create enough layering to make the photographs appear gradually. The goal is to keep everything secure while allowing the recipient to interact with the card naturally.
Supplies You Can Use for a Handmade Photo Card
One reason this project works so well is that it can be made with accessible craft materials. You can adapt the supplies according to what you already have at home.
- Blank cardstock or thick paper for the card base
- Printed photographs
- Colored cardstock or scrapbook paper
- Scissors or a paper trimmer
- Double-sided tape or craft glue
- Decorative washi tape
- Colored pens or markers
- Small stickers or paper embellishments
- Ruler and pencil
- Optional ribbon, patterned paper, or small envelopes
The photographs are the most important decorative element, so choose images that have emotional meaning rather than simply selecting pictures because they look polished. A collection of imperfect but memorable snapshots can make the finished card feel much more genuine.
Choosing the Right Photos
Try selecting three to six photographs that represent different memories. You might choose one favorite portrait, one funny picture, one candid moment, and one image from a memorable outing. Variety will make the photo arrangement more interesting.
Before printing, consider how each photo will fit the card. A large image works well as the focal point, while smaller images can be cropped into horizontal strips. If you are printing photos at home, placing several images on one sheet can also reduce paper waste.
How to Make a DIY Photo Card Step by Step
1. Prepare the Card Base
Start with a piece of sturdy cardstock. Fold it in half and press the fold firmly so the card opens and closes neatly. A light-colored base works particularly well because it allows photographs and decorative paper to stand out.
If you want a more polished appearance, trim the edges with a ruler and paper trimmer. Consistent edges will make the finished project look intentional even if the rest of the design has a playful handmade style.
2. Plan the Photo Layout
Place the photographs on the card before gluing anything down. Start with the largest photo and position it toward the upper or central portion of the card. Then arrange the smaller images beneath it.
Leave enough space between sections for colored paper strips. Planning the layout first makes it easier to maintain even spacing and prevents you from running out of room for the final message.
3. Add Decorative Paper Strips
Cut strips of cardstock slightly wider than the photo sections. Use different shades from the same color family for a coordinated look. Soft pink, cream, sage green, peach, or muted coral can create a warm handmade aesthetic.
Attach the strips carefully so they frame or partially cover the photographs without hiding important details. You can also leave some strips loose to create a pull-out effect.
4. Create the Interactive Sections
For a simple interactive feature, create narrow paper tabs or overlapping strips. Test the movement before securing everything permanently. The pieces should slide or lift smoothly without catching on the photographs.
This is a good stage to experiment. If the card feels too crowded, remove one layer. If it feels too plain, add another photo, patterned strip, or small decorative element.
Expert Insight
Think of the card like a miniature scrapbook page. Choose one main focal point, then use smaller photos and decorations to guide the eye downward. This keeps a layered design from becoming visually overwhelming.
5. Add a Personal Message
The final message is where the card becomes truly personal. Write something that sounds like you rather than relying on a generic greeting. Mention a favorite memory, an inside joke, a quality you appreciate, or a simple reason you are grateful for the person.
Even a short handwritten note can make the finished card feel much more meaningful. If handwriting is not your favorite, you can print a message in a stylish font and add a handwritten signature or small note underneath.
6. Finish With Small Decorative Details
Add the finishing touches only after the main layout is complete. Small hearts, stars, dots, stickers, washi tape, or hand-drawn doodles can fill empty spaces without competing with the photographs.
Try repeating two or three colors throughout the design. This creates visual consistency and makes even inexpensive craft materials look coordinated.
DIY Card Ideas for Different Occasions
Once you understand the basic layout, you can adapt the concept for almost any occasion. The structure can remain the same while the photographs, colors, message, and embellishments change.
Best Friend Card
Use funny photographs, favorite memories, and bright or pastel colors for a best friend card. Add a short list of reasons you appreciate your friendship or write a message about a memorable experience you shared.
Birthday Card
For a birthday version, combine photos from different years or important moments. Add paper balloons, stars, candles, confetti patterns, or a colorful birthday message to make the card feel festive.
Thank-You Card
A photo-based thank-you card can be especially thoughtful after a trip, event, celebration, or shared experience. Choose photographs connected to the person and finish with a sincere note of appreciation.
Memory Keepsake
You can also turn the design into a small memory keepsake. Instead of focusing on one occasion, use several photographs that represent a period of friendship or a collection of favorite moments.
Pro Tip: If the card is meant to be kept for years, use thicker paper, strong adhesive, and photo prints with good durability. A sturdy construction helps the recipient preserve the card as a small scrapbook keepsake.
How to Make Your Handmade Card Look More Polished
A handmade card does not have to look perfectly symmetrical, but a few design principles can make a big difference. Keep the main photograph prominent and avoid filling every available space with decorations.
- Stick to a small, coordinated color palette.
- Use consistent margins around photographs.
- Mix patterns with solid colors instead of using too many prints.
- Keep handwritten text large enough to read comfortably.
- Use decorative accents sparingly around the main focal point.
Another useful trick is to create repetition. If you use a particular paper color around one photograph, repeat that color somewhere else in the card. Repeated details make the design feel connected without requiring professional design skills.
Common DIY Card Mistakes to Avoid
It is easy to get excited about decorating and accidentally add too many elements. The photographs should remain easy to see, especially when they are the emotional center of the project.
- Using too many colors: Choose a small palette instead of mixing every shade you have.
- Overcrowding the card: Leave some open space so the design can breathe.
- Skipping the layout test: Arrange everything first before applying adhesive.
- Using too much glue: Excess adhesive can wrinkle paper and photographs.
- Forgetting the message: Decorations are lovely, but a personal note gives the card its emotional meaning.
At a Glance
- Best for: Friends, birthdays, thank-you gifts, and memory keepsakes
- Main materials: Cardstock, photos, decorative paper, adhesive, and pens
- Design focus: Layered photos with colorful paper accents
- Personal touch: Handwritten messages and meaningful photographs
- Style: Playful, colorful, creative, and easy to customize
Conclusion: Make a Card They Will Want to Keep
DIY cards are a wonderful way to transform ordinary craft materials into something personal and memorable. A simple sheet of cardstock becomes much more special when it holds photographs, handwritten words, and small details connected to a real relationship.
The layered photo-card idea is especially versatile because you can change the colors, pictures, message, and decorations to suit almost anyone. You can keep the design soft and minimal, make it bright and playful, or turn it into a nostalgic mini scrapbook filled with favorite memories.
Most importantly, do not worry about making every cut perfectly straight or every decoration perfectly positioned. The charm of a handmade card comes from the effort behind it. Choose meaningful photos, write something genuine, and let your creativity shape the final design. That is what turns a simple DIY card into a keepsake worth saving.
Tags
DIY Cards Handmade Cards Card Making Photo Card Ideas DIY Gift Ideas Best Friend Gifts Paper Crafts Scrapbook Ideas
Would you prefer your next DIY card idea to be cute and colorful, minimalist and elegant, or photo-focused?