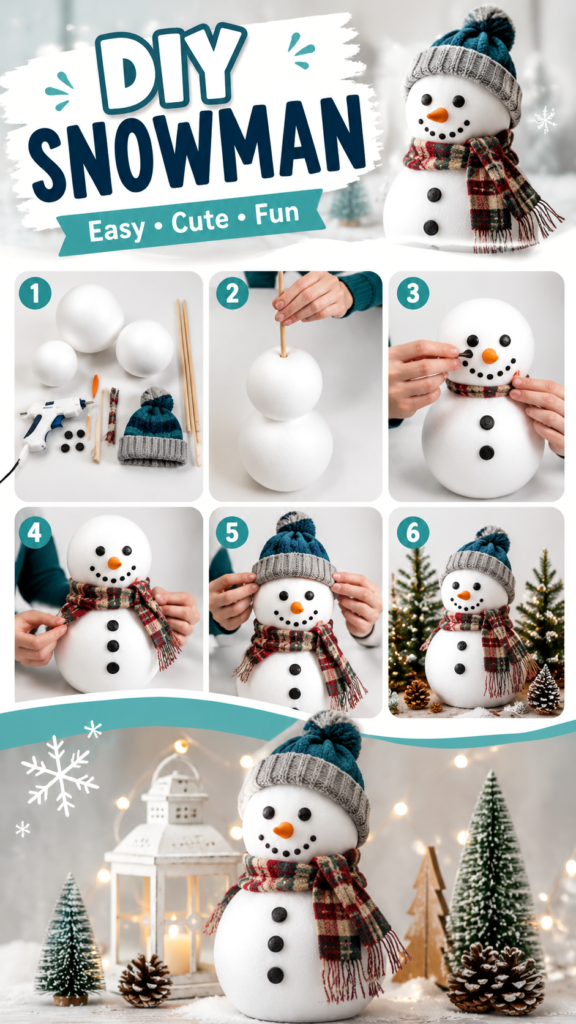
Bring a little handmade charm into your winter decorating with a simple DIY snowman craft that looks festive, cozy, and surprisingly easy to create. This cheerful snowman uses basic craft materials, soft winter accessories, and a few decorative details to become a fun Christmas decoration for your home. Whether you are planning a family craft afternoon, looking for an inexpensive holiday project, or simply want to add something handmade to your seasonal decor, this idea is an inviting place to start.
The finished snowman has a classic rounded shape, a friendly face, a colorful scarf, and a cozy knitted hat topped with a pom-pom. The step-by-step approach also makes this project approachable for beginners. Instead of requiring complicated techniques, it focuses on assembling simple pieces and adding personality through small details.
Key Takeaways
- Use lightweight foam balls to create the snowman’s rounded body.
- Simple buttons and small craft pieces can create an expressive face and body.
- A knitted hat and patterned scarf instantly add cozy Christmas character.
- The project can be adapted to different sizes, colors, and decorating styles.
- A finished snowman works beautifully as seasonal indoor or porch decor.
Why This DIY Christmas Snowman Is So Charming
There is something especially appealing about handmade Christmas decorations. They do not need to be elaborate to make a space feel festive. A simple snowman can bring together several familiar winter details, including snow, knitted textures, scarves, buttons, greenery, and warm decorative lights.
This particular craft also has a wonderfully approachable look. The snowman’s body is made from three rounded forms, creating the familiar silhouette of a traditional snowman. A small orange carrot-style nose provides a bright focal point, while black details define the eyes, smile, and buttons. The colorful scarf and winter hat add texture and make the finished decoration feel ready for Christmas.
Important: The magic of this project comes from the finishing touches. The basic snowman shape is intentionally simple, so accessories such as the scarf, hat, buttons, and facial details do most of the work when it comes to creating personality.
Materials for a Simple Snowman Craft
The project shown uses a small collection of easy-to-find craft supplies. The exact quantities will depend on the size of your snowman and the look you want to create, but the basic concept is straightforward.
- Three lightweight white foam balls in graduated sizes
- A thin wooden stick or dowel for connecting the sections
- Small black buttons or similar craft pieces
- A small orange piece for the carrot-style nose
- A knitted winter hat that fits the top section
- A colorful scarf or strip of patterned fabric
- Craft adhesive or a hot glue gun for appropriate attachments
- Optional decorative greenery, pinecones, or winter accents for the display area
One of the advantages of this idea is that it leaves plenty of room for substitution. If you do not have a particular material, look around your craft supplies for something with a similar function. An old winter scarf can become a miniature snowman scarf, while spare buttons can become eyes, a smile, or body buttons.
Choosing the Right Snowman Size
Before assembling the project, think about where the finished snowman will be displayed. A smaller version can sit on a shelf, mantel, entryway table, or centerpiece. A larger version can become a more noticeable seasonal decoration near a doorway or another sheltered display area.
Using three different foam ball sizes helps create the classic snowman proportions. The largest piece forms the base, the medium piece becomes the torso, and the smallest piece forms the head. Keeping the pieces balanced will help the finished decoration look stable and polished.
How to Make the DIY Snowman Step by Step
1. Gather and Arrange the Materials
Start by placing all your supplies on a clear work surface. Arrange the foam balls from largest to smallest so you can see the proportions before attaching anything. Set the buttons, nose, hat, scarf, adhesive, and wooden stick nearby.
This simple preparation step can make the project much easier. It allows you to test the overall arrangement before committing to the final design. You can also decide whether you want the snowman’s face centered, slightly playful, or angled toward one side.
2. Build the Snowman Body
The next stage is creating the snowman’s three-part body. The largest foam ball forms the base, while the medium and small balls sit above it. A thin wooden stick can help align the pieces and provide additional support through the center.
Take care when positioning each section. You want the snowman to stand upright rather than lean noticeably to one side. If necessary, adjust the placement before securing the pieces. A balanced silhouette will make the finished decoration look much more professional.
3. Create the Friendly Face
Once the body is assembled, it is time to give your snowman some personality. Use small black pieces for the eyes and arrange additional pieces into a curved smile. The orange nose becomes the central facial feature and gives the snowman its recognizable winter character.
Try laying out the facial pieces before attaching them. This gives you an opportunity to adjust the spacing. A slightly wider smile can create a playful appearance, while evenly spaced details create a more traditional look.
4. Add the Body Buttons
Place several larger black buttons vertically down the front of the snowman’s body. These simple details help define the torso and add contrast against the white foam.
Spacing matters here. Before gluing the buttons, step back and look at the snowman as a whole. Keeping the buttons roughly aligned will give the body a neat appearance, while slight variations can create a more whimsical handmade feel.
5. Wrap the Snowman in a Cozy Scarf
The scarf is one of the most visually important accessories in the finished design. Wrap a colorful piece of fabric around the neck area and let the ends hang naturally down the front or side. A plaid or patterned scarf adds warmth and contrast while reinforcing the cozy winter theme.
You can customize this detail to match your existing Christmas decorations. Choose traditional reds and greens for a classic holiday appearance, neutral tones for a minimalist winter display, or brighter colors for a playful family craft.
6. Finish With a Winter Hat
Top the snowman’s head with a small knitted hat. The hat shown in the design has a cozy ribbed texture and a pom-pom, which makes the decoration feel especially wintery.
Make sure the hat sits securely without hiding too much of the face. If you are making the snowman from scratch, you can experiment with different miniature hats, fabric caps, or other soft winter accessories.
Expert Insight
Treat the hat and scarf as part of the snowman’s design rather than simple accessories. Matching or coordinating these two elements can make a basic craft look intentionally styled. A patterned scarf paired with a textured hat creates visual interest without requiring complicated decoration.
Ways to Customize Your Christmas Snowman
The basic design is only a starting point. One of the best things about a DIY Christmas snowman is how easily it can be personalized. You can change the colors, accessories, facial expression, size, and surrounding display to suit your home.
Try Different Color Combinations
A red-and-green scarf gives the snowman a traditional Christmas appearance. For a softer winter look, combine cream, gray, pale blue, and natural wood tones. Navy, teal, and white can create a fresh modern palette, while burgundy and forest green offer a richer seasonal feeling.
Create Different Expressions
Small changes to the eyes and smile can completely change the character of the decoration. Try a cheerful curved smile, a surprised expression, or a simple traditional face. You can also experiment with the size and placement of the eyes to create a more playful snowman.
Build a Winter Display
The finished snowman becomes even more attractive when displayed with complementary seasonal elements. The example combines the character with small evergreen trees, pinecones, artificial snow, a lantern, and warm lights. These surrounding details create a miniature winter scene and make the snowman feel like part of a larger Christmas display.
You do not need a large space to recreate this atmosphere. A small tray, wooden board, shelf, or tabletop can provide a foundation. Add a few miniature trees, pinecones, greenery, or battery-operated lights around the snowman for an inviting seasonal arrangement.
Helpful Tips for a Better DIY Snowman
A few small choices can make a noticeable difference in the finished craft. Plan the composition before attaching decorative elements, especially if you want the snowman to become part of a larger Christmas display.
- Test the arrangement first. Place the balls, face pieces, buttons, scarf, and hat together before permanently attaching them.
- Keep the face balanced. The eyes, nose, and smile should work together visually rather than feeling crowded.
- Use contrast. Dark buttons and facial details stand out beautifully against the white body.
- Choose textured accessories. Knitted fabric, woven scarves, and soft materials add depth to the simple foam shape.
- Think about the final location. Size and stability are especially important if the snowman will be displayed where people frequently walk past it.
Pro Tip: Photograph your finished snowman near a softly decorated background. Evergreen branches, warm fairy lights, pinecones, and a few winter accents can make even a simple handmade project look polished and Pinterest-ready.
Where to Display Your Handmade Snowman
A DIY snowman can fit into many areas of a Christmas decorating scheme. Place a smaller version on a mantel, bookshelf, entryway table, kitchen counter, or side table. A larger version can become the focal point of a sheltered porch or seasonal corner.
For an especially cozy presentation, surround the snowman with miniature evergreen trees and pinecones. A lantern or warm decorative lights can add a gentle glow during evening hours. The goal is not to fill every available space, but to create a small collection of complementary textures and shapes.
A Fun Christmas Craft for the Whole Family
This project can also be a fun way to spend time together during the holiday season. Different people can take responsibility for different parts of the design. One person can arrange the face, another can choose the scarf, and someone else can style the final display.
For younger crafters, adults can handle tools and adhesives while children help choose colors, arrange buttons, or decorate the surrounding scene. The finished snowman can become a memorable seasonal decoration that comes back out year after year.
How to Make the Project Feel More Personal
Handmade decorations are most appealing when they reflect the people who made them. Consider choosing a scarf color that matches your room, adding a favorite winter hat style, or creating several snowmen with different expressions. A small collection can look charming when each character has its own personality.
You can also make the craft part of a larger seasonal theme. If your Christmas decor uses natural materials, surround the snowman with pinecones and miniature trees. If your style is colorful and playful, choose bright scarves and hats. For a clean Scandinavian-inspired look, stick with white, gray, soft blue, and natural wood accents.
Quick Points
- Three foam balls create the classic snowman shape.
- Buttons and simple craft pieces add an expressive face.
- A scarf and knitted hat provide color and texture.
- Mini trees, pinecones, and lights create a cozy display.
- Customize the colors to match your Christmas decor.
Conclusion: A Simple DIY Christmas Decoration With Plenty of Personality
A handmade snowman is a wonderful example of how a few simple materials can become a cheerful Christmas decoration. The rounded white body provides a clean foundation, while buttons, a carrot-style nose, a colorful scarf, and a knitted hat bring the character to life.
What makes this DIY Christmas craft especially appealing is its flexibility. You can keep the design simple or build an entire winter scene around it. Change the colors, experiment with accessories, create different facial expressions, or make several snowmen to display together.
Whether you are decorating a shelf, preparing a cozy holiday centerpiece, or looking for a creative project to enjoy with family, this snowman offers an easy way to add handmade warmth to your Christmas decor. Gather your materials, choose your favorite winter accessories, and let the small details give your snowman its own festive personality.
Tags
DIY Christmas Snowman Craft Christmas Crafts Holiday Decor Winter Crafts Handmade Christmas Decor Christmas DIY Ideas Cozy Winter Decor