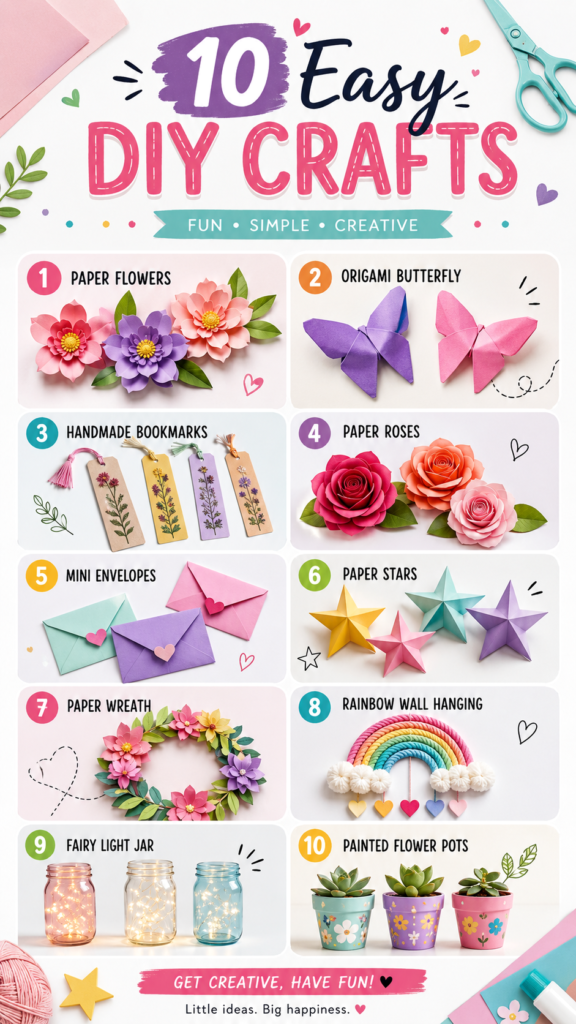
Paper crafts are one of the easiest ways to turn a few simple supplies into colorful decorations, thoughtful handmade gifts, and relaxing creative projects. You do not need an elaborate craft room or expensive materials to get started. With paper, scissors, glue, pencils, and a little patience, you can make flowers, butterflies, bookmarks, roses, envelopes, stars, wreaths, wall art, light-filled jars, and decorated flower pots.
Key Takeaways
- Paper crafts can be simple, affordable, and beginner-friendly.
- Flowers, origami, bookmarks, envelopes, and stars are great projects to start with.
- Color combinations and small details can make basic crafts look polished.
- Many paper crafts work beautifully as handmade gifts or home decorations.
- You can adapt the projects to different seasons, celebrations, and personal styles.
10 Easy Paper Crafts DIY Ideas to Try
The best thing about paper crafts DIY projects is their flexibility. A single sheet of colored paper can become something decorative, practical, or completely playful. The ideas below are inspired by a bright collection of approachable crafts, with each project offering a different way to experiment with folding, cutting, rolling, layering, and decorating.
1. Make Layered Paper Flowers
Paper flowers are a classic craft for good reason. They instantly add color and dimension, and you can create them in almost any palette. Start by cutting several flower shapes in different sizes. Layer the pieces from largest to smallest, then secure the centers with glue. A pencil can help gently curl the edges of each petal, giving the flower a softer and more natural appearance.
Try combining several shades of the same color for depth. Pink, coral, purple, yellow, and green work especially well for cheerful arrangements. Add paper leaves around the flowers to create a small bouquet, centerpiece, card decoration, or wall display.
2. Fold an Origami Butterfly
An origami butterfly is a fun project for anyone who enjoys folding paper. Choose a square piece of origami paper and follow a sequence of diagonal and horizontal folds to create the wings and body. Once the basic shape is complete, gently open and shape the wings for a dimensional effect.
Use contrasting colors for a playful collection of butterflies. A group of folded butterflies can be attached to a handmade card, arranged on a bedroom wall, or used as decorative accents for a creative display. Lightweight paper is particularly easy to fold while still holding its shape.
3. Create Handmade Floral Bookmarks
Bookmarks are among the most practical paper crafts DIY projects. Begin with a narrow rectangle of cardstock or sturdy paper. Decorate the surface with drawn flowers, pressed-flower-inspired designs, patterns, or simple illustrations. Punch a hole near the top and add ribbon or a small tassel.
This project is also easy to personalize. Make different bookmarks for different books, or create a small set as a handmade gift. If you want the bookmark to last longer, use thicker cardstock and keep embellishments relatively flat so it remains comfortable between book pages.
4. Roll a Paper Rose
Paper roses look more intricate than they actually are. The basic technique involves cutting a spiral shape from colored paper and carefully rolling it from the outside toward the center. Keep the roll fairly tight at first, then allow the layers to loosen slightly as the rose takes shape. Secure the finished flower with glue.
Experiment with different spiral widths to change the appearance of the petals. Several roses grouped together can become a bouquet, gift decoration, or centerpiece. Add green paper leaves underneath the blooms to create a more complete floral arrangement.
Expert Insight
The biggest difference between a basic paper craft and a polished one is often the finishing detail. Clean cuts, consistent folds, carefully layered pieces, and a thoughtful color palette can make even a very simple project look professionally made.
5. Fold Mini Paper Envelopes
Mini envelopes are useful for tiny notes, handmade cards, gift messages, or decorative displays. Start with a square or rectangular piece of paper and fold the sides inward before bringing up the bottom and folding down the top flap. A small amount of glue can help hold the sides securely.
Choose soft pastel shades for a delicate look or bright colors for a playful stationery collection. Small paper hearts, stickers, or simple drawings can be added to the front. These envelopes are especially charming when used for handwritten messages because the handmade element makes the note feel more personal.
6. Fold Colorful Paper Stars
Paper stars are a great way to practice repetitive folding while creating a decorative result. Narrow paper strips can be folded and tucked into a compact star shape. Once you become comfortable with the technique, you can make a collection in several colors and sizes.
Use paper stars in small bowls, gift packaging, handmade cards, or decorative jars. They can also become part of seasonal displays. Mixing different colors gives the finished collection more visual interest without requiring complicated materials.
7. Design a Paper Flower Wreath
A paper wreath combines several simple techniques into one eye-catching decoration. Begin with a cardboard ring as the base. Cut leaves and flowers from colored paper, then arrange them around the ring before gluing everything into place.
Planning the arrangement before applying glue makes the process easier. Spread larger flowers around the wreath instead of grouping them all together, then fill open spaces with smaller flowers and leaves. You can create a monochromatic wreath for a modern look or combine several bright colors for a cheerful seasonal decoration.
8. Make a Rainbow Wall Hanging
A rainbow wall hanging is an easy way to introduce color and texture into a room. Cut strips of colored paper in different lengths, roll or curve them into rainbow-shaped sections, and arrange them from largest to smallest. Cotton or soft paper clouds can be added at each end for extra texture.
Small hanging shapes beneath the rainbow can make the design feel more playful. Hearts, stars, circles, or simple geometric shapes all work well. Keep the colors coordinated so the finished piece feels intentional rather than crowded.
9. Decorate a Fairy Light Jar
A clear jar combined with small decorative lights can create a warm and cozy craft display. Clean the outside of the jar, arrange the lights neatly inside, and decorate the exterior with ribbon, lace, or other lightweight accents.
Because the lights provide the main visual effect, simple decoration is usually enough. A neutral ribbon can create an elegant look, while pastel details can make the jar feel more playful. Place the finished jar somewhere where its gentle glow can be appreciated.
10. Paint and Decorate Flower Pots
Small clay flower pots are another easy surface for creative decorating. Paint the base in a color you love, allow it to dry, and add simple flowers, dots, leaves, or other patterns. Even basic shapes can create a cheerful finished design.
For a coordinated display, decorate several pots using the same pattern but different colors. Small plants or succulents can then turn the painted pots into colorful accents for a windowsill, shelf, desk, or other suitable space.
Simple Supplies for Paper Crafts
Most of these projects can be made with supplies you may already have at home. Keeping a small craft kit nearby makes it easier to start a project whenever inspiration strikes.
- Colored paper and origami paper
- Cardstock or other sturdy paper
- Child-safe or craft scissors
- Glue or paper adhesive
- Pencil and eraser
- Markers or colored pens
- Ribbon, yarn, or thread
- Cardboard for craft bases
- Optional decorative items such as stickers or beads
You do not need every item for every project. Start with paper, scissors, glue, and a pencil, then add decorative supplies as needed. This keeps paper crafting affordable and makes experimentation less intimidating.
How to Make Paper Crafts Look More Professional
A polished craft is less about having expensive supplies and more about paying attention to proportion, spacing, and finishing. Before cutting, measure where appropriate and use a pencil to mark light guidelines. When folding, take a moment to align edges before pressing down firmly.
Color is another powerful tool. Instead of using every color at once, choose three or four shades that work well together. A palette built around pink, purple, teal, yellow, or soft green can create a bright handmade aesthetic while keeping the finished project visually balanced.
Layering also adds depth. For flowers, use multiple petal sizes. For wall decorations, combine large shapes with smaller accents. For bookmarks, keep the main design simple and let the ribbon or tassel provide a small finishing touch.
Pro Tip: Before gluing anything permanently, arrange all the pieces on your work surface first. Take a quick look from a distance. This simple step helps you spot uneven spacing, crowded areas, or missing accents before the design is fixed in place.
Easy Ways to Personalize Your DIY Crafts
The same paper craft can look completely different depending on the colors, patterns, and finishing touches you choose. Personalization is where these simple projects become truly yours.
- Use favorite colors for flowers, butterflies, stars, and envelopes.
- Add names, initials, short messages, or simple illustrations to bookmarks.
- Create seasonal color palettes for wreaths and wall decorations.
- Mix patterned paper with solid colors for extra visual contrast.
- Change the size of a project to suit a card, gift, shelf, or wall.
Paper crafts are also excellent for handmade gifts because the recipient can see the time and creativity behind the finished piece. A floral bookmark, mini envelope set, paper flower arrangement, or decorated pot can be adapted to suit different personalities and occasions.
Why Paper Crafting Is So Enjoyable
There is something satisfying about watching a flat sheet of paper become a three-dimensional object. Cutting and folding provide a simple creative routine, while choosing colors and arranging shapes gives you room to experiment.
Another advantage is that many paper crafts can be completed in small stages. If you only have a few minutes, you can cut petals or fold a few stars. When you have more time, you can assemble a full wreath or decorative display. This flexibility makes paper crafting an easy hobby to fit around a busy schedule.
Why This Matters
- Simple materials make creative projects more accessible.
- Repeating basic techniques helps build confidence and consistency.
- Small handmade details can transform everyday objects into personalized decor.
Tips for a Smoother DIY Session
Set up a clean, flat workspace before you begin. Keep scissors, glue, paper, and decorations within reach so you can concentrate on the project rather than searching for supplies. If you are working on several pieces, organize them by color or project to avoid confusion.
Do not rush the glue. Applying too much can make paper wrinkled or difficult to handle. A small amount spread evenly is often enough. For folded projects, crisp creases usually produce cleaner shapes, while rolled projects benefit from gentle adjustments rather than forcing the paper into place.
Most importantly, allow yourself to experiment. A slightly uneven flower or a different color combination does not mean the project has gone wrong. Handmade crafts are appealing precisely because they have a personal character that mass-produced decorations cannot reproduce.
At a Glance
- Best for: beginners, families, creative weekends, and handmade gifts
- Core techniques: cutting, folding, rolling, layering, and decorating
- Easy starting projects: flowers, bookmarks, envelopes, and paper stars
- Best finishing touches: coordinated colors, clean edges, and thoughtful spacing
- Creative goal: make simple paper projects that feel colorful and personal
Conclusion: Start With One Sheet of Paper
Paper crafts DIY projects prove that creativity does not have to be complicated. With a few basic supplies and an open mind, you can turn ordinary paper into flowers, butterflies, bookmarks, roses, envelopes, stars, wreaths, rainbows, glowing decorations, and colorful plant pots.
Choose one project that catches your attention and start small. Focus on clean cuts, careful folds, balanced colors, and simple details. Once you finish one craft, you may find yourself wanting to try another technique and create an entire collection.
Ready to get creative? Pick your favorite paper colors, gather a few basic supplies, and make something by hand today. Save these paper crafts DIY ideas for your next creative afternoon and let a simple sheet of paper become something special.