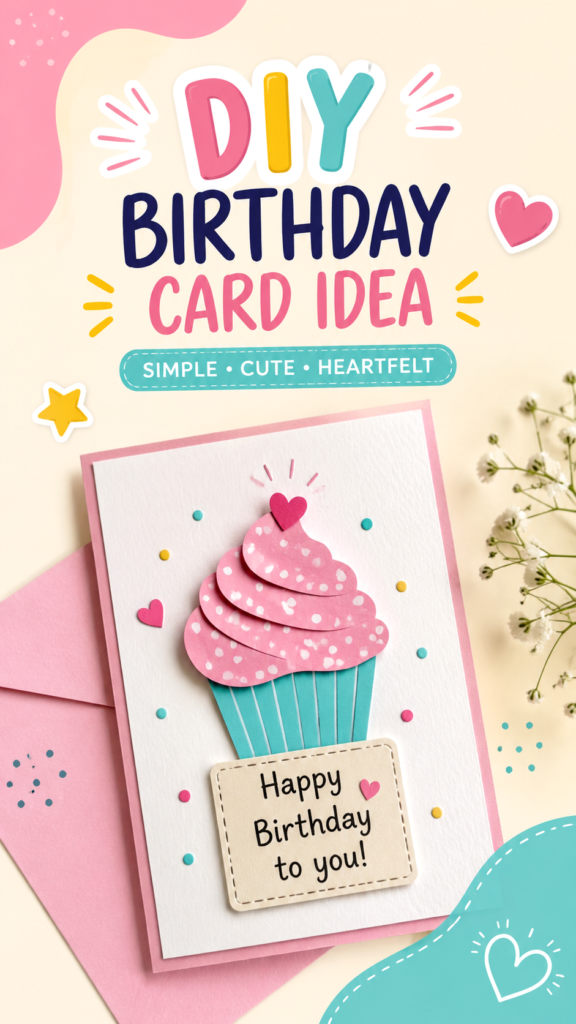
A handmade birthday card can turn a simple celebration into something much more personal. This cheerful cupcake-inspired design combines layered paper shapes, playful colors, a handwritten-style birthday message, and small decorative details to create a card that feels thoughtful without requiring complicated crafting skills. The result is a cute DIY birthday card that works beautifully for friends, family members, classmates, coworkers, or anyone who appreciates a handmade touch.
The design centers on a colorful cupcake with a generous swirl of pink frosting and a bright turquoise wrapper. A small heart adds a sweet finishing detail, while colorful dots and simple accents make the card feel festive. The overall look is approachable, making it a great source of inspiration for anyone searching for easy birthday card ideas, handmade birthday cards, cupcake card crafts, or beginner-friendly paper crafts.
Key Takeaways
- Create a charming birthday card around a simple cupcake theme.
- Use layered paper shapes to give the cupcake a dimensional appearance.
- Combine pink, turquoise, white, and soft neutral tones for a cheerful palette.
- Add small hearts, dots, flowers, or confetti for extra personality.
- Keep the greeting short, clear, and easy to read.
- Personalize the finished card with colors and details that suit the recipient.
Why a DIY Birthday Card Feels So Special
Store-bought cards can be beautiful, but a handmade birthday card carries a different kind of charm. Even a simple design shows that you took the time to create something specifically for the person celebrating. The cupcake theme is especially effective because it immediately communicates celebration, sweetness, and fun.
You do not need advanced drawing skills or an extensive craft collection to recreate the spirit of this project. The visual appeal comes from a few uncomplicated components arranged thoughtfully. A folded card base provides the foundation, while the cupcake becomes the main focal point. Decorative pieces then fill the surrounding space without overwhelming the central design.
Important: The strongest handmade cards are not necessarily the most complicated ones. A clear focal point, attractive color combination, readable greeting, and a few intentional decorative accents can make a simple card look polished and memorable.
The Inspiration Behind the Cupcake Card Design
The card shown here uses a playful paper-craft approach rather than a traditional flat illustration. The cupcake is built from distinct visual layers. The frosting has several curved sections stacked together, creating the impression of a fluffy swirl. The wrapper underneath uses vertical lines to suggest the folds of a real cupcake liner.
A small heart sits above the frosting, giving the cupcake a friendly handmade character. The greeting appears on a separate light-colored label near the lower section of the card, which helps the words stand apart from the colorful cupcake. Small dots and decorative marks are scattered around the design to reinforce the birthday theme.
This arrangement also demonstrates an important design principle: visual hierarchy. The cupcake immediately attracts attention because it is the largest illustrated element. The birthday greeting is the second point of focus, while the smaller decorations provide supporting details.
Materials for an Easy Handmade Birthday Card
One of the advantages of this birthday card idea is that the materials can remain simple. You can adapt the project to whatever paper-crafting supplies you already have at home.
- Blank cardstock or thick paper for the card base
- Colored paper or cardstock for the cupcake wrapper
- Pink or another favorite color for the frosting
- White or cream paper for the greeting label
- Scissors or a craft cutting tool
- Glue or double-sided adhesive
- Black pen or fine marker for lettering
- Colored pens, pencils, or markers for decoration
- Optional stickers, paper dots, hearts, or small embellishments
The exact supplies are flexible. If you do not have turquoise paper, for example, choose blue, lavender, yellow, or any color that complements the frosting. The goal is to capture the cheerful cupcake concept while making the finished card your own.
How to Make a Cute Cupcake Birthday Card
1. Prepare the Card Base
Start with a piece of cardstock folded into a simple greeting card. A white, cream, blush, or very light pastel background works especially well because it allows the colorful cupcake to become the main attraction.
For a more finished appearance, you can mount the card onto a slightly larger piece of colored cardstock. This creates a subtle border around the design and makes the card feel more substantial.
2. Create the Cupcake Wrapper
Cut a simple trapezoid shape from colored paper to represent the cupcake liner. Turquoise is a playful choice, but almost any bright or pastel shade can work.
Add several narrow vertical lines to the wrapper using a pen or a contrasting strip of paper. These lines give the flat shape the appearance of folded cupcake paper. Keep the spacing relatively even, but do not worry about making every line perfectly identical. Slight variation can reinforce the handmade quality.
3. Build the Frosting
The frosting is the visual centerpiece, so give it plenty of attention. Cut several rounded, wavy shapes in different sizes from pink paper. The bottom layer should be the widest, with each following layer becoming slightly smaller.
Stack the pieces from largest to smallest, overlapping them slightly. This creates the look of a tall swirl of frosting. You can use different shades of pink to add depth, or keep the entire frosting section in one color for a clean modern appearance.
For additional texture, add small white dots, hearts, curved lines, or tiny highlights. These details make the frosting look decorative while keeping the project easy enough for beginners.
4. Add a Small Topper
A tiny paper heart is an easy way to finish the top of the cupcake. You could also use a star, flower, circle, sprinkle shape, or a miniature candle. Choose an element that reflects the personality of the person receiving the card.
5. Add the Birthday Message
The reference-inspired design uses a separate light-colored label for the greeting. This is a smart approach because it keeps the text readable against the colorful artwork.
Write a simple message such as “Happy Birthday to You!” or personalize it with the recipient’s name. If your handwriting is not your favorite feature, you can print the message, cut it out, and attach it as a paper label.
6. Finish With Decorative Details
Once the main cupcake and message are in place, look at the empty areas of the card. Add a few small dots, hearts, stars, flowers, or confetti marks. The key is restraint. A handful of accents can make the composition feel finished, while too many can compete with the cupcake.
Why This Matters
A strong handmade card balances creativity with readability. Let one element dominate, give the greeting enough breathing room, and use smaller decorations to guide the eye rather than distract from the message.
Color Ideas for Your Birthday Card
The soft pink and turquoise combination gives this cupcake card a fresh, youthful feel, but there are plenty of other palettes to explore. Changing the colors is one of the easiest ways to make the same basic craft feel completely different.
- Pink and cream: Soft, sweet, and romantic.
- Lavender and mint: Calm, modern, and playful.
- Yellow and coral: Bright, energetic, and cheerful.
- Blue and white: Clean, classic, and versatile.
- Peach and aqua: Warm, fresh, and contemporary.
When choosing colors, consider the person receiving the card. A favorite color can instantly make a handmade card feel more personal. You can also coordinate the card with a birthday party theme or use colors that match the gift wrapping.
Easy Ways to Personalize the Design
The cupcake does not have to look exactly the same every time. Think of the design as a starting point rather than a fixed template. Change the frosting shape, wrapper color, topper, greeting, or surrounding decorations to create a new version.
For a child’s birthday, bright colors and playful shapes can make the card especially fun. For a friend, you might choose their favorite colors and add a short inside joke. For a family member, a heartfelt handwritten message can become the main personal feature.
You can also make several cupcakes in different colors across the front of the card. Another option is to create a single oversized cupcake and use tiny paper sprinkles around it. If you enjoy dimensional crafts, foam adhesive can lift selected pieces slightly from the card surface and create extra depth.
Pro Tip: Before gluing anything down, arrange all of the pieces on the card first. Take a quick look at the balance of the composition and adjust the spacing while everything is still movable. This small step can make the final card look much more polished.
Birthday Message Ideas for a Handmade Card
A handmade card becomes even more meaningful when the message feels personal. Keep the front greeting short and use the inside for a longer note if you want more room to express yourself.
- Happy Birthday to You!
- Wishing You the Sweetest Birthday!
- Hope Your Birthday Is Full of Joy!
- Have a Wonderful Birthday!
- Sending Birthday Wishes Your Way!
For a more personal touch, add the recipient’s name or write a sentence about a favorite memory. Even a short handwritten note can make a simple DIY birthday card feel far more thoughtful.
Tips for a More Professional-Looking Finish
Clean cutting is one of the easiest ways to improve a paper craft. Use sharp scissors and make slow, controlled cuts around curved frosting shapes. If you are using a craft knife, work carefully on a suitable cutting surface.
Adhesive placement also matters. Apply glue sparingly so that it does not spread beyond the edges of the paper. For layered pieces, double-sided adhesive or small foam pads can help create a cleaner finish.
Keep the greeting aligned with the overall composition. If the cupcake is centered, a centered message often creates a balanced appearance. If the artwork is slightly off-center, place the message where it helps visually balance the opposite side.
Finally, leave some open space. White space is not wasted space. It gives the colorful elements room to stand out and prevents the card from looking crowded.
Perfect for Beginners, Kids, and Family Craft Time
This type of birthday card project is flexible enough for different skill levels. Beginners can use basic geometric shapes and simple decorations, while experienced crafters can experiment with layered cardstock, textured paper, dimensional adhesive, and more detailed lettering.
It can also be a fun family activity. Children can choose colors and decorations while an adult helps with cutting or adhesive. Each finished card can look completely different, which is part of the appeal of handmade crafting.
If you are preparing cards for several birthdays, the cupcake design is also easy to adapt. Create a batch of card bases and prepare multiple frosting shapes, wrappers, hearts, and message labels in advance. Then mix and match the components to create unique cards without starting from scratch each time.
How to Make the Card Your Own
The most important part of a DIY birthday card is not perfection. It is personality. Handmade details naturally have small variations, and those imperfections can make the finished card feel more genuine.
Use the cupcake as your inspiration, then experiment with your own visual language. Try patterned frosting, a striped wrapper, metallic accents, tiny flowers, colorful sprinkles, or a large personalized name. You could even turn the cupcake into a theme for an entire set of birthday stationery.
Think about the recipient before choosing your final details. Someone who loves minimal design may prefer a single cupcake with a simple greeting. Someone who enjoys bright colors may appreciate confetti, hearts, stars, and multiple layers.
At a Glance
- Theme: Cute cupcake birthday card
- Skill level: Beginner-friendly
- Main technique: Layered paper crafting
- Best feature: Easy personalization
- Style: Cheerful, colorful, and handmade
Conclusion
A cute cupcake birthday card is a wonderful example of how simple craft materials can become a thoughtful handmade gift. With a cardstock base, a few colorful paper shapes, a short birthday message, and a handful of decorative accents, you can create something that feels cheerful, personal, and genuinely made with care.
The layered cupcake provides an eye-catching centerpiece, while the soft color palette and playful details keep the design approachable. Best of all, the idea is easy to customize. Change the colors, add a favorite message, experiment with the frosting, or decorate the card with details that reflect the person you are celebrating.
Whether you are looking for an easy DIY birthday card, a last-minute handmade gift idea, or a fun paper craft to make with family, this cupcake-inspired project is a great place to start. Gather your paper, choose your favorite colors, and create a birthday card that is as sweet as the celebration itself.
Tags
DIY Birthday Cards Birthday Card Ideas Cupcake Card Handmade Birthday Cards Paper Crafts Easy Card Making Cute Birthday Crafts Handmade Gift Ideas