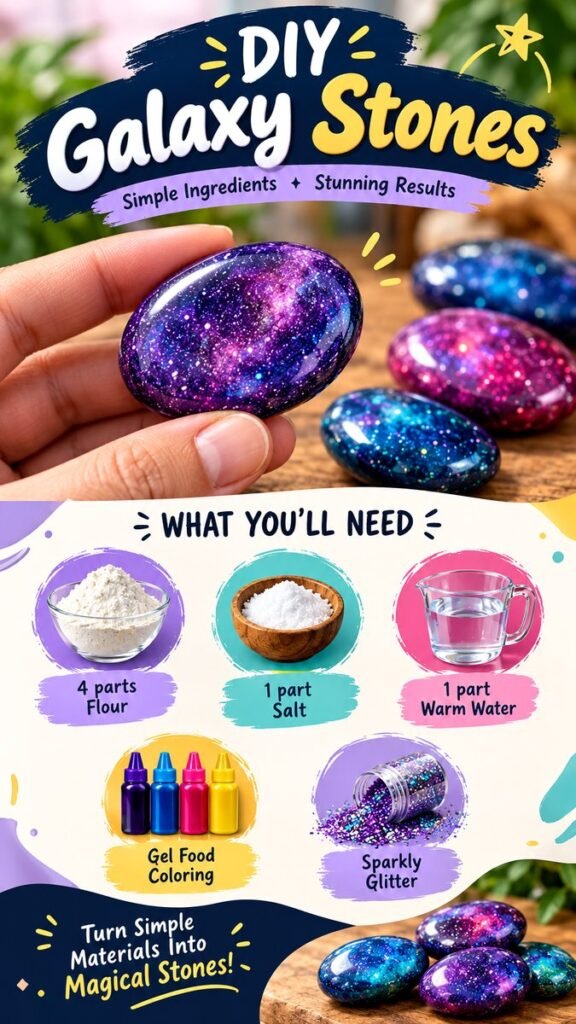
Looking for a fun, colorful craft that turns simple household ingredients into beautiful handmade pieces? These DIY worry stones are an easy project with plenty of room for creativity. The pictured stones have a smooth, polished look with rich purple, blue, pink, and green colors, plus plenty of sparkle. Even better, the basic recipe uses just flour, salt, warm water, gel food coloring, and glitter.
Key Takeaways
- Make simple DIY worry stones with flour, salt, and warm water.
- Use gel food coloring to create bold, colorful stone designs.
- Add glitter for a fun galaxy-inspired finish.
- Shape each piece by hand for a unique handmade look.
- Let the stones dry thoroughly before handling or displaying them.
What Are DIY Worry Stones?
DIY worry stones are small handmade objects designed to fit comfortably in your hand. Their appeal comes from their simple shape, smooth appearance, and satisfying tactile quality. They can be made in different colors, sizes, and finishes, making them a creative project rather than a one-size-fits-all craft.
The version shown here takes inspiration from colorful polished stones and galaxy-style crafts. A deep purple stone covered with tiny sparkles creates the main visual focal point, while finished blue, green, pink, and purple stones add variety in the background.
Although worry stones are often associated with having something tactile to hold or rub, it is best to think of this project primarily as a hands-on craft. A handmade stone can become a pleasant desk accessory, decorative object, gift, or creative keepsake.
Why Make Your Own Worry Stones?
Making your own worry stones gives you much more creative freedom than choosing a ready-made piece. You can experiment with colors, shapes, textures, and glitter until you find a combination you love.
It is also a straightforward craft that does not require an elaborate supply list. The recipe pictured in the design uses four parts flour, one part salt, and one part warm water. Gel food coloring and glitter can then be added to customize the appearance.
One of the best parts of this DIY is the creative control. Instead of trying to make every stone identical, embrace small differences. Handmade pieces often look more interesting when their colors, sparkle patterns, and shapes are slightly varied.
DIY Worry Stones Ingredients
The ingredient list is intentionally simple. Before you begin, gather everything together so you can focus on shaping and decorating your stones.
Flour
Flour forms the main base of the dough. The image shows a ratio of four parts flour, which provides the largest portion of the mixture.
Salt
Salt is combined with the flour as part of the basic dough. The pictured recipe calls for one part salt.
Warm Water
Warm water brings the dry ingredients together. The image shows one part warm water. Add it gradually rather than pouring everything in at once, because the exact amount needed can vary depending on the ingredients and mixing conditions.
Gel Food Coloring
Gel food coloring is responsible for the vivid shades that make these stones stand out. Purple, blue, pink, green, and other bright colors can create completely different effects.
Sparkly Glitter
Glitter gives the stones their eye-catching finish. Fine glitter can create a subtle shimmer, while larger sparkles produce a more dramatic decorative effect. Use craft glitter appropriate for your intended project and workspace.
How to Make Worry Stones DIY Style
Start by preparing your work surface. A clean, flat area makes it easier to mix, knead, shape, and decorate the dough. You may also want parchment paper or another suitable surface for setting the finished pieces aside while they dry.
1. Mix the Base
Combine four parts flour with one part salt in a bowl. Mix the dry ingredients thoroughly so the salt is distributed throughout the flour.
Gradually add one part warm water while mixing. Work the mixture until it begins to come together into a workable dough. If the mixture feels too dry, add a tiny amount of additional water. If it becomes too wet or sticky, a little more flour can help bring the consistency back under control.
2. Knead Until Smooth
Transfer the mixture to a clean work surface and knead it until it becomes cohesive and easier to shape. The goal is a dough that can be pressed and molded without immediately falling apart.
Take your time during this stage. A consistent texture makes shaping much easier and helps you create stones with smooth edges.
3. Add Your Colors
Divide the dough into smaller portions if you want to create several colors. Add a small amount of gel food coloring to each portion and knead until the color is distributed.
For a galaxy-inspired appearance, deep purple, royal blue, bright pink, and turquoise work especially well together. You can also combine two colors gently rather than mixing them completely, leaving streaks and swirls throughout the dough.
Expert Insight
For more visual depth, avoid overmixing contrasting colors. A few deliberate swirls can create a marbled effect that looks more interesting than a completely uniform color.
4. Shape the Stones
Pinch off a small piece of colored dough and roll it gently between your hands. Press it into a rounded, flattened shape similar to a smooth pebble.
Traditional worry stones often have a comfortable indentation or gently curved surface, but you can keep the shape simple. The smooth oval form shown in the inspiration is a great starting point because it is easy to create by hand.
Try making several sizes. A collection of slightly different stones looks more natural and gives you more opportunities to experiment with colors and patterns.
5. Add Sparkle
While the surface is still suitable for decorating, sprinkle glitter over the stone or incorporate a small amount into the material. Focus the sparkle in selected areas if you want a galaxy effect rather than an evenly glittered surface.
For a cosmic-inspired look, combine dark purple with bright blue and tiny flecks of silver or multicolored glitter. The contrast can make the finished pieces resemble miniature colorful galaxies.
6. Dry the Finished Stones
Place the shaped stones on a suitable drying surface and allow them to dry thoroughly. Drying time can depend on the size and thickness of each piece as well as the environment.
Keep the stones undisturbed while they dry. Turning or moving them too frequently can affect their shape before they have fully firmed up.
Do not rush the drying stage. A stone may feel firm on the outside while remaining softer inside. Giving the pieces enough time to dry helps produce a more stable finished craft.
How to Create a Galaxy Worry Stone Look
The standout stone in the image uses a rich purple base with layers of glitter that create a sparkling galaxy effect. You can recreate the overall visual idea without making every stone identical.
Begin with a dark base such as purple, navy, or deep blue. Add a second color in a loose swirl through the center. Pink, magenta, turquoise, or violet can provide contrast.
Next, add tiny amounts of glitter to mimic stars. Instead of covering the entire surface evenly, concentrate the sparkle around the lighter swirls. This creates areas of contrast and gives the stone a more dimensional appearance.
For an extra playful collection, make one stone predominantly purple, another blue, another pink, and another green. Displaying several contrasting stones together creates the colorful arrangement seen in the inspiration.
Creative Ways to Customize DIY Worry Stones
Try Different Color Combinations
Color is the easiest way to personalize this craft. Soft pastels can create a gentle look, while jewel tones produce a richer appearance. You can also create seasonal palettes using colors associated with different holidays or times of year.
Experiment With Marbling
Instead of fully blending two colors, twist them together and gently roll them into a stone. This leaves visible ribbons of color throughout the piece.
Change the Amount of Glitter
There is no need for every stone to sparkle at the same intensity. Try making one subtle, one heavily glittered, and one with concentrated sparkle in the center.
Play With Shapes
Rounded ovals are easy to make, but you can experiment with flatter pebbles, slightly elongated shapes, or smaller rounded pieces. Keep the edges comfortable and smooth if the finished pieces are intended to be held.
Why This Craft Is So Appealing
Part of the charm of DIY worry stones comes from the hands-on process. Mixing, kneading, coloring, shaping, and decorating each provide an opportunity to make creative decisions. The finished result also feels personal because every stone can have its own color combination and texture.
The craft is particularly appealing for anyone who enjoys small handmade projects that can be completed without a complicated setup. It can be a relaxing creative activity, a colorful addition to a craft collection, or a simple project to work on during a free afternoon.
Quick Tips for Better Results
- Measure the basic ingredients consistently for a more predictable dough.
- Add water gradually to avoid making the mixture unnecessarily wet.
- Use gel coloring sparingly at first and build up the shade.
- Do not overmix colors when creating marbled or galaxy-style designs.
- Make stones similar in thickness if you want them to dry at roughly the same pace.
- Give finished stones plenty of time to dry before decorating or handling them extensively.
- Protect your work surface when using food coloring and glitter.
Safety and Practical Notes
Although the basic ingredients are common kitchen materials, this project should be treated as a craft rather than food. Once you add coloring or glitter, the finished stones are decorative craft items and should not be eaten.
Young children should have adult supervision, especially when working with glitter and small decorative materials. Keep the workspace tidy and wash hands and surfaces after crafting.
If you plan to carry a finished stone around regularly, check it occasionally for cracks, loose glitter, or other changes. These handmade pieces are best treated as decorative craft objects rather than durable manufactured products.
At a Glance
- Base: flour, salt, and warm water
- Color: gel food coloring
- Finish: sparkly glitter
- Style: smooth, colorful, galaxy-inspired stones
- Best feature: easy customization
DIY Worry Stones for Creative Gifting
Handmade stones can also make thoughtful little gifts because each one can be customized to suit the recipient. Create a set using their favorite colors, or make a coordinated collection with several complementary shades.
You could place several finished stones together in a small craft box or decorative container. Add a simple handwritten note describing the colors or inspiration behind the collection. The handmade nature of the project is what makes it special.
For a group craft activity, prepare portions of the basic dough in advance and let each person choose their own colors and glitter. Everyone can leave with a completely different set, even though the basic recipe is the same.
Frequently Asked Questions
Can I make worry stones without glitter?
Absolutely. Glitter is optional and mainly adds the sparkling finish seen in the inspiration. You can leave it out or use another decorative approach that suits your style.
Can I use different food coloring?
Yes. Gel food coloring is useful because it provides strong color without requiring a large amount. Experiment with different shades to create pastel, bright, jewel-toned, or galaxy-inspired stones.
Do all the stones need to be the same shape?
No. Slight variations can make a handmade collection look more natural. Focus on creating smooth edges and comfortable shapes rather than perfect uniformity.
How can I make the stones more colorful?
Try layering colors rather than mixing everything into one shade. Deep purple paired with blue and pink creates a particularly striking combination, while green and turquoise can produce a brighter look.
Final Thoughts on Worry Stones DIY
These DIY worry stones show how a handful of simple ingredients can become a colorful and highly customizable craft. With flour, salt, warm water, gel food coloring, and glitter, you can create a collection of smooth handmade pieces in almost any color palette you can imagine.
The galaxy-inspired approach is especially fun because it encourages experimentation. Mix deep shades with brighter colors, add scattered sparkle, and shape every piece slightly differently. There is no need to make the collection perfectly uniform. The small variations are part of the handmade charm.
Whether you make one special stone or an entire colorful set, this project is an enjoyable way to spend a creative afternoon. Keep the basic recipe simple, take your time with shaping and drying, and let your imagination guide the colors and decorations.
Pro Tip: Save your favorite color combinations as you experiment. A simple palette of two or three contrasting shades can make a collection look intentionally designed while still keeping every handmade stone unique.
Tags
Worry Stones DIY DIY Worry Stones Galaxy Stones DIY Crafts Handmade Stones Glitter Crafts Easy Craft Ideas Creative Crafts