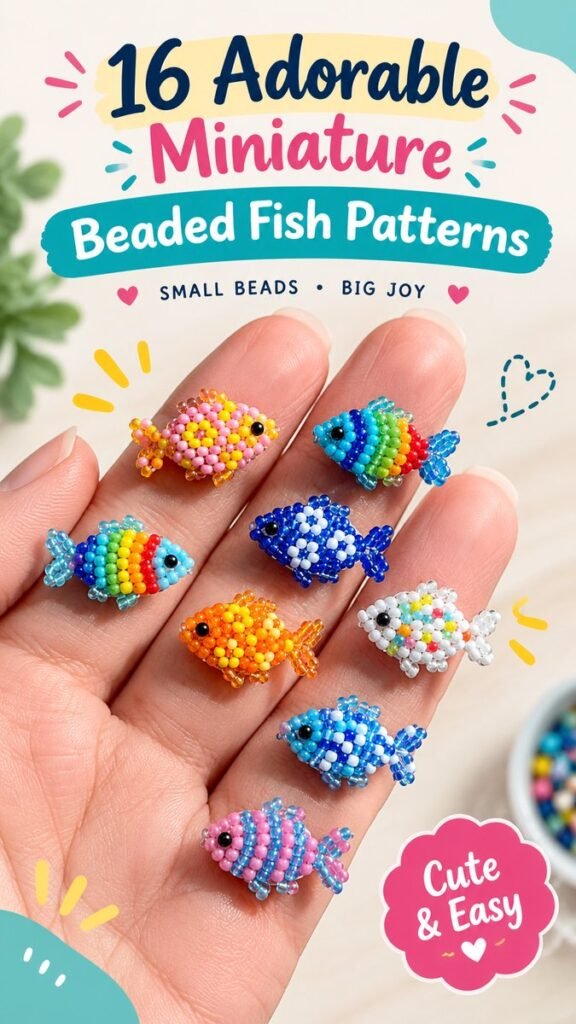
DIY beads are a simple way to turn colorful materials into tiny pieces of handmade art, and the possibilities go far beyond traditional jewelry. From miniature beaded fish and playful charms to bracelets, keychains, decorations, and small gifts, bead crafts can be adapted to almost any creative style. The colorful miniature fish shown here are a great example of how a handful of beads can become detailed, eye-catching designs with personality.
Whether you are completely new to beading or already enjoy making small handmade projects, DIY beads offer an approachable craft that rewards patience and creativity. You can experiment with color combinations, patterns, shapes, and textures while working at your own pace. Best of all, many bead projects are compact, making them easy to work on at a desk, craft table, or even during a quiet afternoon at home.
Key Takeaways
- DIY beads can be used to create miniature animals, jewelry, charms, and decorations.
- Bright color combinations can make small bead designs stand out beautifully.
- Simple repeating patterns are a useful starting point for beginners.
- Organizing beads by color and size makes crafting easier and more enjoyable.
- Small projects are ideal for practicing new beading techniques without feeling overwhelming.
Why DIY Beads Are So Fun to Make
One of the best things about DIY beads is the freedom to create something that feels completely personal. Beads come in countless colors, finishes, sizes, and shapes, so even a basic pattern can look different depending on the materials you choose. A colorful fish, for example, can be transformed simply by changing its body colors, adding contrasting details, or creating a different stripe pattern.
Beading is also a satisfying craft because the finished result is easy to see. A collection of tiny beads gradually becomes a recognizable shape as each piece is placed into position. This makes the process especially enjoyable for people who like detailed crafts and miniature projects.
Important: When working with tiny beads, focus on consistency rather than speed. Keeping your rows, spacing, and color placement neat will usually make the finished design look much more polished.
Miniature Beaded Fish Ideas
Miniature beaded fish are an especially charming DIY beads project because their shape naturally lends itself to colorful patterns. The body can be built from rows of beads, while smaller sections can form the fins and tail. Different colors can then be arranged to create stripes, spots, blocks, or playful combinations.
The designs pictured feature a variety of cheerful color palettes. Pink and yellow create a soft, playful look, while blue and green can give a fish a fresh underwater feel. Orange and yellow bring warmth, while white beads combined with several accent colors create a more detailed appearance.
Try Different Color Combinations
Color is one of the easiest ways to personalize a DIY bead project. Instead of trying to reproduce one exact design, choose a small palette that matches your own style. Two or three main colors can create a clean look, while several contrasting shades can produce a more playful result.
- Use pink, peach, and yellow for a warm pastel effect.
- Combine blue, turquoise, and green for an ocean-inspired palette.
- Pair orange and yellow for a bright, energetic design.
- Add white or clear beads to create contrast between stronger colors.
- Use one dark accent color for small details that need extra definition.
Experiment With Patterns
Once you become comfortable with basic rows, pattern changes can make your DIY beads projects much more interesting. Try alternating two colors, creating a central stripe, or placing small contrasting beads between larger sections. Even simple changes can give each miniature piece a completely different personality.
For beginners, repeating patterns are often easier to manage because you can follow the same sequence throughout the project. Once that feels comfortable, introduce small variations and see how they affect the overall shape.
Essential Supplies for DIY Bead Projects
You do not need a huge collection of supplies to start exploring DIY beads. A small selection of colorful beads, suitable thread or beading material, and a comfortable workspace can be enough for many miniature designs.
Beads
Choose beads that are appropriate for the type of project you want to make. Small, evenly sized beads are useful when creating compact patterns because they allow the design to remain detailed without becoming bulky. Keeping several colors nearby also makes it easier to experiment as you work.
Thread or Beading Cord
The material that holds your beads together should be suitable for small, detailed work. It needs to be flexible enough to pass through the beads while still providing enough structure for the finished shape. Following the instructions for your chosen pattern is the easiest way to determine what works best.
Small Craft Tools
A pair of small scissors, a suitable needle when needed, and a tray or shallow container can make the process more comfortable. A bead organizer is also useful if you plan to collect multiple colors and sizes over time.
Expert Insight
Small bead projects become easier when your materials are organized before you begin. Separate colors into small containers and place the beads you need closest to your workspace. This reduces interruptions and helps you concentrate on the pattern.
How to Start a Miniature Beaded Design
If you are new to DIY beads, begin with a simple shape rather than a highly detailed project. A miniature fish is a fun choice because its basic silhouette can be broken into manageable sections. Work slowly and check the arrangement regularly so you can catch mistakes before the design becomes too large to adjust easily.
- Choose a simple pattern and gather the required bead colors.
- Sort the beads into small groups so each color is easy to reach.
- Prepare your thread, cord, or other recommended beading material.
- Build the main body according to the chosen pattern.
- Add smaller details such as fins, a tail, or contrasting sections.
- Check the finished shape and secure the ends carefully.
Pro Tip: Keep a small sample section beside you when working with repeating colors. It can help you maintain the same sequence and reduce the need to undo rows later.
Creative Ways to Use Finished Bead Crafts
Once you have created several miniature bead designs, there are many ways to use them. Their small size makes them particularly suitable for decorative and functional projects. A finished fish can become part of a charm, a keychain, a small hanging decoration, or a colorful addition to a handmade collection.
Beaded pieces can also make thoughtful handmade gifts. A personalized design in someone’s favorite colors can feel much more special than a generic craft. If you enjoy creating several pieces at once, consider making a small themed collection with different colors or animal shapes.
Make a Colorful Collection
Instead of stopping after one project, create a series with a shared theme. You could make several fish using different color combinations, or explore other miniature creatures once you are comfortable with the technique. A coordinated collection can also help you practice repeating the same basic construction while experimenting with new details.
Create Handmade Accessories
Small beaded shapes can be incorporated into accessories such as charms, zipper pulls, keychains, or decorative attachments. Choose a secure connection method that suits the finished piece and the way it will be used. For items that will be handled frequently, make sure the attachment is firmly secured before using it.
Beginner Tips for Better DIY Beads Results
Working with tiny beads requires a little patience, especially when you are learning how to maintain consistent tension and follow a pattern. The goal is not to finish as quickly as possible. A slower, controlled approach can make the final result cleaner and easier to manage.
- Work in a well-lit area so you can easily see small beads and thread.
- Use a tray or cloth surface to prevent loose beads from rolling away.
- Sort colors before starting instead of searching for each bead during the project.
- Keep your thread tension consistent throughout the design.
- Pause occasionally to compare your work with the pattern.
- Store unfinished projects in a small container so beads stay together.
Make DIY Beads Your Own
The beauty of bead crafting is that there is no need to follow a single color scheme or style. The miniature fish designs provide inspiration, but your own version can be completely different. Change the palette, adjust the pattern, or create a new combination that reflects your personality.
You can also use the same creative approach for other small projects. Once you understand how colors and repeating bead arrangements work together, you can begin exploring bracelets, flowers, animals, charms, decorative shapes, and other handmade pieces.
Think of every project as an opportunity to practice. One design might teach you how to manage color placement, while another helps you become more comfortable with shaping and finishing. Over time, these small skills can make more complicated DIY bead projects feel much more approachable.
At a Glance
- DIY beads are ideal for colorful miniature crafts.
- Miniature fish are a playful way to practice patterns and shaping.
- Bright contrasting colors can make tiny designs more noticeable.
- Organized supplies make small bead projects easier to manage.
- Finished pieces can become charms, decorations, gifts, or accessories.
Conclusion
DIY beads are a creative, flexible craft that can turn tiny materials into surprisingly detailed handmade designs. The colorful miniature fish style is a wonderful source of inspiration because it combines simple shapes, cheerful colors, and plenty of room for personalization. Whether you are making your first beaded figure or building a growing collection of tiny crafts, the process is all about experimenting, practicing, and enjoying the details.
Start with a simple pattern, choose a few colors you love, and give yourself time to work through each step. As your confidence grows, try new shapes, more intricate patterns, and creative ways to display your finished pieces. With a little patience and imagination, even a handful of small beads can become something genuinely fun to keep, share, or turn into a handmade accessory.
Tags
Take the bead craft post further
Add a beginner supply list
Create an SEO meta description