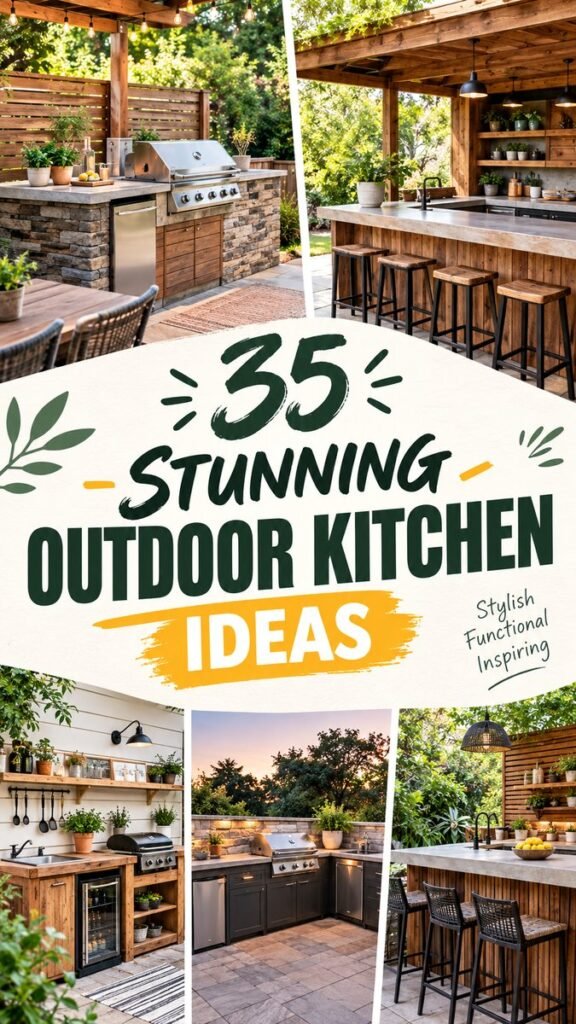
Creating an outdoor kitchen does not have to mean taking on a huge construction project or spending a fortune. The inspiration shown here highlights how practical materials, thoughtful layouts, and a little creativity can transform a backyard, patio, or deck into a beautiful cooking and entertaining area. From simple grill stations and compact counters to full outdoor kitchen setups with sinks, storage, seating, and overhead shelter, there are plenty of ways to build a space that fits your home and budget.
Key Takeaways
- Use affordable materials such as wood, concrete blocks, stone, and simple countertops to create a custom outdoor kitchen.
- Design around the grill, preparation area, storage, and serving space for a practical layout.
- Repurposed and reclaimed materials can add character while helping control project costs.
- Plants, warm lighting, wood accents, and comfortable seating can make an outdoor kitchen feel inviting.
- A covered structure can provide shade while creating a more defined outdoor cooking area.
- Small outdoor kitchens can be just as useful when every section is planned carefully.
What Makes an Outdoor Kitchen DIY Project So Appealing?
An outdoor kitchen creates an opportunity to bring everyday cooking outside while making better use of your backyard. Instead of keeping the grill as a standalone appliance, you can build a complete station around it with countertops, shelves, cabinets, sinks, and places to sit.
The designs pictured here show several different approaches. One uses concrete blocks as a sturdy base, another relies on warm reclaimed-looking wood, while another creates a more complete kitchen beneath a simple roof structure. These ideas demonstrate that there is no single formula for an outdoor kitchen DIY project.
The most important goal is to create a space that works for the way you actually use your yard. If you mainly grill on weekends, a compact grill station with counter space may be enough. If you regularly host family and friends, additional preparation surfaces, storage, seating, and lighting can make the space much more functional.
Start With a Practical Outdoor Kitchen Layout
Before choosing finishes or decorative details, think about how you will move through the kitchen. A good DIY outdoor kitchen should feel natural when you are preparing food, cooking, serving, and cleaning.
Begin by identifying the main cooking appliance. In many backyard kitchens, the grill becomes the visual and functional centerpiece. Place a useful amount of counter space beside it so there is room for plates, utensils, ingredients, and serving dishes.
Next, consider where food preparation will happen. A countertop positioned near the grill can reduce unnecessary trips between the outdoor kitchen and the indoor kitchen. If you have enough room, adding a sink can make rinsing produce, washing hands, and cleaning much easier.
- Cooking zone: Position the grill where it is easy to access and operate.
- Prep zone: Include a durable counter for chopping, seasoning, and assembling meals.
- Storage zone: Add cabinets, shelves, drawers, or open storage for frequently used items.
- Serving zone: Leave space for placing finished food and drinks.
- Seating zone: Add stools or a nearby dining area if entertaining is a priority.
Important: Keep the overall arrangement comfortable to navigate. A beautiful outdoor kitchen becomes frustrating when the grill, sink, storage, and counters are positioned too far apart or create awkward traffic patterns.
Build a Budget-Friendly Base With Simple Materials
One of the strongest ideas shown in the inspiration is the use of straightforward building materials to create substantial-looking kitchen bases. Concrete blocks, wood framing, stone finishes, and simple countertop materials can be combined in creative ways.
Concrete blocks are particularly useful for a DIY outdoor kitchen because they can form a sturdy foundation for a countertop. Their unfinished appearance can also be softened with paint, wood panels, stone veneer, or other exterior-friendly finishes.
Wood provides another versatile option. Vertical boards, horizontal slats, reclaimed-style panels, and simple timber framing can give an outdoor kitchen a warm, relaxed appearance. Wood also works especially well when the surrounding yard already contains fences, decks, pergolas, or other natural materials.
Consider Reclaimed or Repurposed Materials
A DIY project is a great opportunity to give existing materials a second life. Old boards, leftover decking, sturdy shelving, and suitable outdoor furniture components may be incorporated into a kitchen design when they are structurally appropriate.
The inspiration includes a rustic character that works particularly well with repurposed materials. Instead of trying to make every surface perfectly uniform, variations in wood grain and texture can become part of the design.
When reusing materials outdoors, inspect them carefully and make sure they are appropriate for the intended use. Surfaces exposed to weather should be able to handle moisture and temperature changes, while food preparation areas should use suitable, easy-to-clean materials.
Choose a Countertop That Works for Outdoor Cooking
The countertop is one of the most important visual elements in an outdoor kitchen. It also needs to withstand regular use, changing weather conditions, spills, and cleaning.
The inspiration features substantial-looking light countertops paired with wood, masonry, and darker finishes. This combination creates contrast while keeping the cooking area visually bright.
When selecting a countertop material, think about durability, maintenance, appearance, and the type of weather your outdoor kitchen will experience. The countertop should also provide enough depth for practical preparation without making the surrounding walkway unnecessarily narrow.
Make the Counter Work Harder
A useful outdoor countertop can serve several purposes. It can act as a preparation surface, serving station, drink counter, buffet area, and casual breakfast bar. If space is limited, maximizing countertop function can be more valuable than adding extra decorative features.
Expert Insight
Think about the outdoor kitchen as a small workspace rather than simply a place for a grill. Every counter, shelf, cabinet, and appliance should have a clear purpose. Good planning can make a modest DIY kitchen feel surprisingly complete.
Add Smart Storage to Keep the Space Organized
Outdoor cooking can quickly become cluttered without dedicated storage. The pictured designs demonstrate several ways to keep tools, cookware, serving pieces, and gardening-related items organized without sacrificing style.
Closed cabinets are useful for protecting items from dust and weather, while open shelves make frequently used accessories easy to reach. A combination of both can create a practical balance.
- Use lower cabinets for larger cookware and outdoor accessories.
- Add shelves for bowls, planters, jars, or frequently used serving items.
- Use drawers for smaller cooking tools when the design allows.
- Keep everyday grilling accessories close to the cooking station.
- Leave some open space so the kitchen does not feel visually crowded.
Vertical space is another useful resource. Wall-mounted shelves, hooks, and rails can hold utensils while keeping the countertop clear. In smaller outdoor kitchens, this approach can provide additional organization without increasing the footprint.
Create a Covered Outdoor Kitchen
Several of the visual examples show how a roof or pergola-like structure can turn a simple cooking station into a more defined outdoor room. A covered area can also create a comfortable transition between the home and backyard.
Wooden posts and overhead beams contribute warmth, while corrugated roofing or another suitable covering can provide protection from sun and light weather. String lights or simple exterior lighting can make the space feel especially inviting in the evening.
If you build a roof, pergola, or permanent structure, pay close attention to local building requirements and the appropriate construction methods for your property. The structure should also be designed around safe placement of grills and cooking appliances.
Use Lighting to Extend the Evening
Outdoor lighting does more than create atmosphere. It can help illuminate food preparation and serving areas after sunset. The warm string lights shown in the inspiration add a relaxed entertaining mood without overwhelming the space.
Consider combining general lighting with focused illumination near work surfaces. Keep cords, fixtures, and electrical components appropriate for outdoor use and protected according to their intended installation requirements.
Bring in Plants and Natural Details
Plants are a simple way to make an outdoor kitchen feel connected to the surrounding garden. The inspiration uses potted greenery throughout the cooking areas, adding freshness and softening the harder surfaces of stone, concrete, metal, and wood.
Herbs can be especially useful near a cooking station when they are suitable for the growing conditions. Small pots can sit on shelves or counters, while larger planters can help define the edges of the kitchen.
Natural textures also help create a cohesive look. Wood, stone, greenery, woven seating, and warm lighting can work together to produce an inviting outdoor environment without requiring excessive decoration.
Design a Small Outdoor Kitchen Without Wasting Space
You do not need a large backyard to enjoy an outdoor kitchen. A compact setup can focus on the essentials: a grill, useful counter space, storage, and perhaps a small sink or serving area.
One effective approach is to build along a wall or fence line. This keeps the kitchen concentrated in one zone and leaves more open space for dining or movement. Another option is an L-shaped arrangement, which can provide separate cooking and preparation areas while using the corner efficiently.
For very small spaces, prioritize the features you will use most often. A homeowner who primarily grills may prefer additional counter space over a large sink. Someone who entertains frequently might prioritize a serving counter and stools instead.
Add Seating for Backyard Entertaining
An outdoor kitchen becomes even more useful when guests have a comfortable place to gather. The inspiration includes bar-style seating that brings people close to the cooking area without interfering with the main workspace.
Counter-height stools can turn a wide countertop into a casual dining spot. For larger gatherings, a nearby outdoor dining table can create a separate eating zone while allowing the kitchen to remain focused on preparation and cooking.
Think about circulation when arranging seating. Guests should be able to sit, stand, and move around comfortably without blocking the grill, sink, or storage areas.
Use Color to Give Your DIY Kitchen Personality
The visual examples show how natural wood can be paired with neutral stone, dark cabinetry, gray masonry, and greenery. This creates a timeless palette that works well in many backyard settings.
If you want a more colorful design, consider using paint on suitable exterior surfaces or introducing color through cushions, planters, outdoor accessories, and decorative objects. Keeping the major materials neutral allows smaller accents to be changed easily as your style evolves.
For a modern appearance, combine clean-lined counters with darker hardware and simple cabinetry. For a rustic look, emphasize natural wood grain, textured stone, vintage-inspired details, and warm lighting.
Plan Your Outdoor Kitchen DIY Project Step by Step
A clear plan can prevent expensive changes later. Start with the space itself and determine what you can realistically build within the available footprint.
- Measure the area: Record the available width, depth, and usable wall or fence space.
- Choose the main function: Decide whether the kitchen is primarily for grilling, entertaining, food preparation, or a combination.
- Sketch the layout: Mark the grill, counters, storage, sink, seating, and walking paths.
- Select materials: Choose materials that suit the outdoor environment and the overall look of your yard.
- Build the base: Construct the support structure carefully and ensure it is appropriate for the countertop and appliances.
- Add work surfaces: Install the countertop and organize preparation and serving areas.
- Install storage: Add cabinets, shelves, hooks, and other practical organization features.
- Finish the details: Add lighting, plants, seating, and decorative touches that make the area feel complete.
Pro Tip: Before committing to the final arrangement, temporarily mark the planned footprint with tape or another removable method. This can help you visualize walkways, counter depth, seating, and appliance placement before construction begins.
Keep Safety at the Center of the Design
A stylish outdoor kitchen also needs to be a safe cooking environment. Grills and other heat-producing appliances should be positioned with appropriate clearance from combustible structures and materials according to the appliance manufacturer’s requirements.
Make sure cooking areas are not located where guests will constantly pass behind the person operating the grill. Keep combustible items away from heat sources, and choose outdoor-rated electrical and lighting components when electricity is part of the project.
If your DIY kitchen involves permanent gas, electrical, plumbing, structural, or other regulated work, consult qualified professionals and follow applicable local requirements. A thoughtful plan protects both the project and the people using it.
Why These Outdoor Kitchen Ideas Work
The most appealing feature of these outdoor kitchen concepts is their combination of function and personality. Rather than looking like an isolated appliance placed in the yard, the kitchen becomes part of the landscape.
Wood panels add warmth. Stone and masonry create visual weight. Plants soften the structure. Open shelving introduces practical storage. Lighting creates evening ambiance. Counter seating encourages conversation. Each element serves a purpose while contributing to the overall design.
That balance is what makes an outdoor kitchen DIY project so rewarding. You can start with the essentials and add features over time rather than trying to complete everything at once.
Why This Matters
- A well-planned layout can make a compact kitchen feel much larger.
- Durable, practical materials help the space remain useful through regular outdoor use.
- Small details such as plants, lighting, and seating can transform a basic cooking station into an inviting backyard destination.
Make Your Outdoor Kitchen Feel Like an Extension of Home
The best backyard kitchens often feel like a natural extension of the home’s living space. Repeat materials or colors already used around the property to create visual continuity. For example, a wood deck can pair beautifully with timber cabinetry, while a stone patio can inspire the finish of the kitchen base.
Comfort matters too. Add weather-appropriate seating, a few planters, useful serving accessories, and lighting that makes the area pleasant after dark. The goal is not simply to build a place where food can be cooked. It is to create a space where people naturally want to gather.
Whether your vision is a compact grill station or a complete covered outdoor kitchen, the same principles apply: start with function, choose materials thoughtfully, use available space efficiently, and finish with details that reflect your style.
At a Glance
- ✓ Best starting point: Define the grill, counter, and storage zones.
- ✓ Budget idea: Explore concrete blocks, reclaimed wood, and simple finishes.
- ✓ Style idea: Mix warm wood, neutral counters, greenery, and dark accents.
- ✓ Space saver: Use wall shelves, vertical storage, and compact layouts.
- ✓ Finishing touch: Add outdoor lighting and seating for comfortable entertaining.
Conclusion: Build an Outdoor Kitchen That Fits Your Lifestyle
An outdoor kitchen DIY project can completely change the way you use your backyard. The inspiration shown here proves that an attractive cooking area can be created in many different ways, from simple masonry bases and compact grilling stations to spacious wood-framed kitchens with sinks, counters, storage, lighting, and seating.
You do not need to copy a particular design to create something impressive. Instead, use the ideas as a starting point and adapt them to your available space, cooking habits, budget, and preferred style. Focus first on a practical layout, then choose durable materials and finish the space with details that make it feel welcoming.
With thoughtful planning, even a modest patio or backyard corner can become a functional outdoor cooking and entertaining area. Start with the features that matter most, build gradually when needed, and let the surrounding landscape inspire the final look.