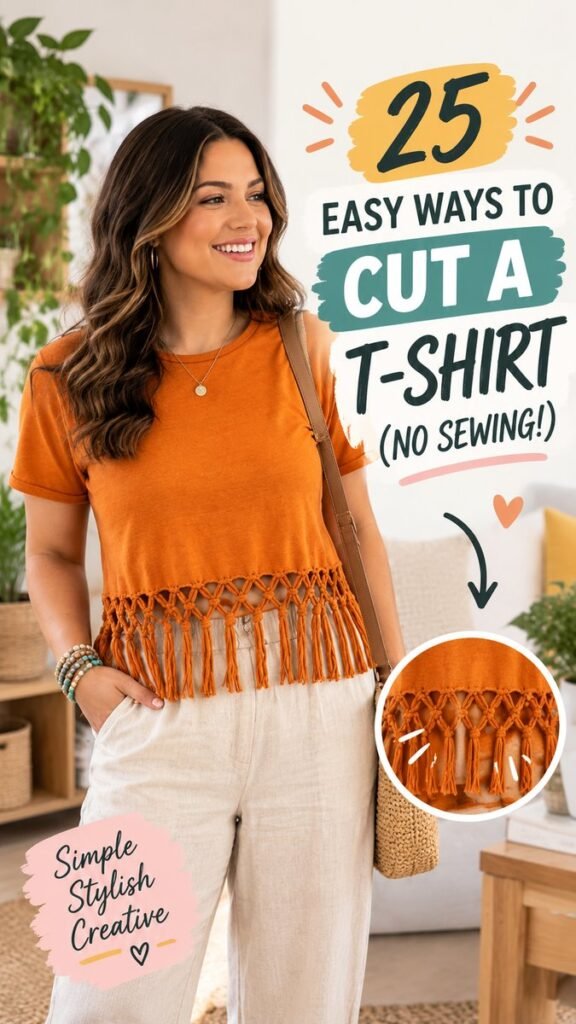
Giving an old T-shirt a fresh look does not have to involve a sewing machine, complicated patterns, or expensive supplies. The DIY shirt ideas shown here highlight how a basic tee can become a more stylish and personalized wardrobe piece with simple cutting, knotting, and decorative techniques. From fringe hems and cropped silhouettes to playful cutouts and textured details, there are plenty of ways to transform an everyday shirt into something that feels completely different.
Key Takeaways
- Turn basic T-shirts into creative fashion pieces with simple DIY techniques.
- No-sew transformations are beginner-friendly and require very few supplies.
- Fringe, knots, slits, and strategic cuts can completely change a shirt’s appearance.
- Old or oversized tees are excellent starting points for clothing upcycling projects.
- Plan your cuts carefully and make small adjustments rather than cutting too much at once.
Why DIY Shirt Ideas Are So Popular
A plain T-shirt is one of the easiest pieces of clothing to customize. Its simple shape gives you a blank canvas for experimenting with proportions, texture, and personal style. Instead of letting an old tee sit unworn in the back of your closet, you can give it a completely new purpose with a pair of sharp fabric scissors and a little creativity.
DIY shirt projects are especially appealing because they can be adapted to different fashion preferences. Someone who loves relaxed outfits might create a loose fringe hem, while another person may prefer a fitted crop top, shoulder detail, or decorative side cut. The same basic shirt can inspire several different transformations.
Important: The easiest way to get a polished result is to make gradual cuts. Fabric can always be shortened further, but once a section has been removed, it cannot easily be put back.
25 Easy DIY Shirt Ideas to Try
There are countless ways to customize a T-shirt, and you do not need advanced crafting skills to get started. The following ideas focus on simple transformations that can add shape, movement, texture, or personality to an everyday tee.
1. Fringe Hem T-Shirt
Create a relaxed boho-inspired look by cutting the lower portion of a T-shirt into narrow strips. The strips can remain loose or be tied together to create a decorative fringe. For a more detailed appearance, small sections can be knotted into patterns similar to the textured hem shown in the design.
2. Simple Cropped Tee
A classic crop is one of the quickest T-shirt transformations. Decide where you want the new hem to sit, mark the line with fabric chalk, and cut slowly across the shirt. Leave a little extra length at first so you can adjust the final shape.
3. Knotted Bottom
Instead of creating a straight hem, divide the bottom section into small strips and tie them into simple knots. This adds visual interest without requiring sewing. You can make the knots evenly spaced or vary their placement for a more casual handmade effect.
4. Side-Slit Shirt
Adding vertical slits along the sides can create movement and a relaxed silhouette. This works particularly well on oversized T-shirts. Keep the cuts relatively short at first, then increase their length if you want a more open style.
5. Open-Back Tee
A simple back cutout can turn a basic shirt into a statement piece. You can create one larger opening or several narrow horizontal strips. This idea works well for casual summer outfits and can be customized according to how much coverage you prefer.
6. Shoulder Cutout
Give a basic tee a softer, more fashion-forward shape by carefully removing small sections around the shoulders. Keep the cuts symmetrical if you want a polished appearance, or experiment with an intentionally uneven design for a more artistic result.
7. Sleeveless Tank Transformation
Turn a T-shirt into a casual tank by removing the sleeves. Follow the existing armhole as a guide and trim small amounts at a time. The cut edges can remain raw for a relaxed DIY appearance.
8. Deep Armhole Tank
For a sporty or laid-back style, make the arm openings slightly larger. This creates a looser shape that works especially well with fitted tanks or camisoles layered underneath.
9. Front Tie Shirt
Cut the front bottom section into two long strips and tie them together at the waist. The result creates a simple fitted effect without sewing or adding additional fabric.
10. Ladder Cutout Design
Create a series of horizontal cuts across a section of fabric, leaving narrow strips between them. The strips form a ladder-like pattern that adds texture and visual detail to an otherwise plain shirt.
11. Geometric Cut Tee
Try triangles, rectangles, or angled openings for a more contemporary look. Use washable chalk to map out the design before cutting so the shapes remain balanced.
12. Front Fringe Panel
Instead of cutting the entire bottom edge, create fringe across only the front portion. This gives the shirt a decorative focal point while leaving the sides and back more structured.
13. Braided Fringe
For a more detailed version of a fringe shirt, divide the cut strips into small groups and braid or twist them. Secure the ends with simple knots. This creates texture and gives a handmade piece more dimension.
14. Waist-Length Tee
If a T-shirt feels too long, shorten it to a waist-length silhouette. Pair it with high-waisted jeans, trousers, or a skirt for a simple everyday outfit.
15. Rolled-Sleeve Style
Cut or slightly reshape the sleeves and roll the edges outward. This subtle alteration can make a loose T-shirt look more intentional while keeping the original character of the garment.
16. Tie-Side Tee
Add several small cuts along one side and tie the resulting strips together. This creates an adjustable detail that can make the shirt more fitted around the waist.
17. Front Slit Detail
A single vertical slit can create a surprisingly stylish update. Place it in the center or slightly to one side, depending on the effect you want. Keep the opening modest at first and enlarge it gradually.
18. Decorative Hem Knots
Cut small strips around the bottom edge and tie pairs together. You can create one row of knots or continue upward to build a layered texture similar to a simple macramé-inspired pattern.
19. Off-Shoulder Tee
Carefully reshape the neckline so it can sit lower across the shoulders. This transformation works best when the shirt has enough room around the neckline to maintain a comfortable fit.
20. Distressed Cutout Tee
Add small slits or openings in selected areas for a casual distressed effect. Keep the cuts intentional and spaced apart so the finished design looks decorative rather than accidental.
21. Double-Layer Fringe
Create two rows of fringe at different lengths for extra movement. A shorter upper row combined with a longer lower row can give a basic shirt more visual depth.
22. Back-Tie Tee
Use narrow fabric strips at the back to create a simple tie detail. This can add shape to an oversized shirt while keeping the front clean and casual.
23. Asymmetrical Hem
Instead of cutting a perfectly straight line, create a gentle angled hem. An asymmetrical finish can make a plain tee look more contemporary and works particularly well with relaxed outfits.
24. Minimal Cutout Accents
If you prefer subtle DIY fashion, focus on one or two small details. A tiny shoulder opening, side slit, or neckline adjustment can make the shirt feel more personalized without dramatically changing its shape.
25. Mix-and-Match T-Shirt Makeover
Combine several techniques to create a truly customized piece. For example, pair a cropped hem with side ties, or combine a fringe bottom with slightly shortened sleeves. Start with one technique and add details gradually.
Why This Matters
A successful DIY shirt does not need dozens of complicated details. The strongest transformations often use one clear focal point, such as a fringe hem, interesting cutout, or carefully shaped silhouette. Keeping the design intentional helps a handmade project look stylish rather than overly busy.
What You Need for Easy T-Shirt DIY Projects
Most beginner-friendly shirt transformations require only a few basic supplies. You can start with an old T-shirt, a pair of sharp fabric scissors, a ruler, and washable fabric chalk or a pencil suitable for marking fabric.
- A clean cotton or cotton-blend T-shirt
- Sharp fabric scissors
- Fabric chalk or a washable marking tool
- A ruler for measuring straight cuts
- A flat surface for planning and cutting
You may also want a measuring tape if you are creating a cropped style or symmetrical design. For decorative knots, fringe, and braided details, no additional materials are necessarily required because the shirt itself provides the fabric strips.
How to Cut a T-Shirt Without Sewing
The basic process is simple, but preparation makes a big difference. Wash and dry the shirt first if appropriate for the fabric, then place it flat on a clean surface. Smooth out wrinkles before measuring or marking anything.
- Choose the transformation you want to create.
- Lay the shirt completely flat.
- Mark the cutting lines before picking up the scissors.
- Measure both sides when symmetry is important.
- Make small cuts first and check the shape.
- Trim additional fabric only when necessary.
- Stretch the cut edges gently to see how the fabric settles.
- Try the shirt on and make final adjustments carefully.
Pro Tip: Jersey T-shirt fabric often changes shape slightly after cutting and stretching. Leave extra length during the first cut, then refine the edges after you see how the fabric naturally rolls or relaxes.
How to Get a Clean DIY Finish
Raw edges are part of the charm of many no-sew T-shirt projects, but a clean result still requires careful cutting. Avoid rushing through long cuts. Keep the scissors open and make smooth, controlled movements rather than repeatedly chopping through the fabric.
For fringe, consistency is particularly important. Try to keep each strip approximately the same width. They do not have to be perfectly identical, but noticeable differences can make the hem look uneven. If you want a more relaxed handmade appearance, slight variations can actually add character.
For geometric cutouts, measure twice before cutting. A ruler can help create straight edges, while chalk makes it easier to visualize the finished design before any fabric is removed.
Choosing the Right T-Shirt for Your Project
Not every T-shirt needs to be treated the same way. Oversized tees are particularly useful for dramatic transformations because they provide extra fabric for crops, ties, fringe, and open-back designs. A fitted tee may be better suited to subtle neckline, sleeve, or side details.
Consider the fabric thickness before starting. Lightweight jersey can create soft, flowing fringe, while a heavier shirt may produce chunkier strips and a more structured result. Stretchy fabric is often forgiving for beginners, but always test a small hidden section if you are unsure how it will behave after cutting.
Color also influences the final look. Neutral shirts can highlight texture and shape, while bright colors make fringe, knots, and cutouts more noticeable. The rust-orange shirt inspiration demonstrates how a strong color can make a simple silhouette feel especially eye-catching when paired with a textured hem.
Ways to Style a DIY Shirt
Once your shirt makeover is finished, styling can help emphasize the new details. A cropped or knotted shirt pairs naturally with high-waisted pants, jeans, or skirts. A fringe design can work beautifully with simple bottoms because the textured hem becomes the focal point of the outfit.
Accessories can also complement a handmade shirt without competing with it. A woven shoulder bag, simple bracelets, delicate necklace, or understated earrings can reinforce a relaxed, creative aesthetic. When the shirt already includes a lot of texture, keeping the rest of the outfit relatively simple can create a balanced look.
- Pair cropped tees with high-waisted bottoms.
- Let fringe details stand out against simple trousers or skirts.
- Use woven or natural-texture accessories for a relaxed DIY look.
- Layer open-back or side-cut designs over a simple camisole when desired.
- Choose neutral accessories when the shirt has a bold color or detailed texture.
Common DIY Shirt Mistakes to Avoid
One of the biggest mistakes beginners make is cutting too much fabric immediately. It is tempting to create a dramatic transformation in one step, but gradual changes provide much more control. Start with a conservative cut and increase it as needed.
Another common issue is skipping the measuring stage. Even casual designs benefit from basic planning. If you are creating matching fringe strips, for example, marking the area first makes the finished pattern much more consistent.
It is also worth remembering that a shirt should remain comfortable after customization. Avoid making armholes, necklines, or side openings so large that the garment becomes difficult to wear. The goal is to create a stylish piece that still functions as clothing.
Make Your DIY Shirt Your Own
The best DIY fashion projects leave room for personal creativity. You do not have to reproduce a particular design exactly. Use the idea of a fringe hem as a starting point, then change the strip width, length, knot pattern, or placement to create something that matches your style.
You can also experiment with combining techniques from different projects. A simple cropped shirt might benefit from knotted sides, while an oversized tee could become a fringe top with shortened sleeves. Keeping a few basic techniques in your crafting toolkit makes it easier to customize almost any old shirt.
Key Style Insight: Texture can make a simple garment look much more elaborate. Fringe, braided strips, knots, and layered cuts create dimension while keeping the project accessible for beginners.
Quick Points
- Start with an old or inexpensive tee.
- Mark every major cut before using scissors.
- Try fringe, knots, slits, crops, or cutouts.
- Make small adjustments until the fit feels right.
- Keep the rest of the outfit simple when the shirt has strong texture.
Conclusion
DIY shirt ideas are an easy way to refresh everyday clothing while exploring your own creativity. A basic T-shirt can become a cropped top, textured fringe shirt, knotted design, open-back style, or completely personalized fashion piece with only a few simple cuts.
The fringe-inspired transformation is a great example of how a small structural change can make a plain tee feel much more distinctive. Whether you prefer bold cutouts or subtle details, the most important part is to work slowly, measure carefully, and let your personal style guide the design.
With a few old shirts and some basic fabric scissors, you can build an entire collection of customized pieces without complicated sewing techniques. Choose one idea to try first, save the others for your next crafting session, and enjoy turning simple clothing into something that feels uniquely yours.