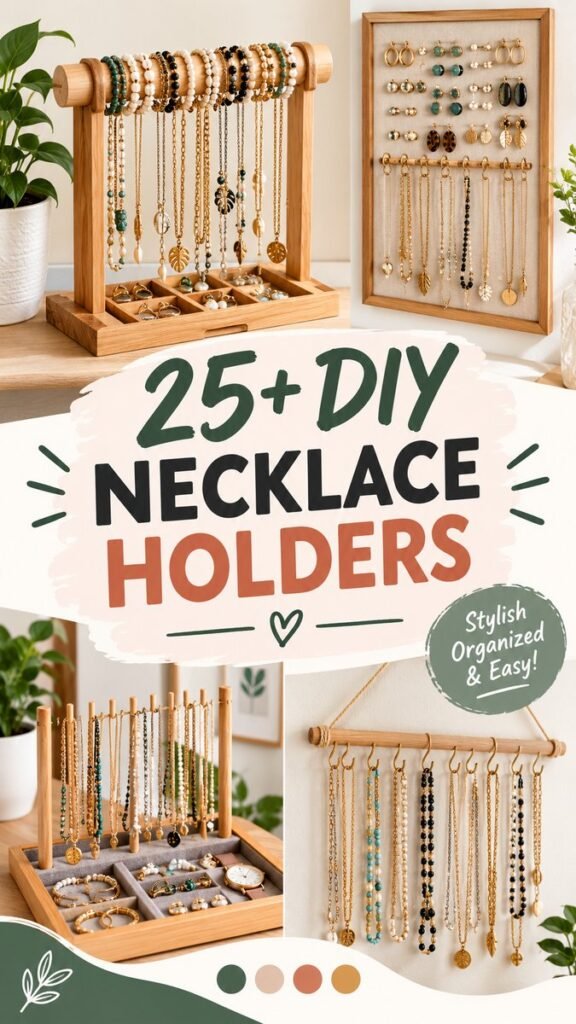
If your necklaces always seem to end up tangled in a drawer, a DIY necklace holder can turn everyday jewelry storage into something practical and decorative. The inspiration here combines several creative display ideas, from simple hanging designs to framed organizers and wooden stands, showing how easy it can be to keep necklaces visible, accessible, and beautifully arranged.
Key Takeaways
- A DIY necklace holder can organize chains while doubling as room decor.
- Wooden dowels, frames, hooks, mesh, and simple boards offer flexible storage options.
- Separate hanging points help reduce tangles and make favorite pieces easier to find.
- A wall-mounted organizer can save valuable drawer and countertop space.
- Decorative materials can make jewelry storage feel intentional rather than purely functional.
Why a DIY Necklace Holder Is Worth Making
A necklace collection does not need a large jewelry cabinet to stay organized. With a little creativity, you can create a dedicated place for chains, pendants, bracelets, and other small accessories using materials that are easy to adapt to your space.
The biggest advantage is visibility. When necklaces are displayed individually, you can see your options at a glance instead of searching through a box or drawer. This makes getting ready easier and also helps prevent delicate chains from becoming knotted together.
Important: The most useful necklace organizer is not necessarily the most complicated one. A simple row of evenly spaced hooks can be surprisingly effective when it gives every necklace its own place and keeps chains separated.
The designs shown by this style of inspiration range from rustic wooden displays to minimalist wall organizers. That variety is useful because it proves there is no single formula for making a necklace holder. You can choose a design based on your available wall space, the size of your jewelry collection, and the overall look of your room.
Creative DIY Necklace Holder Ideas
One of the easiest ways to begin is by thinking about how you naturally use your jewelry. If you reach for necklaces every morning, a wall-mounted holder near your dressing area may be convenient. If you prefer keeping accessories on a tabletop, a freestanding wooden organizer can work better.
1. Wooden Dowel Necklace Rack
A wooden dowel can create a warm, simple jewelry display with very little visual clutter. Add small hooks along the length of the dowel and mount it horizontally on the wall. Longer necklaces can hang from the lower portion while shorter chains remain easy to see near the top.
This approach works particularly well with natural, neutral, or boho-inspired interiors. The wood adds texture while the hanging jewelry becomes part of the decoration.
2. Framed Jewelry Organizer
A picture frame can become the foundation of a stylish necklace holder. Instead of leaving the frame empty, add a backing material such as fabric, mesh, or another suitable surface and attach hooks or small hanging points.
The result looks more like wall art than ordinary storage. You can choose a frame that complements your furniture or paint an unfinished frame to match your room.
3. Mesh and Hook Jewelry Display
Mesh is especially useful for jewelry storage because it provides many possible attachment points. Small earrings can fit naturally into the openings, while necklaces can hang from hooks placed along the upper edge or frame.
This type of organizer is also easy to customize. A larger frame can accommodate an expanding collection, while a smaller version is ideal for a compact bedroom, apartment, or dressing corner.
4. Freestanding Necklace and Bracelet Stand
If you do not want to drill into the wall, consider a freestanding jewelry stand. A wooden frame with horizontal rods can provide separate areas for necklaces and bracelets while keeping everything on a dresser or vanity.
This style can also incorporate small compartments at the bottom for rings, earrings, watches, or other accessories. The combination of hanging storage and small trays makes one organizer much more versatile.
5. Repurposed Wall Hanger
Another approachable option is to repurpose an existing decorative wall hanger. Add hooks or small knobs along the surface and use the resulting row as a dedicated necklace rack.
Repurposing is especially helpful if you enjoy personalized DIY decor. An old wooden piece, unused frame, or simple shelf can often be transformed into something useful without requiring a complicated construction project.
Choosing the Right Materials
The materials you choose will influence both the appearance and functionality of your DIY necklace holder. Wood creates a warm and natural look, while metal hooks can add a clean modern touch. Fabric and mesh bring softness and can create an attractive background for delicate jewelry.
For a simple project, consider starting with a few basic supplies:
- Wooden dowels or small boards
- Picture frames
- Small hooks or knobs
- Mesh, wire, or decorative fabric
- Wood glue or suitable mounting hardware
- Paint or stain if you want to customize the finish
- Small trays or compartments for additional jewelry
You do not need to use every material. The best combination depends on the design you want and the type of jewelry you plan to store.
Expert Insight
Think about necklace length before installing your hooks. Leave enough vertical room beneath each hanging point so longer chains do not overlap heavily with the row below or brush against the surface underneath.
How to Plan Your Necklace Holder
Before cutting wood, attaching hooks, or mounting anything to the wall, take a moment to plan the layout. This small step can make the finished organizer much easier to use.
- Count your necklaces. Estimate how many individual hanging spaces you need.
- Measure the available area. Check your wall, dresser, shelf, or vanity before choosing the size.
- Group similar pieces. Consider keeping long necklaces, short chains, and statement pieces in separate sections.
- Space the hooks evenly. Consistent spacing creates a cleaner appearance and helps prevent chains from touching.
- Test the height. Make sure the organizer is comfortable to reach without stretching or bending excessively.
A little planning also makes it easier to create a display that feels balanced. Instead of filling every available inch with hooks, leave enough breathing room for each piece to stand out.
Organizing Necklaces Without the Tangle
Good necklace storage is about more than appearance. The way you arrange the hanging points can make a major difference in everyday use. When multiple chains share a small space, they can quickly overlap and become difficult to separate.
Use one hook per necklace whenever possible. Longer pieces can occupy the lower sections, while shorter necklaces can be placed higher up. If your collection includes pendants of different sizes, give larger designs extra space so they do not crowd smaller pieces.
Another useful strategy is to organize jewelry by how often you wear it. Keep everyday favorites in the easiest-to-reach section and move occasional or seasonal pieces farther to the side.
Pro Tip: Leave a few empty hooks when you can. Extra space makes it easier to add new necklaces later without having to redesign the entire organizer.
Make Your Jewelry Holder Match Your Decor
A DIY necklace holder can become part of the room rather than something that needs to be hidden. Choose materials and finishes that already appear in your space for a cohesive look.
For a Natural Look
Choose unfinished or lightly finished wood, neutral fabric, and simple hardware. Natural tones work beautifully with plants, woven textures, baskets, and other relaxed decorative elements.
For a Modern Look
Use clean lines, a simple rectangular frame, and evenly spaced hooks. A restrained palette can make the jewelry itself become the main visual feature.
For a Creative Look
Mix decorative frames, unusual shapes, textured backgrounds, or painted wood. The holder can become a small gallery-style display where your favorite accessories contribute to the room’s personality.
Using a Necklace Holder in Small Spaces
Small rooms often benefit the most from vertical jewelry storage. Instead of taking up drawer space or leaving accessories across a dresser, a wall-mounted organizer uses an otherwise overlooked surface.
A narrow wooden rack can fit beside a mirror, while a framed jewelry display can occupy a small section of wall. If you have very limited space, focus on your most frequently worn necklaces and create a compact organizer around them.
Vertical storage also makes your jewelry easier to see. Rather than stacking accessories on top of one another, you can arrange them in rows and create a visually organized collection.
Simple Ways to Personalize Your DIY Design
The beauty of a DIY necklace holder is that you can adjust almost every detail. Change the size, finish, hardware, background, or number of hooks to create a design that suits your collection.
- Paint the frame or wood to coordinate with your room.
- Use decorative knobs instead of standard hooks.
- Add a small shelf or tray for rings and earrings.
- Create separate sections for necklaces and bracelets.
- Use different hook heights for short and long pieces.
- Add a textured backing to make the jewelry stand out.
You can also build the project gradually. Start with a basic rack and add compartments or additional hanging points when your collection grows. This makes the organizer adaptable instead of treating it as a one-time project.
Keeping Your Jewelry Display Looking Tidy
Once your DIY necklace holder is installed, a simple maintenance routine can keep it looking attractive. Return each necklace to its designated hook after wearing it instead of placing it temporarily on a nearby surface.
Every few weeks, take a moment to rearrange the collection. Remove pieces you no longer wear regularly and check whether the spacing still works. This is also a good opportunity to clean the display surface and keep dust from building up around the jewelry.
If you notice several necklaces repeatedly overlapping, adjust their positions. The organizer should make your routine easier, so there is no reason to keep a layout that feels inconvenient.
Why These DIY Jewelry Storage Ideas Work
The strongest designs combine organization with decoration. Instead of treating storage as something hidden away, these necklace holder ideas make accessories visible while giving them a designated home.
They are also flexible. A simple wall rack can be adapted to a minimalist room, a wooden stand can complement a natural interior, and a framed display can add personality to a dressing area. The same basic concept can be customized in countless ways.
Most importantly, an effective jewelry organizer solves a real everyday problem. When necklaces have individual places to hang, you spend less time searching for a favorite piece and more time enjoying the collection you already own.
Quick Points
- Choose a design that matches your available space.
- Give each necklace enough room to hang freely.
- Use wall space when drawers and surfaces are limited.
- Customize wood, frames, hooks, and finishes to suit your decor.
- Keep frequently worn jewelry within easy reach.
Conclusion
A DIY necklace holder can be one of those small home projects that makes a surprisingly big difference. Whether you choose a wooden dowel rack, a framed display, a mesh organizer, or a freestanding jewelry stand, the goal is the same: create a simple system that keeps necklaces visible, separated, and easy to reach.
The ideas featured here are a great starting point, but there is plenty of room to make the design your own. Experiment with materials, colors, hook placement, and storage sections until the organizer fits both your jewelry collection and your space.
Ready to organize? Start with the simplest design that fits your space, then personalize it with finishes and details you love. A practical jewelry holder can also become a beautiful part of your room decor.
Tags
Take your necklace holder idea further
Create a simple materials list
Add Pinterest SEO keywords