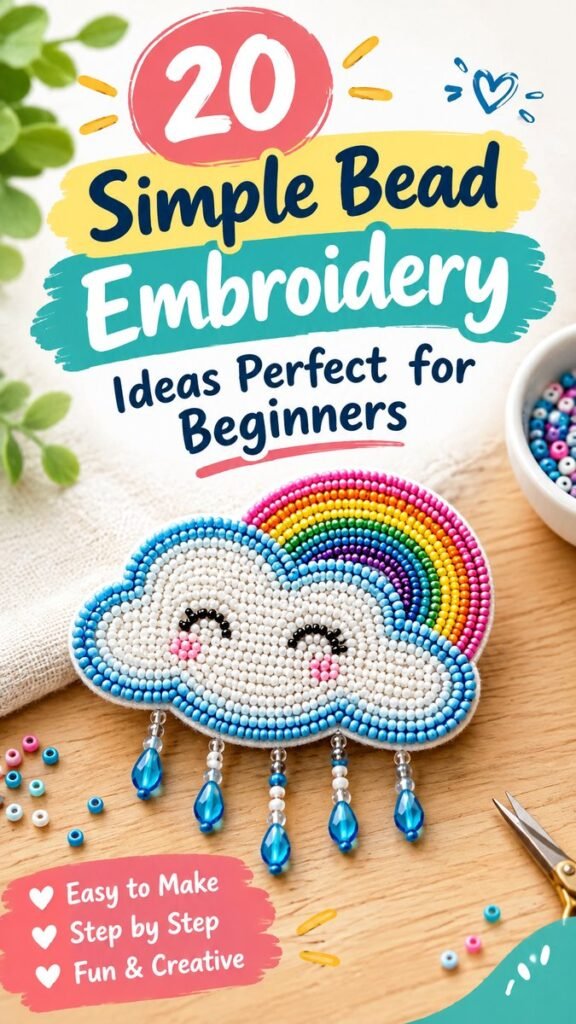
DIY bead embroidery is a fun way to turn simple beads, thread, and a little creativity into colorful handmade art. The featured inspiration combines a cheerful cloud shape with a bright rainbow, rows of small beads, and dangling blue bead accents. It shows how playful shapes can become eye-catching embroidered pieces without requiring an overly complicated design. If you are looking for DIY bead embroidery ideas that feel creative, colorful, and approachable, this style is a wonderful place to begin.
Bead embroidery can be used for decorative pieces, brooches, ornaments, accessories, patches, and other handmade projects. The best part is that you can start with simple outlines and gradually experiment with more detailed patterns. By choosing a limited color palette, repeating bead rows, and working with recognizable shapes, even a beginner can create something that looks polished and intentional.
Key Takeaways
- Start with a simple, recognizable shape such as a cloud, flower, heart, or rainbow.
- Use consistent bead rows to create clean outlines and attractive texture.
- Choose a small group of coordinating colors before beginning.
- Secure beads carefully so the finished embroidery stays neat and durable.
- Add dangling beads or small embellishments for movement and extra visual interest.
- Keep the first project simple, then increase the detail as your confidence grows.
What Makes DIY Bead Embroidery So Appealing?
DIY bead embroidery combines the relaxing rhythm of hand stitching with the colorful appeal of beadwork. Each individual bead becomes part of a larger picture, allowing you to build outlines, borders, filled shapes, patterns, and decorative details one stitch at a time.
Unlike some large embroidery projects, a small beaded design can be completed in manageable sections. This makes it especially appealing when you want a creative project that can be worked on gradually. You can spend a short session arranging colors and another session stitching the design without needing to finish everything at once.
The cloud and rainbow concept shown in the inspiration is particularly effective because it uses familiar shapes. The soft cloud provides a broad base for light-colored beads, while the rainbow creates naturally curved rows of contrasting colors. Small hanging beads add another layer of dimension beneath the main shape.
Important: The most successful beginner bead embroidery projects usually focus on clean shapes and consistent stitching rather than trying to include too many complicated details. A simple design can look striking when the bead placement is neat and the colors work well together.
Supplies for a Beginner Bead Embroidery Project
You do not need an enormous collection of supplies to begin. A small project can be created with a few basic materials and gradually expanded as you discover which techniques you enjoy most.
- Seed beads: Small uniform beads are useful for creating smooth outlines and detailed patterns.
- Beading thread: Select a strong thread designed for hand beadwork.
- Beading needle: A fine needle that can pass through your chosen beads is essential.
- Fabric or embroidery foundation: Choose a stable material that can support the stitching.
- Scissors: Sharp, compact scissors make trimming thread easier.
- Backing material: A suitable backing can help give a finished piece a cleaner appearance.
- Beads for embellishment: Larger accent beads can be used for dangling details or decorative highlights.
For a rainbow-inspired design, a collection of bright colors can create the strongest visual effect. You could use several colors for curved rainbow bands and reserve white, pale blue, or another neutral shade for the cloud. Clear or translucent accent beads can also add a subtle change in texture.
Choosing a Simple Design
One of the easiest ways to make DIY bead embroidery beginner-friendly is to begin with a shape that has a clear outline. Clouds, rainbows, flowers, leaves, hearts, stars, fruit, simple animals, and geometric shapes are all useful starting points.
Think about the design as a collection of sections instead of one complicated picture. For example, a cloud and rainbow can be separated into a cloud outline, cloud interior, rainbow bands, and hanging embellishments. Each section can be completed independently while still contributing to the finished design.
Keep the First Pattern Manageable
A beginner pattern should have enough detail to be interesting but not so much that every stitch becomes frustrating. Large areas with repeated beads are often easier to handle than tiny sections containing many different bead sizes.
Before stitching, sketch the main shape on paper or use a simple template. Mark the major color sections and decide where the outline should sit. This small planning step can make the stitching process much more enjoyable.
Plan the Color Palette First
Color is one of the strongest features of bead embroidery. A carefully selected palette can make a simple design feel much more sophisticated. The rainbow example demonstrates how multiple bright colors can be organized into repeating curved rows while the cloud remains lighter and visually softer.
Try choosing one main background or neutral color, several accent colors, and one or two colors for decorative details. Keeping the palette intentional prevents the project from looking visually crowded.
How to Approach a DIY Bead Embroidery Design
The exact stitching method can vary depending on the foundation, pattern, and bead type you choose. However, a simple workflow can help keep a beginner project organized.
- Prepare the design. Draw or transfer a simple outline onto your embroidery foundation.
- Sort the beads. Place the colors into small containers so they are easy to reach while stitching.
- Choose a starting point. Begin with an outline or another clearly defined section.
- Work in small areas. Complete one curve, border, or color section before moving to the next.
- Check spacing frequently. Look at the bead alignment after every few stitches.
- Secure the thread. Finish each section carefully so the beads remain firmly attached.
- Add finishing details. Once the main embroidery is complete, attach any backing or decorative elements appropriate for your project.
Working gradually is more important than rushing. Bead embroidery rewards patience because small improvements in spacing and alignment can make a noticeable difference in the final appearance.
Expert Insight
Think of every bead as part of a visual line. When beads follow the same curve and sit at similar distances from one another, the finished design looks cleaner even when the pattern itself is very simple.
Creating Clean Beaded Outlines
Outlining is especially important when working with recognizable shapes. A strong outline separates one section from another and helps the design remain readable from a distance.
For rounded shapes such as clouds and rainbows, avoid forcing the beads into sharp changes of direction. Instead, build the curve gradually. Slight adjustments in bead placement can help create a smoother edge.
Consistency is more important than perfection. Handmade embroidery naturally contains tiny variations, and those small differences can give the piece character. Focus on maintaining a steady rhythm rather than trying to make every stitch mathematically identical.
Working With Curves
Curved rows can be created by following the contour of the pattern and adjusting the bead placement as the direction changes. Shorter sections often make it easier to maintain an even curve.
If the design starts to look crowded, pause and examine the spacing before continuing. It is much easier to correct a small section early than to discover a major alignment problem after the entire area has been completed.
Adding Dimension With Dangling Beads
One of the most playful details in the featured style is the use of dangling beads beneath the main embroidered shape. These elements create movement and help transform a flat embroidered motif into something that feels more dimensional.
You can experiment with different combinations of small spacer beads, larger accent beads, and transparent or colored beads. The hanging strands do not all need to be identical. Varying their lengths can create a more natural decorative effect.
If you are making a wearable accessory, keep the dangling details balanced so they do not overpower the main embroidered shape. For decorative ornaments, you have more freedom to experiment with longer strands and additional embellishments.
Pro Tip: Use larger accent beads sparingly. One noticeable bead at the end of a short strand can create more visual impact than covering every section with oversized embellishments.
20 Simple DIY Bead Embroidery Ideas to Try
The rainbow cloud style can inspire many variations. Once you understand the basic approach, you can change the shape, palette, bead arrangement, and finishing details to create a collection of original projects.
- Rainbow cloud: Combine curved rainbow rows with a soft cloud shape.
- Floral patch: Create petals from bright beads around a contrasting center.
- Beaded heart: Use one or two colors for a simple romantic motif.
- Leaf design: Experiment with different shades of green for natural texture.
- Sun motif: Create a round center surrounded by short beaded rays.
- Star ornament: Outline a star and add small beads to the interior.
- Rainbow arch: Focus on layered curved rows without the cloud.
- Fruit motif: Try a strawberry, lemon, cherry, or another simple fruit shape.
- Butterfly: Use symmetrical bead patterns to decorate the wings.
- Simple flower cluster: Combine several small flowers into one composition.
- Moon-inspired design: Create a crescent shape using beads in soft colors.
- Geometric patch: Experiment with triangles, circles, squares, and repeated lines.
- Beaded mushroom: Use contrasting colors to define the cap and stem.
- Cloud and raindrops: Pair a cloud with dangling blue beads for a playful effect.
- Colorful initials: Turn a simple letter into a personalized beaded motif.
- Abstract waves: Use curved bead rows to create a flowing pattern.
- Beaded bow: Build two symmetrical loops around a central detail.
- Simple butterfly patch: Repeat bead colors on each wing for visual balance.
- Mini rainbow patch: Make a compact version suitable for a small accessory.
- Mixed bead charm: Combine seed beads with a few larger accent beads for texture.
These ideas can be adapted to different sizes and color combinations. The goal is not to reproduce one exact pattern but to use basic shapes and bead placement as a starting point for your own handmade designs.
Beginner Tips for Better Bead Embroidery
Good results often come from a few simple habits. Before starting, make sure your working area is comfortable and well organized. Small beads are much easier to manage when each color has its own container.
- Work under good lighting so individual beads and stitches are easy to see.
- Keep unused beads separated by color and size.
- Avoid pulling the thread excessively tight, as this can distort the foundation.
- Check your design regularly rather than waiting until the end to inspect it.
- Practice a small section before committing to a large project.
- Use a simple color chart if your pattern contains several shades.
- Take breaks during long stitching sessions to maintain comfortable hand positioning.
It is also helpful to photograph your work occasionally. Looking at a project through a camera or from a little distance can make spacing issues easier to notice than when you are viewing the piece close up.
How to Make Your Design Look More Polished
A polished bead embroidery project does not necessarily require complicated techniques. Strong composition, balanced colors, and careful finishing can make a major difference.
Repeat Colors for Visual Harmony
Repeating the same color in several areas helps connect the design. In a rainbow-inspired project, the colorful rows naturally repeat across the curved shape. You can use the same idea in other motifs by repeating one accent color around the border or in small decorative details.
Create Contrast Between Sections
Contrast helps each part of the design remain visible. A light cloud against colorful rainbow rows creates an immediate distinction. You can create similar contrast with light and dark beads, warm and cool colors, or matte and glossy finishes.
Give the Main Shape Room to Shine
It can be tempting to fill every available space with beads, but leaving some visual breathing room can make a handmade design look more intentional. The main motif should remain the focal point while smaller embellishments support it.
Ways to Use Finished Bead Embroidery
Once your embroidered motif is complete, there are many ways to turn it into a finished craft. Depending on its size, construction, and backing, a design can become a decorative patch, brooch-style accessory, ornament, bag embellishment, clothing accent, or small handmade gift.
A cloud and rainbow design works especially well as a cheerful decorative accent because the shape is recognizable and the colors naturally attract attention. You can also create several coordinated motifs and combine them into a larger handmade collection.
If you are making an accessory, pay particular attention to the backing and attachment method. A secure finish helps protect the embroidery and keeps the piece looking neat during use.
Making DIY Bead Embroidery Your Own
The most rewarding part of bead embroidery is personalization. You can take the basic idea of a colorful, beaded motif and change almost every creative element. Try a muted palette for a softer look, jewel tones for a richer appearance, or bright primary colors for a playful project.
You can also change the bead arrangement. Instead of filling a shape completely, outline it and leave the center open. Alternatively, create rows of beads inside the shape for a more textured finish. Mixing tiny seed beads with a few larger beads can add dimension without making the design complicated.
Personal touches can include initials, favorite colors, seasonal motifs, simple geometric patterns, or decorative hanging strands. These details make a project feel less like a generic craft and more like something designed specifically by you.
At a Glance
Quick Points
- Choose a simple shape with a clear outline.
- Sort beads before stitching to keep the process organized.
- Build curved and straight rows gradually for cleaner results.
- Use color repetition to create a cohesive design.
- Add a few larger beads for dimension and movement.
Final Thoughts on DIY Bead Embroidery
DIY bead embroidery is an inviting craft for anyone who enjoys colorful details, hands-on creativity, and small projects with plenty of personality. A simple cloud and rainbow design demonstrates how much visual interest can come from basic shapes, repeated bead rows, contrasting colors, and a few carefully placed embellishments.
If you are new to bead embroidery, start small and concentrate on consistency rather than complexity. Choose a manageable shape, prepare your colors, work patiently, and allow yourself to experiment. As your stitching becomes more comfortable, you can explore more detailed patterns, different bead sizes, layered textures, and personalized motifs.
Whether you are creating a cheerful patch, a decorative accessory, or simply practicing a new craft, each project is an opportunity to develop your own style. Save your favorite DIY bead embroidery ideas, gather a few colorful beads, and start with a design that makes you want to keep stitching.