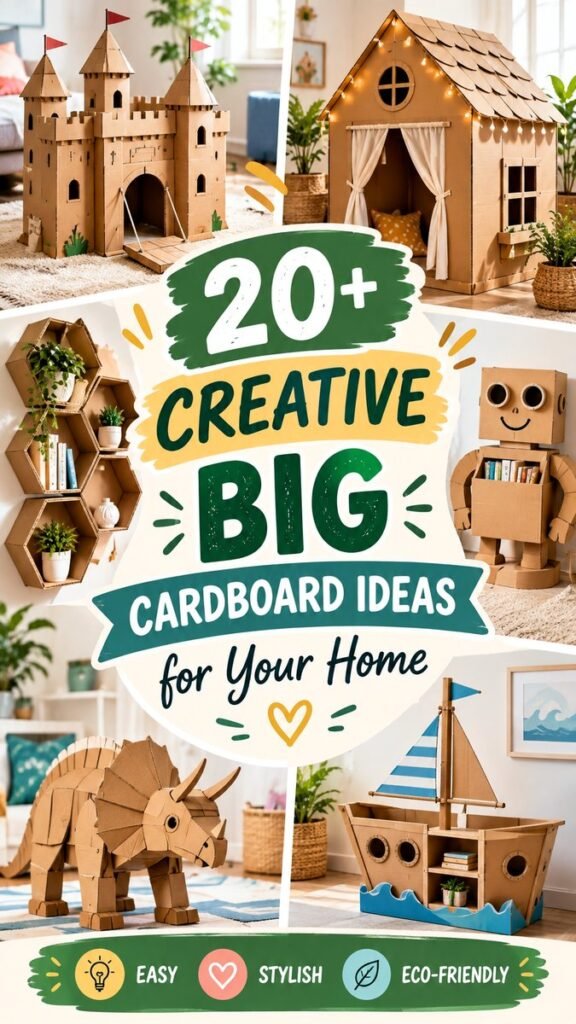
Cardboard is one of the easiest materials to transform into something surprisingly creative, practical, and fun. With a few boxes, sheets of corrugated cardboard, scissors, glue, and a little imagination, you can create everything from imaginative playhouses and castles to decorative shelves, toy displays, boats, and animal sculptures. These DIY cardboard ideas prove that you do not need expensive supplies to make eye-catching projects for your home.
Key Takeaways
- Turn everyday cardboard boxes into creative home and playroom projects.
- Build imaginative castles, houses, boats, animals, and decorative pieces.
- Reuse packaging to create affordable and eco-conscious crafts.
- Layer and reinforce cardboard for stronger, longer-lasting structures.
- Use paint, fabric, paper, plants, and simple embellishments to personalize each project.
Why DIY Cardboard Ideas Are So Creative
Cardboard may seem like a basic packaging material, but its lightweight structure makes it remarkably versatile. It can be cut, folded, layered, scored, painted, and assembled into almost any shape. That flexibility makes cardboard especially useful for creative projects where experimentation matters more than perfection.
The projects shown in this collection demonstrate how cardboard can move far beyond simple storage boxes. Architectural shapes become miniature castles and houses, flat sheets become boats and animals, and small pieces can be assembled into shelves or decorative displays. The result is a collection of projects that combine creativity, practical design, and imaginative play.
Important: The biggest advantage of cardboard crafting is that you can test an idea with inexpensive materials before committing to a more permanent version. Build a rough structure first, see what works, and then improve the details.
20+ DIY Cardboard Ideas to Try at Home
There is no need to reproduce every project exactly. Instead, use the ideas as starting points and adapt the shapes, colors, sizes, and functions to suit your space. Here are creative directions inspired by the projects featured in the visual collection.
1. Create a Cardboard Castle
A cardboard castle can become the centerpiece of a playroom. Use large boxes for the main towers and connect them with smaller sections of cardboard. Add crenellations along the top, arched doorways, windows, flags, and decorative shields to create a playful miniature fortress.
For extra strength, reinforce the base and major joints with additional cardboard strips. A neutral kraft-paper finish looks charming on its own, while simple paint details can make the walls resemble stone or brick.
2. Build a Cozy Cardboard Playhouse
A small cardboard house is another wonderful project for imaginative play. Cut out a doorway and windows, then add curtains, a pitched roof, shutters, or flower boxes. Even simple details can transform a plain box into a welcoming little hideaway.
Keep the interior comfortable and uncluttered. A small cushion or soft blanket can make the space feel more inviting while keeping the cardboard structure visually simple.
3. Make Cardboard Wall Shelves
Not every cardboard project has to be a toy. Layered cardboard can also become attractive lightweight display shelves. Geometric shapes such as hexagons are particularly effective because several units can be arranged together as a decorative wall composition.
Use sturdy, evenly cut pieces and reinforce the joints carefully. These shelves are best suited to lightweight decorative objects, small plants, books, or craft supplies rather than heavy items.
4. Design a Cardboard Robot
A friendly cardboard robot is a fun way to turn leftover boxes into characterful decor. Stack boxes of different sizes for the body, head, and limbs. Add circular cardboard pieces for eyes, simple facial features, and smaller details for buttons or controls.
This project works especially well when children can help choose the character’s expression and accessories. The finished robot can become a playful reading-room decoration or imaginative-play companion.
5. Craft a Cardboard Dinosaur
Large cardboard animals can make memorable decorative pieces. A dinosaur can be constructed from separate body sections, with layered cardboard used for the head, legs, horns, or decorative plates. The key is to simplify the silhouette rather than trying to reproduce every anatomical detail.
Natural cardboard tones give the project a handcrafted appearance, while painted details can make the creature more playful and colorful.
6. Build a Cardboard Boat
A cardboard boat is perfect for a nautical-themed playroom. Create a long central body, add circular windows, and finish the top with a mast and simple fabric or paper sail. Blue cardboard or painted waves around the base can complete the theme.
For a decorative project, focus on appearance and proportions. If children will interact with it frequently, reinforce the structure generously and avoid sharp exposed edges.
7. Make a Cardboard Play Kitchen
Large cardboard boxes can be transformed into a miniature kitchen with a little planning. Cut openings for an oven, add cardboard burners to the countertop, and use painted circles or safe decorative pieces for knobs.
A simple neutral finish can make the kitchen blend into a modern playroom, while colorful accessories can give it a cheerful appearance.
8. Create a Cardboard Animal House
Small cardboard structures can be designed as imaginative homes for toy animals. Try a barn, pet house, stable, or miniature woodland shelter. Add doors, windows, roof panels, and tiny decorative signs to give each structure personality.
9. Turn Cardboard Into a Reading Nook
A large box can become a simple reading nook by cutting a wide entrance and adding a roof or decorative trim. Place it near bookshelves and make the inside comfortable with soft cushions.
This idea is especially useful when you want a dedicated quiet corner without purchasing bulky furniture.
10. Make Decorative Cardboard Gears
Layered cardboard gears can create an industrial-inspired decorative display. Cut large and small circles, add evenly spaced teeth around the edges, and arrange several pieces together. Painting them in contrasting neutral shades can emphasize their shapes.
11. Design a Cardboard Rocket
A tall cardboard rocket is a playful addition to a child’s room. A cylindrical or carefully shaped box can form the body, while triangular cardboard panels create the fins. A cone-shaped top and circular windows complete the design.
Use stars, planets, stripes, or simple geometric patterns to personalize the outside without making the project overly complicated.
12. Create Cardboard Hexagon Storage
Hexagonal cardboard compartments combine storage with wall decor. Cut matching hexagonal frames and connect them securely before arranging them in a honeycomb pattern. They can hold small decorative objects, craft materials, or lightweight plants.
13. Make a Cardboard Pet-Themed Display
Cardboard can also become a backdrop for small decorative scenes. Build a box-shaped display, paint the interior, and add cutout fish, plants, waves, or other simple shapes. This approach works beautifully for creating miniature underwater or nature-inspired scenes.
14. Build a Miniature Village
Instead of creating one large structure, use smaller boxes to make a collection of houses. Vary the roof shapes, windows, doors, and heights to create a charming miniature neighborhood. This can become a seasonal display or a permanent creative corner.
15. Craft Cardboard Furniture for Pretend Play
Simple cardboard furniture can complement a playhouse or miniature room. Tables, stools, counters, beds, and cabinets can all be built from layered pieces. Reinforcement is especially important for pieces that children may touch or move frequently.
16. Create a Cardboard Market Stand
A pretend market stand is another creative use for large boxes. Add a countertop, awning, shelves, and a sign area. Children can use it for imaginative shop games, while adults can decorate it to match the colors of the playroom.
17. Make a Cardboard Toy Garage
Several stacked cardboard boxes can be turned into a miniature garage for toy cars. Cut openings for parking spaces and add ramps, signs, or simple road markings. This project can be expanded whenever more cardboard becomes available.
18. Design Cardboard Wall Art
Flat cardboard does not have to become a three-dimensional structure. Cut leaves, geometric shapes, letters, animals, or abstract patterns and arrange them as wall art. Layering pieces creates depth without requiring complicated construction.
19. Build a Cardboard Puppet Theater
A large box can become a charming puppet theater with a rectangular opening, decorative curtains, and a simple stage. Paint the frame or cover it with paper to create a finished look. It is a compact project with plenty of opportunities for imaginative storytelling.
20. Make Cardboard Decorative Letters
Large cardboard letters can spell a name, word, or short phrase for a playroom or craft space. Cut two matching letter shapes and connect them with strips around the edges to create a three-dimensional form. Cover them with paint, paper, or fabric for a personalized finish.
21. Create a Cardboard Storage Organizer
Small boxes and leftover cardboard pieces can be combined into compartments for art supplies, toys, stationery, or craft materials. Cover the finished organizer with paper or paint if you want a more polished appearance.
Expert Insight
Strong cardboard projects are usually built from simple shapes rather than complicated pieces. Measure carefully, reinforce high-stress areas, and assemble the main structure before spending time on decorative details.
How to Make Cardboard Projects Look Polished
The difference between a quick cardboard craft and a polished DIY project often comes down to preparation. Start by choosing cardboard that is clean, dry, and reasonably flat. Corrugated cardboard is useful for larger structures because its internal layers provide additional rigidity.
Measure every major panel before cutting. When several pieces need to match, create one template from paper or thin scrap cardboard first. This small step can prevent uneven pieces and reduce wasted material.
Reinforce the Important Areas
Use extra strips of cardboard behind corners, bases, handles, and connecting points. Layering two or three pieces can make a noticeable difference in strength. For larger builds, a simple internal frame can support the outer panels.
Keep the Edges Clean
Clean edges immediately make a project look more intentional. Use a sharp craft blade carefully when straight cuts are needed, and measure rather than cutting freehand whenever precision matters. For projects involving children, adults should handle sharp cutting tools and make sure exposed edges are safe.
Choose a Simple Color Palette
You do not need dozens of colors to make cardboard decor attractive. A combination of natural kraft brown with two or three complementary colors can create a cohesive appearance. Soft greens, warm neutrals, muted blues, and cheerful accent colors work particularly well with the handmade character of cardboard.
Pro Tip: Let the cardboard texture become part of the design. Instead of completely covering every surface, combine painted sections with natural cardboard to create warmth, contrast, and a handmade feel.
Materials for DIY Cardboard Crafts
Most cardboard projects can begin with materials you already have around the house. The exact supplies depend on the design, but a basic craft station can include:
- Clean corrugated cardboard boxes
- Flat cardboard sheets for templates and details
- Scissors and a craft knife for adult use
- Ruler, pencil, and measuring tape
- Craft glue or another suitable adhesive
- Paint and brushes
- Colored paper or cardstock
- Fabric scraps for curtains, flags, or soft details
- Markers for small decorative features
- Optional twine, cardboard tubes, and recycled packaging pieces
Before starting, sort your cardboard by thickness. Thin sheets are excellent for decorative details, while thicker corrugated pieces are better for structural walls, floors, and large panels.
Tips for Building Cardboard Structures
- Sketch the idea first. A quick drawing helps you understand the size and number of pieces required.
- Create templates. Use one carefully measured shape as a guide for repeated pieces.
- Build from the base upward. A stable foundation makes larger structures easier to assemble.
- Reinforce joints. Add hidden strips behind seams where extra support is needed.
- Test before decorating. Assemble the structure temporarily before painting or adding embellishments.
- Protect the finished piece. Keep cardboard crafts away from excessive moisture and rough handling.
Why Cardboard Is Great for Budget-Friendly Creativity
One of the most appealing things about DIY cardboard projects is how accessible they are. Packaging that might otherwise be discarded can become the raw material for a new project. This makes cardboard especially useful for families, classrooms, hobbyists, and anyone who enjoys experimenting with crafts without spending a lot on supplies.
It also encourages creative problem-solving. A box does not have to remain a box. Once you begin looking at cardboard as a construction material, you start noticing its potential for shapes, structures, textures, and functional organizers.
Another benefit is flexibility. If a first attempt does not work, you can modify it, reinforce it, repaint it, or take it apart and reuse the material. That freedom makes cardboard a low-pressure material for learning basic design and construction skills.
Making DIY Cardboard Projects More Personal
The most memorable cardboard crafts are often the ones that reflect the people who use them. Add favorite colors, playful signs, simple patterns, fabric curtains, paper flags, or themed accessories. A castle can become a fantasy fortress, a box can become a cozy cottage, and a boat can become part of an entire imaginary ocean scene.
For home decor, consider matching the project’s palette to the surrounding room. Natural cardboard works beautifully with neutral interiors, while carefully selected accent colors can make children’s spaces feel more energetic without overwhelming the room.
At a Glance
- Use sturdy cardboard for structure and thinner pieces for details.
- Try castles, houses, boats, animals, shelves, organizers, and play furniture.
- Reinforce corners, bases, and joints before adding decoration.
- Combine natural cardboard with a simple, coordinated color palette.
- Reuse packaging creatively instead of letting useful material go to waste.
Conclusion: Turn Simple Cardboard Into Something Special
These DIY cardboard ideas show just how much potential can be hidden inside an ordinary box. With thoughtful cutting, strong construction, and a little decorative creativity, cardboard can become playful furniture, imaginative toys, useful storage, wall decor, and eye-catching room accents.
The best place to start is with a project that matches your skill level and the cardboard you already have. Begin with simple geometric shapes, experiment with layering, and gradually add more complex details as your confidence grows. Whether you are creating a miniature castle, a cozy playhouse, a cardboard boat, a friendly animal, or a practical organizer, the process is just as rewarding as the finished piece.
Save your favorite DIY cardboard ideas and turn your next empty box into a creative project worth keeping.