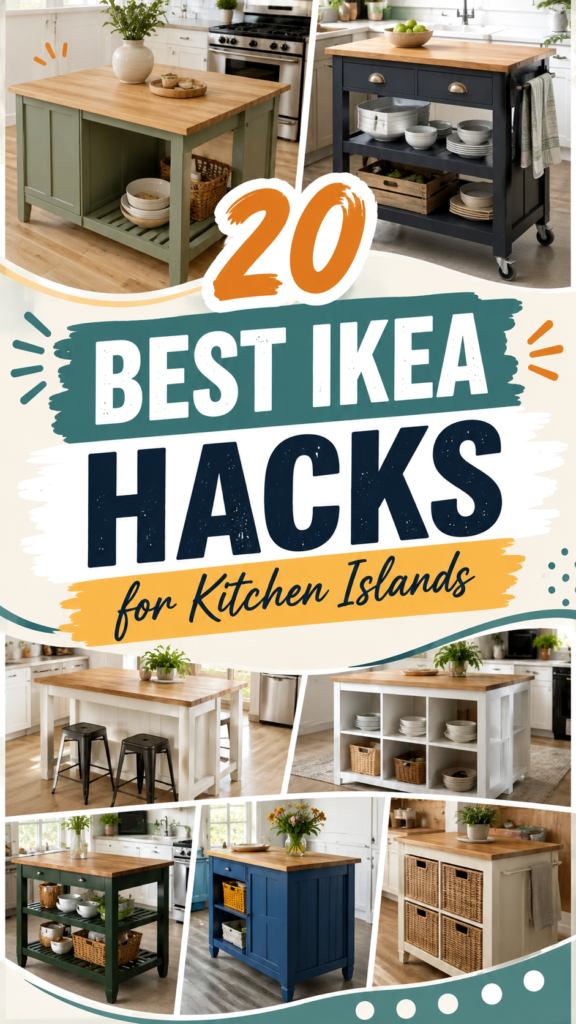
Want to give your kitchen a fresh, functional upgrade without committing to the cost of a fully custom renovation? A DIY kitchen island can be one of the smartest ways to transform an ordinary kitchen into a more useful and inviting space. The ideas shown here demonstrate just how versatile a kitchen island can be, from simple painted frames with butcher-block countertops to clever IKEA hacks featuring open shelving, baskets, drawers, and seating.
A kitchen island does more than fill an empty area. It can provide extra preparation space, create valuable storage, offer casual seating, and become a natural gathering point for family and friends. Best of all, a DIY approach allows you to choose the size, finish, storage configuration, and style that work best for your home.
Key Takeaways
- Use an existing cabinet, table, or IKEA piece as the foundation for a budget-friendly island.
- Butcher-block countertops add warmth and create a practical work surface.
- Open shelving makes dishes, baskets, and everyday kitchen essentials easy to reach.
- Paint is an easy way to give a basic island a completely different personality.
- Choose storage features based on how you actually use your kitchen.
- Always consider movement and clearance before positioning an island.
Why DIY Kitchen Islands Are So Popular
Kitchen islands have become a favorite feature in both traditional and modern kitchens because they combine several functions in one piece. Instead of adding separate cabinets, shelving, and a breakfast table, an island can bring many of those needs together.
The examples featured in this style of kitchen inspiration show a particularly appealing approach: taking a relatively simple base and turning it into a statement piece with paint, wood, hardware, baskets, and thoughtful storage. This makes the idea especially useful for homeowners who want a kitchen makeover without starting from scratch.
Important: The best DIY kitchen island is not necessarily the largest or most elaborate one. A well-planned island should improve the way you move, cook, store items, and use your kitchen every day.
20 DIY Kitchen Island Ideas to Inspire Your Makeover
1. Add a Butcher-Block Countertop
A wooden countertop is one of the easiest ways to make a basic kitchen island feel warm and substantial. The natural wood look works beautifully with painted bases, particularly soft green, white, navy, black, and neutral finishes.
A butcher-block-style surface also provides a strong visual contrast when paired with a painted island. The combination gives the furniture a handcrafted appearance while keeping the overall design clean and approachable.
2. Try a Two-Tone Island
One of the strongest visual ideas in the inspiration is the contrast between colorful bases and natural wood countertops. Instead of painting the entire piece one shade, use the countertop as a second color and texture.
A deep navy base with warm wood feels classic, while a muted green base creates a softer farmhouse-inspired appearance. White cabinetry with a wooden top can make the kitchen feel bright and timeless.
3. Create Open Shelf Storage
Open shelving is a practical option for a kitchen island because it turns unused space into accessible storage. Plates, bowls, mixing bowls, baskets, and serving pieces can be displayed without opening a cabinet door.
This approach also makes a kitchen island feel lighter. Instead of a completely enclosed cabinet front, open compartments create visual space and allow you to incorporate decorative storage baskets.
4. Use Baskets for a Softer Look
Woven baskets are an easy way to make open shelving look organized rather than cluttered. They can hold kitchen towels, smaller accessories, pantry items, or other everyday essentials while adding texture.
The combination of painted wood and natural woven baskets is particularly effective for farmhouse, cottage, Scandinavian, and relaxed modern kitchens.
5. Turn an IKEA Piece Into an Island
IKEA hacks are popular because ready-made furniture can provide a useful starting point for a custom-looking project. A basic storage unit, shelving system, or cabinet can potentially become the foundation of a kitchen island with the right modifications.
Adding a new countertop, changing the hardware, painting the base, or incorporating additional trim can completely change the appearance of a simple piece.
6. Add Wheels for Flexibility
A rolling kitchen island can be especially useful when flexibility matters. Wheels allow the island to be moved when you need more floor space or want to change the kitchen layout.
Look for a design with sturdy casters and make sure the island remains stable when being used. A movable island can work particularly well in multifunctional kitchens where the available floor space changes throughout the day.
7. Choose a Deep, Moody Color
Dark navy and charcoal-style finishes can give a kitchen island a dramatic focal point. A dark base paired with a lighter countertop creates contrast without requiring complicated decoration.
This idea works particularly well when the surrounding kitchen has white or light-colored cabinetry. The island becomes an intentional centerpiece rather than simply another cabinet.
8. Keep It Light With White
White remains a reliable choice for anyone who wants an island to blend into a bright kitchen. Open cubbies and a wooden countertop can prevent an all-white island from looking too plain.
White also helps visually reduce the weight of a larger island, which can be useful in kitchens where you want plenty of storage without making the room feel crowded.
9. Build in Plate Storage
If you have attractive everyday dishes, consider incorporating open compartments that allow plates and bowls to become part of the island’s design. This makes frequently used items easy to grab while creating a simple decorative display.
Divided cubbies can also help keep different categories of kitchenware organized. Think about the items you reach for most often and position them where they are easiest to access.
10. Add Seating
An island can double as a casual dining area when the countertop provides enough overhang for stools. Even a compact island can become a convenient spot for morning coffee, quick meals, homework, or conversation.
Simple counter stools can keep the design relaxed. Choose seating that complements the island rather than competing with it.
Expert Insight
Think about your island as a piece of working furniture, not just decoration. The most successful design gives every feature a purpose. Open shelves should hold items you actually use, drawers should store things you need nearby, and countertop space should support the way you prepare and serve food.
11. Combine Drawers and Shelves
You do not have to choose between closed storage and open storage. Combining the two can create a much more flexible kitchen island.
Drawers are useful for smaller items that you prefer to keep hidden, while shelves are ideal for bowls, baskets, cookbooks, or attractive serving pieces. A mixed-storage design can also add visual interest to a simple island.
12. Give the Island a Furniture-Like Finish
Some of the most appealing island designs look more like freestanding furniture than traditional cabinetry. Legs, open shelving, painted panels, decorative hardware, and a substantial wood top can all contribute to that effect.
This approach is ideal when you want your kitchen to feel warm and personalized rather than overly built-in.
13. Use a Soft Green Finish
Muted green is a natural fit for kitchen furniture because it brings color into the room without overwhelming the space. Paired with natural wood and woven storage, it creates a calm, welcoming atmosphere.
If you want color but are hesitant about something bold, a dusty sage or subdued green can be a versatile middle ground.
14. Add Decorative Hardware
Small details can have a surprisingly large effect on a DIY kitchen island. Cup pulls, simple knobs, handles, and other hardware can help establish the personality of the finished piece.
For a traditional look, choose classic hardware. For a modern island, streamlined pulls can create a cleaner appearance. The important thing is to make the hardware feel intentional with the rest of the kitchen.
15. Create a Small-Space Island
A kitchen island does not need to be enormous to be useful. A compact design can provide additional counter space and storage while preserving comfortable walking paths.
When space is limited, prioritize the features that matter most. You might choose a narrow countertop, open shelving, or a movable base instead of trying to include every possible feature.
16. Add a Rustic Wood Top
Natural wood instantly adds character to a painted island. The subtle variations in grain and tone make the piece feel less manufactured and more like custom furniture.
A wood countertop also pairs well with baskets, ceramic dishes, greenery, and simple neutral accessories, making it an easy foundation for several decorating styles.
17. Make Storage Part of the Decor
Storage does not have to be hidden. Carefully arranged bowls, plates, baskets, and serving pieces can become part of the island’s visual appeal.
The trick is to keep the display intentional. Group similar items together and leave enough empty space so the shelves do not appear overcrowded.
18. Try a Classic Black Island
A black or very dark island creates an instant focal point. It can anchor a bright kitchen and provide a sophisticated contrast against pale floors, countertops, or cabinets.
To keep a dark island from feeling too heavy, open shelving, natural wood, and lighter accessories can introduce balance.
19. Use Vertical Storage Wisely
The sides and ends of an island are often overlooked. Depending on the construction, these areas can provide opportunities for shelves, towel storage, decorative baskets, or other useful features.
Making use of vertical space is especially valuable in a smaller kitchen where every storage opportunity counts.
20. Personalize the Finish
The final idea is simple: make the island yours. Paint, hardware, countertop material, baskets, shelving, and styling can all be customized to suit your kitchen.
The beauty of a DIY kitchen island is that it does not have to look exactly like anyone else’s. Start with a practical foundation and build the details around your own needs and decorating style.
How to Plan a DIY Kitchen Island
Before purchasing materials or changing an existing piece of furniture, take time to think about how the island will function. A beautiful island that makes the kitchen difficult to navigate will quickly become frustrating.
Start With Your Kitchen Layout
Measure the available area and identify the main paths through the kitchen. Pay attention to doors, appliances, cabinets, and other areas that need to remain accessible.
Mark the approximate footprint of the proposed island on the floor using removable tape. This simple step can make it much easier to understand whether the planned size feels comfortable before you build or buy anything.
Decide What the Island Needs to Do
Ask yourself what problem the island should solve. Do you need more countertop space? Extra storage? A place for stools? Somewhere to display dishes? Or simply a visual centerpiece?
Once you know the main purpose, it becomes easier to decide which features are worth adding and which ones can be left out.
Choose a Practical Base
An existing cabinet, shelving unit, table, or suitable furniture piece can provide a starting point for a DIY project. The base should be sturdy enough for the intended use and appropriate for the space.
From there, paint, trim, hardware, shelving, and a new countertop can help create a more customized appearance.
Pro Tip: Spend more time planning the function than decorating the exterior. Once the size and storage layout work properly, paint and accessories can transform the appearance surprisingly quickly.
Choosing the Right Style for Your Kitchen
The examples demonstrate how the same basic concept can work with many different decorating styles. The key is to repeat materials, colors, or shapes already present in your kitchen.
- Farmhouse: Try a painted base, natural wood countertop, baskets, and simple hardware.
- Modern: Choose clean lines, minimal hardware, and a restrained color palette.
- Cottage: Soft colors, open shelving, wood, and decorative dishes can create a relaxed feel.
- Scandinavian: Light finishes, natural materials, simple storage, and uncluttered styling work beautifully.
- Eclectic: Mix a bold paint color with contrasting wood, unique hardware, and personal accessories.
Simple Ways to Make Your Island Look Custom
You do not need complicated construction techniques to make a basic kitchen island look thoughtfully designed. Small upgrades can dramatically change the finished appearance.
- Paint the base in a color that complements your existing cabinets.
- Replace basic hardware with handles or knobs that match your kitchen style.
- Add a contrasting wood countertop for warmth.
- Use matching baskets to organize open shelves.
- Style the countertop with a small plant, tray, bowl, or useful kitchen accessory.
- Keep the display simple so the island remains functional.
Keeping a DIY Kitchen Island Functional
Good kitchen design balances appearance with everyday practicality. Open shelving looks beautiful, but it works best when the items stored there are things you regularly use. Likewise, a large countertop is helpful only if it leaves enough room to move comfortably around the island.
Think about cleaning as well. Surfaces that are easy to wipe down and storage areas that are simple to access will be much easier to maintain over time.
If the island includes seating, make sure stools can be pulled out without blocking the main kitchen pathways. If it includes baskets or drawers, place them where you can open them comfortably without interfering with nearby cabinets or appliances.
At a Glance
- Start with the available floor space.
- Choose storage based on your daily routine.
- Use paint and hardware to personalize the base.
- Add wood for warmth and contrast.
- Keep open shelves organized and practical.
Conclusion: Create an Island That Works for You
A DIY kitchen island can be much more than a weekend decorating project. With the right combination of storage, countertop space, color, and thoughtful styling, it can completely change how a kitchen looks and functions.
The inspiration behind these designs shows that there is no single formula for creating the perfect island. A simple white shelving unit can become a practical storage centerpiece, while a painted cabinet with a wooden top can bring warmth and personality to the room. Open shelves, baskets, drawers, seating, and wheels can all be adapted to suit different needs.
The best kitchen island is the one that makes everyday life easier. Focus on useful storage, comfortable movement, durable surfaces, and a style you genuinely enjoy. With a little creativity, even a basic starting piece can become a beautiful focal point that feels custom to your home.
Whether you are planning a complete kitchen makeover or simply looking for an affordable way to add storage and workspace, these DIY kitchen island ideas offer plenty of inspiration. Start with your layout, identify your biggest need, choose a practical foundation, and then add the colors and details that make the finished piece feel like yours.
Tags
DIY Kitchen Island Kitchen Island Ideas IKEA Kitchen Hacks Kitchen Makeover Small Kitchen Ideas Kitchen Storage DIY Home Projects Butcher Block Countertops