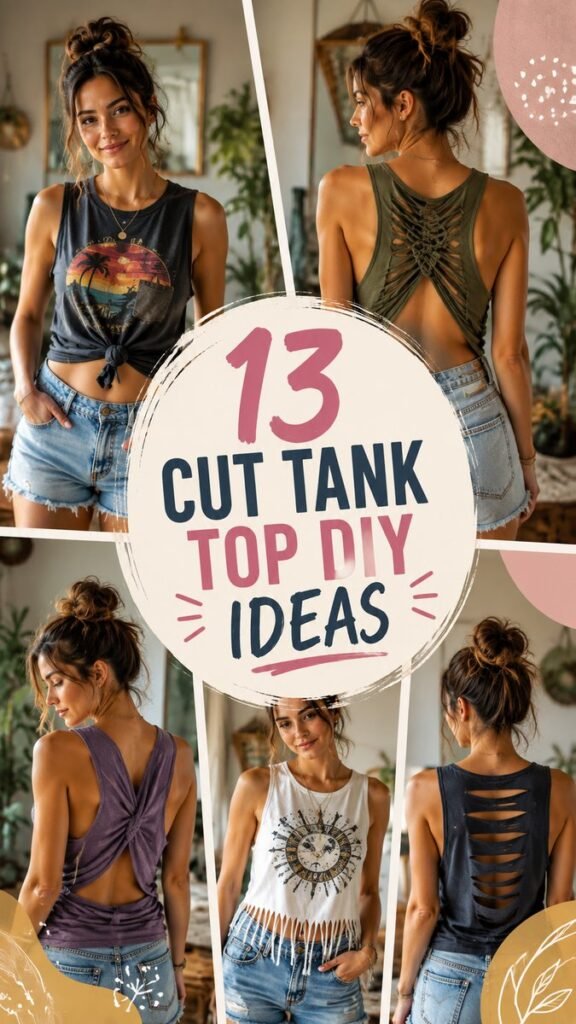
Giving your wardrobe a creative refresh does not always require buying something new. A few simple cuts, knots, twists, and thoughtful details can transform an ordinary tank top into a completely different piece. These DIY tops are a fun way to experiment with personal style while making the most of clothes you already own. From open-back designs and dramatic side cuts to fringed hems and creative twists, there are plenty of ways to turn a basic top into a standout summer look.
Key Takeaways
- Simple cutting techniques can dramatically change the look of a basic tank top.
- Open backs, fringe, knots, and woven details create different style effects.
- Old T-shirts and tank tops can become useful materials for creative wardrobe projects.
- Start with small changes and gradually create more adventurous designs.
- Pair DIY tops with denim shorts, jeans, skirts, or relaxed summer layers.
Why DIY Tops Are So Fun to Make
DIY tops combine creativity and fashion in a way that makes every finished piece feel more personal. Instead of choosing from the same styles available in stores, you can decide how much fabric to remove, where to add texture, and which details best match your wardrobe.
A simple tank can become a cropped top, a backless style, a knotted design, or a fringed statement piece with surprisingly little effort. The best part is that you do not need advanced sewing skills for many of these transformations. Scissors, a washable fabric marker, a measuring tape, and a little patience can be enough for several beginner-friendly projects.
Important: The most successful DIY tops usually begin with a clear idea of the final shape. Before cutting, put the top on and mark the areas you want to change. Removing a little fabric at a time gives you much more control than making one large cut immediately.
13 Cut Tank Top DIY Ideas to Try
The inspiration for these looks centers on wearable designs that feel relaxed, youthful, and perfect for casual outfits. Each technique can be adjusted depending on the type of top you have and the amount of transformation you want.
1. Simple Sleeveless Tank Transformation
Start with an oversized or relaxed T-shirt and create a basic tank by removing the sleeves. This is one of the easiest ways to begin experimenting with DIY clothing. Keep the neckline intact for a polished look, or reshape it slightly for a more relaxed finish.
This style works particularly well with denim shorts and sneakers. Because the design is simple, it can also serve as the starting point for additional alterations later.
2. Front Knot Tank Top
A front knot instantly gives a loose tank a more defined silhouette. You can gather the lower front section and tie it into a compact knot at the waist. For a softer effect, leave the knot loose. For a cropped appearance, position it slightly higher.
This technique is especially useful when styling oversized tops that otherwise feel too long or shapeless. Pair the finished top with high-waisted denim for an effortless casual outfit.
3. Open-Back Cut Tank
An open-back design creates a dramatic change without requiring complicated construction. Remove selected sections from the back while leaving enough fabric around the shoulder and side areas to maintain the basic structure of the garment.
For a more interesting finish, thin fabric strips can be left behind and arranged into a woven or crisscross effect. This gives a plain tank a handmade, textured appearance.
4. Woven Back Tank
A woven back is one of the most eye-catching approaches for a DIY cut top. Rather than removing the entire back panel, create several horizontal or vertical strips and carefully weave or overlap them.
The result can look intricate even though the basic concept is quite simple. Use a stretchy cotton tank when possible because flexible fabric is easier to manipulate and more comfortable when the finished design has an open back.
5. Fringe Hem Tank
Turn a basic tank into a playful summer top by cutting the bottom edge into narrow strips. Keep the strips relatively even for a clean finish, or vary their lengths for a more relaxed look.
Fringe works especially well on lightweight casual tops. It adds movement to the outfit and can make an otherwise plain shirt feel much more distinctive. Try pairing a fringed tank with denim shorts for an easy warm-weather combination.
6. Side-Cut Tank
Side cuts can create a breezier silhouette while adding visual interest to a simple top. Small openings can be cut along the sides, or larger sections can be removed for a more dramatic design.
Keep both sides symmetrical if you want a polished appearance. A fabric marker and measuring tape can make this much easier before you begin cutting.
Expert Insight
Think of each cut as part of the overall silhouette. Open areas should complement the shape of the garment rather than simply add more holes. A few intentional details can often look more stylish than excessive cutting.
7. Twisted Back Design
A twisted back can create a soft, gathered effect that feels more sophisticated than a standard cutout. Depending on the fabric, you can twist sections together and secure them with small knots or carefully arranged openings.
This technique works beautifully on fitted tanks because the altered fabric naturally follows the shape of the body. Keep the front relatively simple so the back remains the main feature.
8. Layered Cutout Back
Instead of making one large opening, create several smaller horizontal cutouts. This layered approach gives a basic dark or neutral tank a bold graphic appearance while retaining some of the original fabric.
The key is spacing. Leave consistent gaps between each opening so the design looks intentional. Use sharp fabric scissors to help produce smoother edges.
9. Cropped Tank Top
A classic crop is one of the easiest DIY transformations. Mark your preferred length while wearing the top, then remove small amounts of fabric until you reach the desired proportion.
Consider the rest of your outfit before choosing the length. A slightly cropped top can work well with high-waisted jeans, shorts, or skirts, while a longer crop may be better for relaxed everyday outfits.
10. Distressed Cut Tank
For a casual, lived-in appearance, combine several small cuts with a slightly unfinished edge. This approach works particularly well with graphic tees or older tanks that already have a relaxed feel.
Keep distressed details concentrated in selected areas rather than cutting randomly across the entire garment. That gives the finished piece a deliberate design instead of an overly worn appearance.
11. Shoulder Cutout Top
Shoulder cutouts offer a subtle way to change a basic shirt without dramatically altering its overall structure. Carefully remove small sections near the shoulder while preserving the neckline and main body of the garment.
This is a good choice if you want something more understated than a completely open-back tank. It can also be a useful beginner project because the alterations are relatively limited.
12. Tie-Side Tank
Create narrow fabric strips along the sides and tie them together to create an adjustable effect. The ties can be left loose for a relaxed appearance or secured closer to the body for a more fitted silhouette.
This idea is particularly useful for oversized clothing because the ties can help define the waist without permanently removing large sections of fabric.
13. Statement Graphic Tank
A graphic tank becomes even more distinctive when combined with a simple structural alteration. Keep the main artwork visible while transforming the hem, back, or sides around it.
This approach lets the existing design remain the focal point while the DIY details provide a fresh silhouette. It is a great way to give an old favorite top a completely different personality.
What You Need for DIY Cut Tops
You do not need a large craft collection to get started. A small set of reliable tools can make the process easier and more precise.
- Sharp fabric scissors for clean cuts
- Washable fabric marker or tailor’s chalk for planning
- Measuring tape or ruler for symmetrical designs
- A flat surface for marking and cutting
- An old tank top or T-shirt for practice
- Small safety pins for testing placement before cutting
Pro Tip: Practice your first cutting technique on a top you no longer wear regularly. This removes the pressure to make everything perfect and helps you understand how the fabric stretches, curls, and behaves after it has been cut.
How to Plan Your DIY Top Before Cutting
The planning stage can make the difference between a polished DIY top and a project that does not turn out as expected. Start by deciding which part of the garment you want to transform. Focus on one main feature instead of changing everything at once.
- Choose a top with a shape and fabric you enjoy wearing.
- Try it on and identify where you want the new details to sit.
- Use a washable marker to outline your intended cuts.
- Check both sides for symmetry when creating matching details.
- Cut conservatively and test the fit before making additional changes.
- Stretch the fabric gently to see how the edges naturally settle.
Remember that fabric often behaves differently after cutting. Some materials curl slightly at the edges, while others remain relatively flat. Leaving a little extra fabric during the first cut gives you room to adjust the design later.
How to Style DIY Tops for Everyday Outfits
The beauty of a handmade top is that it can become the statement piece of an otherwise simple outfit. Denim is an especially easy partner because it provides a casual foundation without competing with interesting cutout or fringe details.
With Denim Shorts
Pair a cropped, knotted, or fringed tank with high-waisted denim shorts for a relaxed summer outfit. Add simple sneakers or sandals and understated accessories for an easy daytime look.
With Jeans
A fitted DIY tank can balance relaxed jeans, while a loose cut top can work nicely with a more streamlined pair of denim. This combination is practical for casual days and makes the handmade detail stand out.
With Skirts
For a slightly more styled outfit, tuck a simple DIY tank into a casual skirt. A clean silhouette works particularly well when the top already includes bold cutouts, knots, or fringe.
With Layers
Open-back and cutout tops can also be layered over another simple piece when you want more coverage. Lightweight shirts, camisoles, and casual layers can change the appearance of the same DIY top without requiring another alteration.
Tips for Getting Cleaner DIY Results
Good results come from taking your time. Fabric scissors should be sharp enough to glide through the material rather than forcing you to repeatedly snip the same area. Slow, controlled cuts are easier to correct than rushed ones.
For symmetrical designs, fold the garment carefully or mark both sides independently before cutting. If you are creating several openings, measure their spacing rather than relying entirely on visual judgment.
It is also worth considering the existing seams. Cutting directly through important structural areas can change how a garment sits. When possible, preserve the shoulder seams, neckline, and other areas that help maintain the original shape.
Make Old Clothes Feel New Again
DIY clothing projects are an easy way to rediscover pieces already sitting in your closet. A tank that feels too plain can become a back-detail statement piece. An oversized T-shirt can become a cropped top. A worn casual shirt can gain new life through fringe, knots, or carefully placed cutouts.
There is no single correct way to customize a top. The goal is to create something that fits your personal style and feels comfortable enough to wear. Start with a straightforward technique, learn how the material responds, and then experiment with more creative combinations.
Quick Points:
- Start with an old tank or T-shirt.
- Mark every cut before using scissors.
- Begin small and remove more fabric only when needed.
- Use knots, fringe, and open-back details to add personality.
- Style finished DIY tops with denim, skirts, and casual layers.
Conclusion: Create a DIY Top That Feels Like You
DIY tops are a simple way to turn everyday clothing into something fresh, expressive, and personal. With a pair of sharp scissors and a little planning, basic tanks and T-shirts can take on entirely new silhouettes. Open backs, woven details, cropped hems, fringe, knots, and layered cutouts each offer a different way to experiment.
Start with one idea that feels achievable, practice on a top you are comfortable modifying, and let your creativity develop from there. Whether you prefer subtle shoulder cutouts or bold back designs, the best DIY clothing projects are the ones that fit naturally into your existing wardrobe.
So grab an old tank, sketch out your first design, and start creating a piece that feels completely your own. Save these DIY top ideas for your next wardrobe refresh and come back whenever you need a little handmade fashion inspiration.