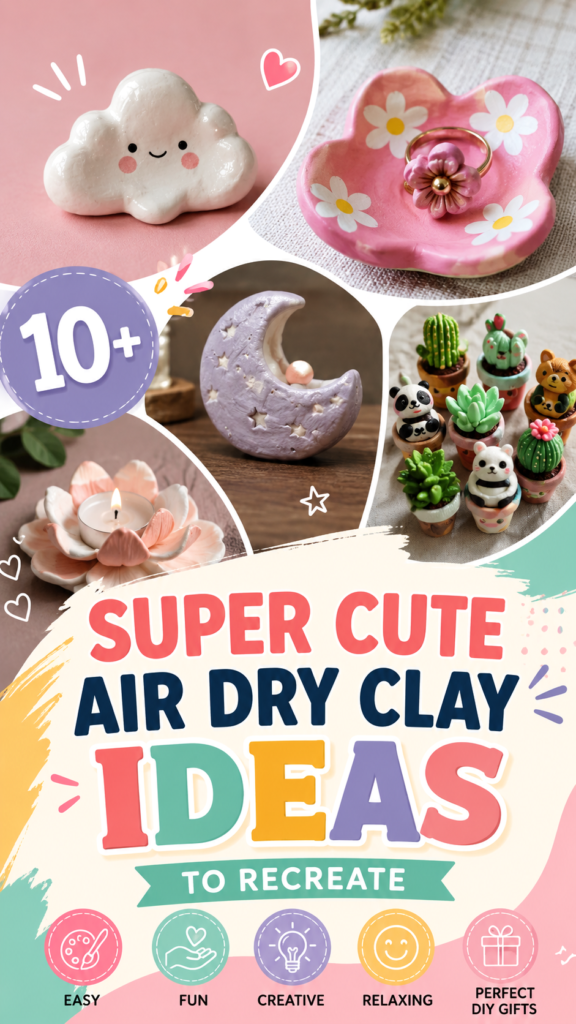
Air dry clay is one of those wonderfully simple craft materials that can turn an ordinary afternoon into a creative project. With a little clay, a few basic tools, and some imagination, you can make charming decorations, tiny planters, trinket dishes, candle holders, and thoughtful handmade gifts. The ideas featured here lean into a playful, colorful style with cute shapes, soft pastel details, miniature plants, flowers, and whimsical forms that are easy to personalize.
What makes these clay DIY ideas especially appealing is their flexibility. You do not need advanced sculpting skills to get started. Simple shapes can become something surprisingly special once you add painted details, textures, tiny faces, flowers, dots, or decorative patterns. Whether you are completely new to air dry clay or simply looking for your next relaxing craft, these projects offer plenty of inspiration.
Key Takeaways
- Air dry clay is ideal for creating small decorative projects without a kiln.
- Simple shapes can become cute dishes, ornaments, planters, and decorative figures.
- Pastel paint, flowers, faces, dots, and textures add personality to finished pieces.
- Small clay projects make enjoyable handmade gifts for friends and family.
- Patience during drying and finishing helps handmade pieces look cleaner and last longer.
Why Air Dry Clay Is Perfect for DIY Projects
Air dry clay is particularly attractive for home crafting because it can harden naturally when left exposed to air. Unlike traditional pottery clay, many beginner-friendly air dry clay projects do not require access to a kiln. That makes it a convenient choice for creating small decorative objects at home.
The material is also easy to shape by hand. You can roll it, press it, flatten it, pinch it, carve it, or combine separate pieces to build a design. This makes it possible to create both functional-looking objects and purely decorative pieces.
Another advantage is how easily clay can be customized. A simple dish can be painted pink and decorated with white flowers. A small sculpture can become a smiling cloud. A crescent moon can be finished with tiny stars. Miniature cactus and succulent shapes can be arranged in tiny pots for an adorable display.
Important: The best clay projects do not have to be technically complicated. A strong idea, clean shape, thoughtful color palette, and a few charming details can make a simple handmade piece feel polished and unique.
10+ Cute Clay DIY Ideas to Try
1. Smiling Cloud Clay Decoration
A tiny cloud is a perfect example of how a basic clay shape can become instantly adorable. Shape the clay into a soft cloud silhouette with rounded bumps, then smooth the surface as much as possible. Once dry, add a simple friendly face and small rosy cheeks with paint.
This project works beautifully as a shelf decoration, desk accent, or small handmade gift. You can also experiment with different expressions, such as sleepy eyes, a cheerful smile, or tiny closed eyes.
2. Flower-Decorated Ring Dish
A shallow clay dish is both cute and practical. Press or shape a small bowl-like form, then decorate the surface with painted flowers, dots, hearts, or other simple motifs. A pastel pink finish gives the project a soft, playful appearance, while contrasting flower centers help the decoration stand out.
These little dishes are useful for holding rings, earrings, hair accessories, or other tiny items. They also make lovely handmade gifts because the design can be customized around the recipient’s favorite colors.
3. Crescent Moon Clay Sculpture
A crescent moon is another beginner-friendly shape with plenty of creative potential. Start with a flattened piece of clay and carefully cut or shape the crescent silhouette. Add tiny stars, dots, flowers, or textured details before allowing it to dry.
Soft lavender, cream, pale blue, or muted pink can give the finished piece a dreamy decorative look. The moon can stand alone as a shelf accent or become part of a larger handmade display.
4. Mini Clay Cactus Pots
Miniature plant-inspired crafts are especially fun because you can create an entire collection with different shapes. Sculpt simple cactus or succulent forms and place them inside tiny clay pots. Rounded leaves, pointed cactus shapes, ridges, flowers, and tiny painted details can make every piece different.
Even if you do not want to work with real plants, these miniature clay creations can bring the look of a tiny garden to a desk, shelf, craft room, or windowsill.
5. Flower-Shaped Candle Holder
Layered clay petals can be used to create a beautiful flower-inspired holder for a small candle. Shape individual petals and arrange them around a central opening or base. Once the clay has dried, add subtle paint details to emphasize the petal shapes.
Because this design involves a candle, choose a sturdy shape and keep the flame safely separated from decorative materials. Never leave a lit candle unattended, and make sure any finished craft used near heat is appropriate for that purpose.
6. Cute Animal-Inspired Clay Figures
Small animal figures can turn a simple clay project into something full of personality. The miniature examples shown in this style of craft include adorable character-inspired shapes paired with tiny plant details. You can create your own collection using simple forms for ears, paws, faces, tails, and bodies.
Pandas, bears, cats, rabbits, and other friendly animal designs are especially suitable for beginners because recognizable features can be created with just a few basic shapes.
7. Tiny Clay Trinket Tray
Not every clay dish needs to be perfectly round. Try making an organic, uneven edge for a handmade appearance. A small tray can be shaped into a flower, cloud, heart, leaf, or abstract form.
Add tiny dots around the rim, a painted border, or a simple central motif. These details are easy to change, so this project is an excellent way to practice decorating clay without committing to a complicated sculpture.
8. Miniature Succulent Collection
Succulents are a great subject for clay because their leaves can be represented with simple repeated shapes. Make several small pointed, rounded, or layered leaves and arrange them into compact rosettes.
Use different shades of green to create visual variety. Pair each miniature plant with a different tiny pot, then arrange the collection together for a cheerful tabletop display.
9. Personalized Heart Dish
A heart-shaped dish is simple enough for beginners and easy to personalize. Flatten the clay, form the heart shape, and gently raise the edges to create a shallow tray. Once dry, decorate it with flowers, dots, initials, tiny hearts, or a contrasting border.
This idea works particularly well as a handmade birthday, friendship, or everyday appreciation gift. You can also create several versions in different colors for a coordinated collection.
10. Cute Clay Flower Decor
Flowers are one of the easiest decorative motifs to recreate with clay. Make individual petals and combine them around a small center. You can leave the clay in a natural finish or paint the petals after they have completely hardened.
Use flowers as standalone decorations or add them to dishes, pots, sculptures, and other clay creations. Repeating the same flower shape in different sizes is an easy way to build a cohesive handmade collection.
11. Whimsical Character Planters
If you enjoy miniature crafts, try combining two ideas into one project by creating tiny planters with character details. A simple pot can become much more expressive when you add ears, eyes, cheeks, leaves, or small decorative flowers.
These projects are particularly fun because each planter can have its own personality. Keep the shapes simple and let the paintwork provide the character.
Expert Insight
For cute clay crafts, consistency often matters more than complexity. Choose a small color palette and repeat a few recognizable details, such as flowers, hearts, dots, or simple faces. This creates a coordinated look even when every project has a different shape.
Basic Supplies for Clay DIY Ideas
You can keep your supply list surprisingly short when starting with air dry clay. The exact materials depend on the project, but a basic setup can include:
- Air dry clay
- A smooth work surface
- A small rolling tool or smooth bottle
- Basic sculpting or shaping tools
- Acrylic or craft paints
- Small paintbrushes
- A palette or mixing surface
- Optional varnish or suitable sealer for decorative pieces
You can also use household objects to create textures and patterns. Small cutters, bottle caps, textured materials, and simple tools can help you experiment with surfaces without purchasing a large collection of specialist equipment.
How to Make Air Dry Clay Crafts Look More Polished
The difference between a basic clay project and a polished-looking one often comes down to preparation and finishing. Before the clay dries, take time to smooth fingerprints, soften rough edges, and check that attached pieces are firmly connected.
Try not to rush the drying stage. Follow the instructions for your particular clay and allow enough time for the entire piece to harden. Larger or thicker pieces may require more time than small decorations.
After drying, lightly inspect the surface before painting. If appropriate for the clay you are using, minor imperfections can sometimes be gently smoothed. Then apply paint in thin, even layers rather than trying to cover everything in one heavy coat.
Pro Tip: Photograph your clay pieces near a window with soft natural light. Pastel colors, tiny painted details, and handmade textures tend to look especially appealing when the lighting is bright but gentle.
Easy Ways to Personalize Your Clay Creations
The most enjoyable part of clay crafting is making an idea your own. You do not have to reproduce a particular design exactly. Instead, use the basic concept as a starting point and change the shape, colors, expression, texture, or decorative details.
- Change the color palette. Try soft pastels for a gentle look, bright colors for playful decor, or neutral shades for a more minimal style.
- Add tiny details. Flowers, hearts, dots, stars, stripes, faces, and leaves can completely change the personality of a piece.
- Mix shapes. Combine a simple dish with flowers, a tiny pot with an animal face, or a sculpture with miniature decorative elements.
- Create a collection. Repeating a theme across several small pieces makes them look intentional when displayed together.
- Make it meaningful. Add initials, favorite colors, or personalized motifs when creating a handmade gift.
Clay DIY Ideas for Relaxing Creative Time
Small clay projects can be a satisfying way to spend time away from screens and everyday routines. There is something naturally calming about rolling clay, shaping simple forms, smoothing edges, and adding tiny details by hand.
You can make the process even more enjoyable by setting up a small craft area with your favorite tools, a few paint colors, and a selection of simple project ideas. Rather than trying to finish everything in one session, treat each piece as a small creative experiment.
One afternoon might be perfect for sculpting shapes, while another can be dedicated to painting and decorating. This slower approach also gives the clay enough time to dry between stages.
At a Glance
- Start with simple shapes such as clouds, hearts, flowers, moons, and small dishes.
- Use pastel colors and tiny painted details for a cute handmade aesthetic.
- Miniature plants and animal-inspired figures are great for building collections.
- Allow pieces to dry completely before decorating or sealing them.
- Save your favorite designs and adapt them with your own colors and details.
Conclusion: Start Creating Your Own Cute Clay Collection
These clay DIY ideas show just how much creativity can come from a small amount of air dry clay. A smiling cloud, floral ring dish, crescent moon, miniature cactus, flower holder, or tiny character can begin with nothing more than a simple shape and a little patience.
The goal is not to make every piece perfect. The charm of handmade crafts comes from the personal touches that make each creation different. Experiment with shapes, play with color combinations, and add details that reflect your own style.
If you are looking for an easy craft to try this weekend, choose one small project and start there. Once you become comfortable shaping clay, you can combine ideas and create an entire collection of cute handmade decor. Keep your favorite inspirations nearby, save the designs you want to try next, and let each new project become an opportunity to experiment.
Ready to get creative? Pick your favorite clay idea, choose a few colors, and make it uniquely yours. The simplest projects can become the most charming pieces when you add your own imagination.