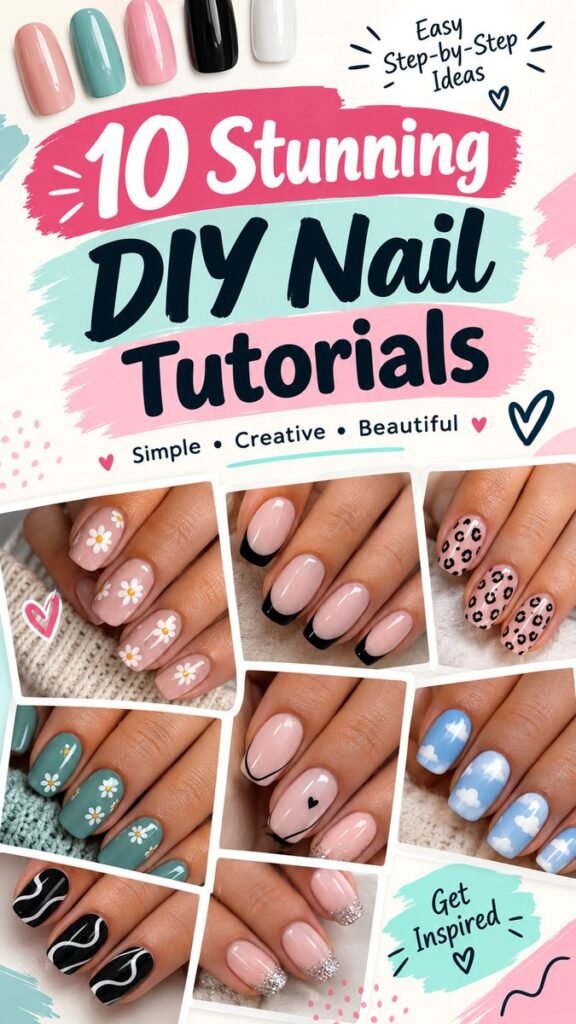
Creating beautiful nails at home can be much easier than it looks. With a few basic supplies, a little patience, and some creative inspiration, you can turn a simple manicure into a polished nail art look. From delicate flowers and classic French tips to playful animal prints, clouds, hearts, glitter, and modern line designs, there are countless ways to make DIY nails at home feel fresh and personal. The key is choosing designs that match your comfort level and building your skills one simple technique at a time.
Key Takeaways
- Start DIY nails at home with clean, shaped nails and a simple base.
- Choose beginner-friendly designs before moving to detailed nail art.
- Use thin brushes, dotting tools, or everyday manicure tools for creative details.
- Keep colors coordinated for a polished and intentional finish.
- Apply thin layers and allow each layer to dry properly.
- Finish with a quality top coat to help protect your design.
Why DIY Nails at Home Are So Popular
Doing your own nails is more than a way to save a trip to the salon. It is an easy creative activity that lets you experiment with colors, patterns, finishes, and seasonal styles. A basic manicure can become a small canvas for personal expression, whether you prefer soft and feminine details or bold graphic designs.
One of the biggest advantages of DIY nail art is flexibility. You do not have to recreate an elaborate design exactly. Instead, you can simplify an idea to suit your skill level. A detailed floral manicure can become a single flower on one accent nail, while a complicated pattern can be reduced to a few clean lines or dots.
Important: Great nail art does not depend on having advanced skills. Clean preparation, controlled brushwork, coordinated colors, and thin layers often make a simple DIY manicure look much more polished.
Essential Supplies for DIY Nails
You can begin with a surprisingly small collection of manicure supplies. The exact tools you need depend on the designs you want to try, but a few basics will cover most beginner nail art projects.
- Nail file and buffer for shaping and smoothing.
- Base coat for creating a smooth starting surface.
- Several nail polish colors that work well together.
- A fine nail art brush for lines and small details.
- A dotting tool for flowers, dots, and small patterns.
- Top coat for adding shine and helping protect the finished design.
- Cotton swabs or a small cleanup brush for correcting edges.
You do not need dozens of colors to create attractive nail designs. A small collection of versatile shades can produce many different combinations. Neutral pinks, white, black, soft blue, pastel green, and a few brighter accent colors can be mixed and matched for countless looks.
Prepare Your Nails Before Painting
A beautiful DIY manicure starts before the polish goes on. Begin by removing old polish and gently cleaning your nails. Shape them with a file, keeping the edges consistent if you want a neat overall appearance.
Pay attention to the nail surface as well. A smooth surface makes polish easier to apply and can help your finished design look cleaner. Avoid rushing this stage because uneven preparation can become more noticeable once you add multiple colors and decorative details.
After preparation, apply a thin base coat. Give it enough time to become ready for the next layer before starting your color. Working with thin coats is generally easier than applying one thick layer, especially when you plan to add nail art on top.
10 DIY Nail Ideas to Try at Home
1. Simple Floral Nails
Small flowers are a friendly introduction to DIY nail art. Start with a soft pink, nude, or pastel base. Use a dotting tool to create several small petals, then add a contrasting dot in the center. You can place flowers on every nail or keep them limited to one or two accent nails.
For a delicate result, choose white petals with a small yellow center. For something more playful, combine several pastel shades. The design does not need to be perfectly symmetrical. Slight differences can give handmade nail art a charming appearance.
2. Classic French Tips
French tips remain one of the easiest ways to make a manicure look neat and sophisticated. Begin with a sheer pink or nude base, then add a clean white tip. If freehand painting feels difficult, use nail guides or create the tip slowly with a fine brush.
You can also modernize the idea by changing the colors. Try black tips, pastel tips, or a combination of two complementary shades. Keeping the base simple allows the tip color to become the main feature.
3. Playful Animal Print
Animal-inspired patterns can create a bold manicure without requiring complicated painting skills. A soft pink or neutral base provides a simple background, while small irregular spots create the pattern.
Instead of trying to make every mark identical, vary the size and shape slightly. Use a darker shade to outline or define the spots, and leave enough space between each detail so the design does not become visually crowded.
4. Soft Cloud Nails
Cloud designs are ideal when you want something playful and light. A blue base paired with small white cloud shapes creates an airy look that can work especially well for casual manicures.
The easiest method is to use several small rounded dots or curved strokes close together to form each cloud. Keep the clouds relatively small so the blue background remains visible.
5. Minimal Heart Accent
If you like subtle nail art, a tiny heart can transform an otherwise simple manicure. Paint your nails in a soft neutral shade and add a small heart to one or two nails.
This approach is particularly useful for beginners because the main manicure remains simple. Even if the decorative detail is not perfectly shaped, the overall look can still feel intentional and stylish.
Expert Insight
- Use a neutral base when your decorative pattern is the main focus.
- Use a limited color palette when you want several different designs to look cohesive.
- Let each layer dry sufficiently before adding detailed artwork.
6. Elegant Black and White Lines
Black and white nail art can look striking without using a complicated color palette. Apply a solid black base and add thin white curves, stripes, or abstract lines. Alternatively, reverse the colors with a light base and dark details.
The beauty of this style is its versatility. Straight lines create a graphic appearance, while curved lines can make the manicure feel softer. Use a very small amount of polish on your detail brush and work slowly to maintain control.
7. Glitter-Tipped Nails
Glitter can instantly make a basic manicure feel more decorative. Apply a soft pink or nude base and concentrate glitter near the tips for a subtle gradient effect. You can also add glitter to just one or two accent nails.
For a cleaner result, avoid covering the entire nail with a heavy layer. A small amount of sparkle can create visual interest while allowing the base color to remain the star of the manicure.
8. Pastel Floral Accents
Pastel shades are especially easy to combine for cheerful DIY nail designs. Try a soft teal or blue-green base with small white flowers, or use several pastel colors across different nails.
When working with multiple shades, repeat at least one color throughout the manicure. This simple trick helps different designs feel connected rather than random.
9. Simple Swirl Designs
Swirls are another approachable option for anyone learning nail art. Start with a clean base and use a fine brush to draw flowing curves. You can create one swirl per nail or combine several thin lines for a more detailed effect.
Contrast is important with this style. A dark design over a light base makes the lines easy to see, while pastel swirls can create a softer appearance.
10. Mix-and-Match Nail Art
One of the most creative ways to approach DIY nails at home is to combine several simple designs in one manicure. For example, you might use French tips on a few nails, floral details on another, a minimalist heart on one accent nail, and a simple pattern on the remaining nails.
The secret is choosing colors that work together. When the palette stays consistent, different nail art techniques can create a cohesive manicure instead of making each nail feel unrelated.
How to Make DIY Nail Art Look Cleaner
Precision improves with practice, but a few simple habits can make a noticeable difference from the beginning. Keep your work area comfortable and well lit so you can clearly see the nail surface. Rest your painting hand on a stable surface instead of trying to work while holding it in the air.
Use small amounts of polish on your detail brush. Too much product can cause lines to spread or details to become thick. It is usually easier to add a second small stroke than to correct a large blob of polish.
Pro Tip: If you are nervous about freehand designs, practice dots, short lines, curves, and tiny flowers on a piece of paper first. A few minutes of practice can make your brush movements feel much more controlled.
Easy Ways to Choose a Color Palette
Color selection can completely change the mood of a manicure. Soft pink, cream, white, and pastel shades create a delicate appearance, while black, white, and a single accent color create stronger contrast.
If you are unsure where to begin, choose one main color, one neutral, and one accent. For example, a pale pink base can be paired with black details and white accents. A pastel blue can work with white and a small amount of silver or glitter.
Remember that nail art does not have to use every color you own. Limiting the palette often makes a homemade manicure look more coordinated and intentional.
Common DIY Nail Mistakes to Avoid
- Applying thick layers: Heavy coats can take longer to dry and may make detailed designs harder to control.
- Skipping nail preparation: A clean, smooth starting surface helps polish apply more evenly.
- Adding details too quickly: Let the base color settle before painting patterns over it.
- Using too many colors: A smaller palette usually creates a more cohesive appearance.
- Rushing the final coat: Give your design enough time before applying top coat carefully.
How to Keep Practicing Nail Art at Home
The best way to improve is to repeat simple techniques rather than immediately attempting the most complicated design. Start with dots, lines, French tips, small flowers, and simple shapes. Once those movements become comfortable, combine them into more detailed patterns.
It can also help to photograph your finished manicures. Looking back at earlier designs makes it easier to notice improvements in line control, color choices, and overall application. You can also keep a small collection of saved nail inspiration and choose one idea to practice each time you do your manicure.
At a Glance
- Prepare and shape your nails first.
- Keep your first designs simple.
- Choose two or three coordinating colors.
- Practice small details before tackling complex patterns.
- Protect your finished design with a top coat.
Create Your Next DIY Nail Look
DIY nails at home are all about finding a balance between creativity and simplicity. You can start with one easy detail and gradually build your confidence until you are comfortable combining several techniques. A manicure does not need to be perfect to be fun, and small variations can make a homemade design feel uniquely yours.
Whether you prefer delicate flowers, classic French tips, playful prints, soft clouds, graphic lines, glitter accents, or mixed designs, there is plenty of room to experiment. Keep your supplies organized, work in thin layers, choose colors that complement each other, and give yourself time to practice.
Most importantly, enjoy the process. The next time you want a fresh manicure, skip the complicated setup and try one of these approachable DIY nail ideas at home. With a little creativity and patience, simple tools can turn into beautiful nail art you will be excited to wear.
Tags
Keep building your DIY nail content
Create a shorter SEO version
Add a step-by-step routine